The Strategic Imperative of Dedicated Servers in Modern Gaming
In today’s competitive gaming landscape, multiplayer functionality is often a cornerstone of a game’s appeal and longevity. Whether crafting a fast-paced competitive shooter, an expansive cooperative survival adventure, or a dynamic social sandbox, the underlying network architecture directly impacts player experience. Dedicated servers emerge as the superior choice over traditional listen servers or peer-to-peer (P2P) models due to their inherent advantages. A dedicated server operates as a centralized, independent game instance, running on specialized hardware without the need for a player client to host the game. This separation of concerns ensures that game logic, physics calculations, and state management are handled by a consistent, powerful machine, rather than being susceptible to the varying internet connections or hardware limitations of individual players.
This architectural choice directly addresses common multiplayer pitfalls such as host advantage, latency inconsistencies, and vulnerability to cheating. By centralizing the game state, dedicated servers provide a single source of truth, minimizing desynchronization issues and fostering a fairer competitive environment. The global multiplayer gaming market, valued at over $150 billion in 2023 and projected to grow significantly, underscores the demand for high-quality, stable online interactions. Industry analysts consistently highlight that player retention in multiplayer titles is strongly correlated with server stability and performance. Developers leveraging Unreal Engine 5, known for its advanced rendering capabilities and scalable architecture, find dedicated servers indispensable for realizing ambitious multiplayer visions that can accommodate thousands of concurrent players.
Evolution of Multiplayer Networking and Unreal Engine 5’s Role
The history of multiplayer gaming networking has seen a steady progression from primitive dial-up connections and small-scale LAN parties to sophisticated global online ecosystems. Early online games often relied on P2P models, where one player’s machine acted as the host. While cost-effective for small player counts (typically 2-16), this approach introduced inherent vulnerabilities and performance bottlenecks. Host migration issues, reliance on the host’s internet speed, and ease of exploiting game state were significant drawbacks that often led to player frustration and unfair competitive conditions.
The advent of broadband internet and the increasing complexity of game worlds pushed dedicated servers into prominence, particularly starting in the late 1990s and early 2000s with titles like Quake and Counter-Strike. Major titles across genres, from MMORPGs to large-scale battle royales, adopted this model to ensure a consistent, low-latency experience for vast player bases. Unreal Engine, throughout its iterations, has continuously evolved its networking capabilities to support these demands. Unreal Engine 5, with features like Nanite and Lumen enabling unprecedented visual fidelity and world scale, requires an equally robust networking solution. Its underlying C++ architecture and extensible framework make it an ideal platform for building custom dedicated server applications capable of handling complex game logic and high player concurrency. Epic Games has consistently provided tools and documentation to empower developers to harness these capabilities, reinforcing its position as a leading engine for large-scale multiplayer development. Epic Games’ development philosophy, as often communicated at events like GDC and Unreal Fest, emphasizes providing robust tools for scalable and performant game creation, with dedicated server support being a key component.
Prerequisites for Dedicated Server Development
Embarking on dedicated server development for Unreal Engine 5 requires adherence to specific foundational requirements to ensure a smooth and successful build process. The most crucial prerequisite is a source build of Unreal Engine 5. Unlike the binary versions downloaded directly from the Epic Games Launcher, a source build, compiled from the engine’s GitHub repository, grants developers full access to the engine’s code. This access is paramount because dedicated servers are often compiled as a distinct target, requiring specific engine modules and configurations not typically included or exposed in a pre-compiled binary. Without a source build, the necessary server-specific compilation targets and tools are unavailable, making dedicated server generation impossible. Compiling the engine from source, while an initial time investment, provides unparalleled customization and control over the engine’s behavior, which is often essential for specialized server deployments or custom networking solutions.
Furthermore, a working multiplayer Unreal Engine 5 project is indispensable. This means the project must already incorporate fundamental multiplayer networking concepts, such as network replication for actors and variables, remote procedure calls (RPCs) for client-server communication, and a basic understanding of server authority. The guide specifically references its "Multiplayer Sessions guide," highlighting the importance of established session management logic. This ensures that the server, once built, can correctly advertise itself, allow players to find and join games, and manage player connections effectively. A project without properly replicated game state will fail to deliver a synchronized experience regardless of the server type.

Finally, the AdvancedSessions plugin is a critical component for robust session management. While Unreal Engine 5 offers native session functionalities, the AdvancedSessions plugin, developed by VREUe4, extends these capabilities significantly. It provides a more user-friendly and feature-rich interface for creating, finding, and joining multiplayer sessions, particularly when interacting with online subsystems like Steam, Epic Online Services (EOS), or Xbox Live. For a dedicated server to correctly appear in a session browser and allow clients to connect seamlessly, the integration of such a plugin is often necessary. Its absence can lead to discoverability issues, preventing players from locating and joining the hosted game instance, thereby negating the purpose of the dedicated server.
Configuring Automatic Session Creation and Map Loading
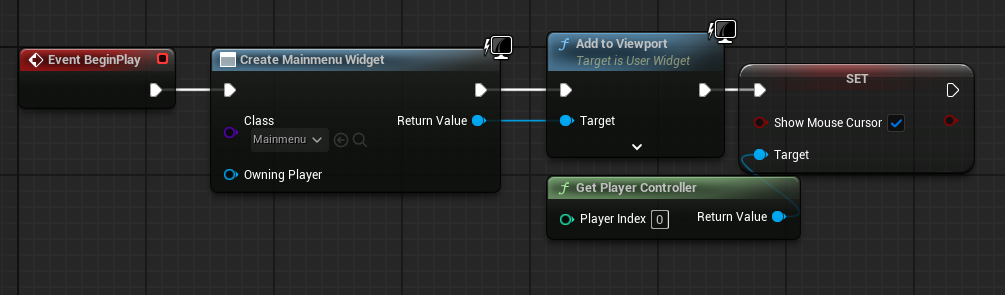
A core requirement for any dedicated server is its ability to operate autonomously, initializing game sessions and loading game worlds without manual intervention or a graphical user interface. The initial step in this automation involves modifying the project’s main menu level blueprint. In a standard client-side game, this blueprint typically creates and adds a MainMenu widget to the screen. However, for a dedicated server, this visual interface is redundant and consumes valuable computational resources.
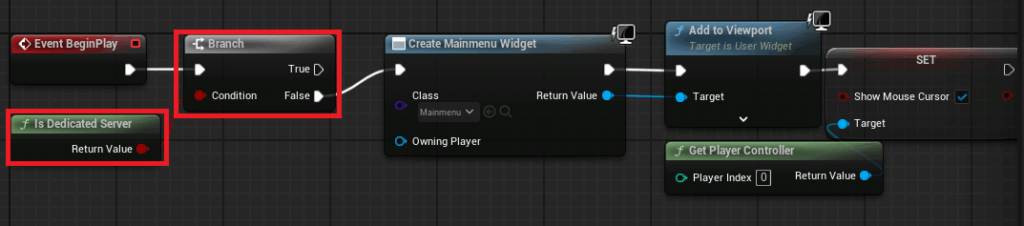
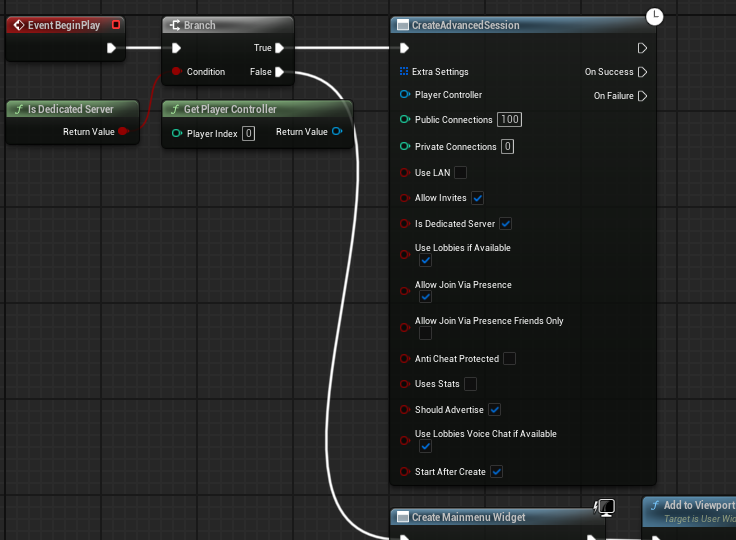
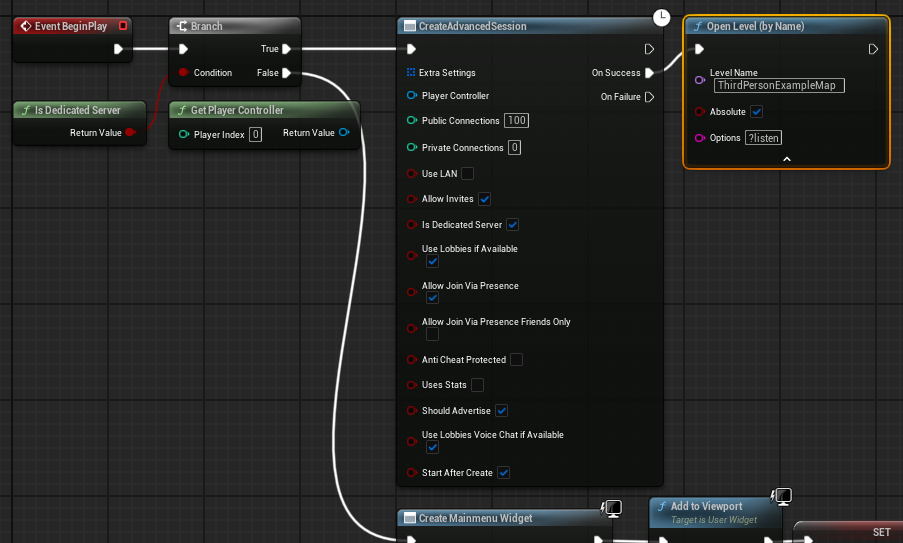
Developers must implement a conditional logic check using the Is Dedicated Server node within the main menu level blueprint. This node returns True if the game instance is running as a dedicated server and False otherwise. By branching the execution flow, the system can bypass the MainMenu widget creation entirely when Is Dedicated Server is true. Instead, on the True pin of the branch, a Create Advanced Session node is executed. This node, leveraging the AdvancedSessions plugin, automatically establishes a multiplayer session with predefined settings such as maximum players, public/private status, and other session metadata. This automation is crucial for server farms where thousands of instances need to be spun up and down programmatically.

Upon successful session creation, the server then proceeds to load the designated game map. This is achieved using an Open Level node with the crucial ?listen option appended to the map name (e.g., MyGameMap?listen). The ?listen argument instructs the server to open the map in a listening state, making it discoverable and capable of accepting incoming client connections. This sequence ensures that the dedicated server boots up, creates an accessible session, and loads the playable game environment, ready for players to connect, all without any graphical display or player input. This streamlined startup process is vital for efficient server management and deployment, allowing for rapid scaling and consistent availability.
Establishing the Default Server Map
Beyond the runtime logic, the Unreal Engine project settings require specific adjustments to correctly direct the dedicated server to its initial game environment. By default, Unreal Engine dedicated server builds often attempt to load an internal engine map named "Entry," which is an empty placeholder unsuitable for hosting a playable game session. This necessitates overriding the default server map setting to ensure the server starts in the intended game world.

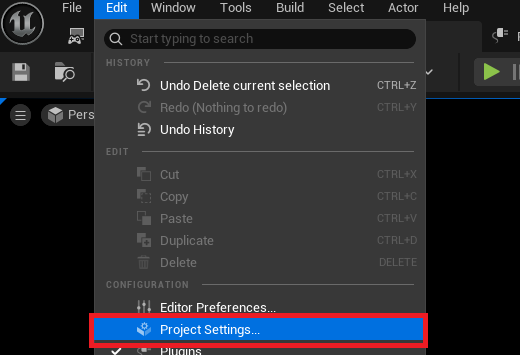
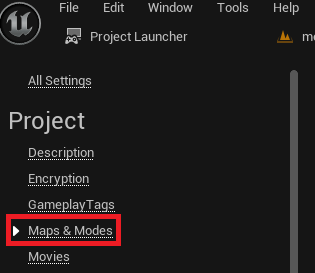
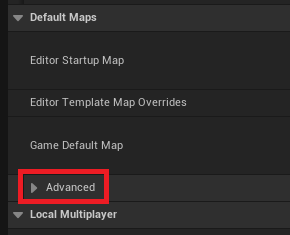
Accessing the project settings involves navigating to the "Edit" menu in the Unreal Editor and selecting "Project Settings." Within the Project Settings window, developers locate the "Maps & Modes" section. This area manages various default maps and game modes for the project. Under the "Default Maps" subsection, an "Advanced" dropdown option reveals additional configurations, including the "Server Default Map." Here, developers must explicitly set the path to the desired initial map for the dedicated server. For instance, if the main multiplayer level is named "GameLevel" and resides in the "Content/Maps" directory, this setting would be configured to that specific asset path. This ensures that when the dedicated server executable is launched, it immediately loads the intended game world, aligning with the automatic session creation logic. Incorrect configuration here would lead to the server loading an empty or unintended map, rendering it non-functional for player connections and potentially causing system errors.
Optimizing Server Resources: Eliminating Default Characters
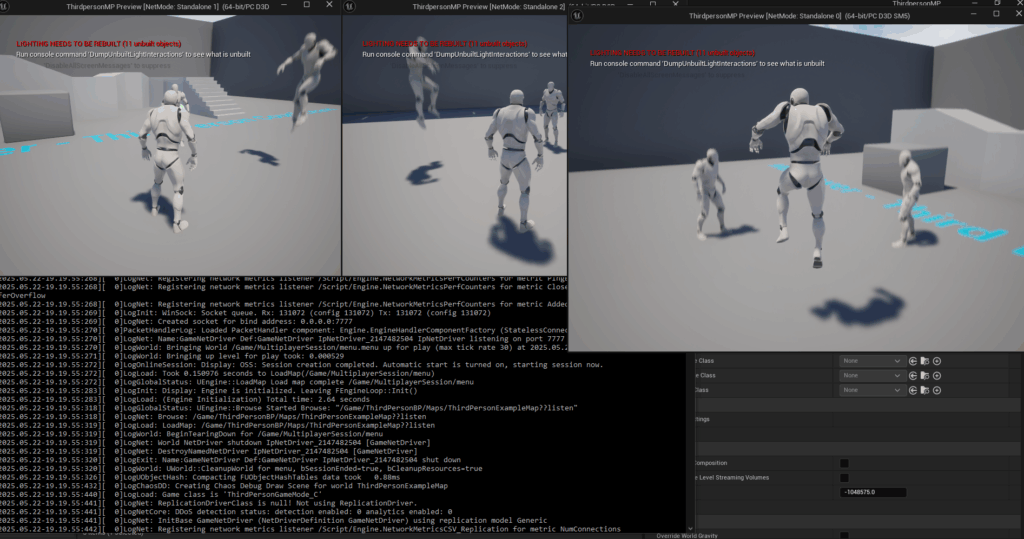
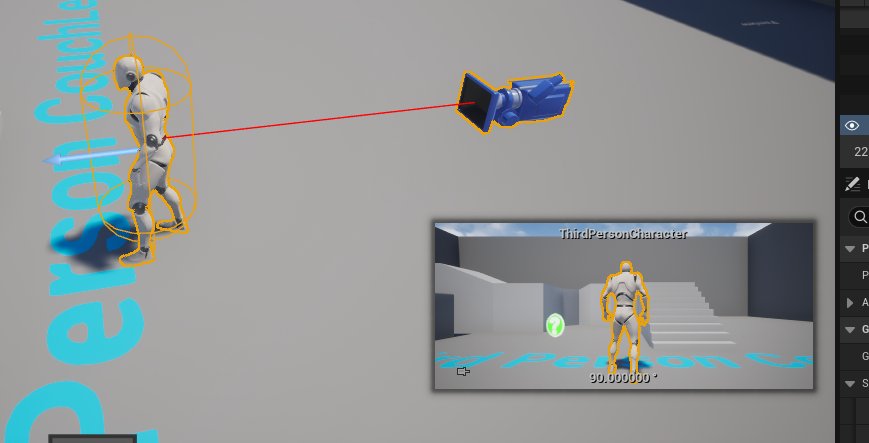
A key distinction between a client-side game instance and a dedicated server is the server’s headless nature. A dedicated server’s primary function is to manage game logic, replicate states, and handle client connections; it does not render graphics, process player input, or display visual elements. Consequently, spawning a player character on the server-side is not only unnecessary but also a wasteful allocation of computational resources.
In many Unreal Engine projects, particularly those starting from templates, a default character blueprint might be placed directly within the level or automatically spawned by the game mode for the first connected player (which, in a listen server scenario, would be the host). For a dedicated server, this character would exist as an inert entity, consuming CPU cycles for animation, physics, and other client-side related processes without serving any functional purpose. To optimize the dedicated server’s performance and minimize its footprint, developers must identify and remove any such default character instances or spawning logic that specifically targets the server authority. This typically involves modifying the GameMode blueprint or the level blueprint to prevent character spawning if Is Dedicated Server is true, or simply deleting any pre-placed character actors from the server’s default map. This optimization contributes to a leaner, more efficient server application, allowing it to dedicate its resources solely to core game mechanics and network management, which can lead to significant cost savings in cloud hosting environments.
Leveraging the Unreal Engine Project Launcher for Server Builds
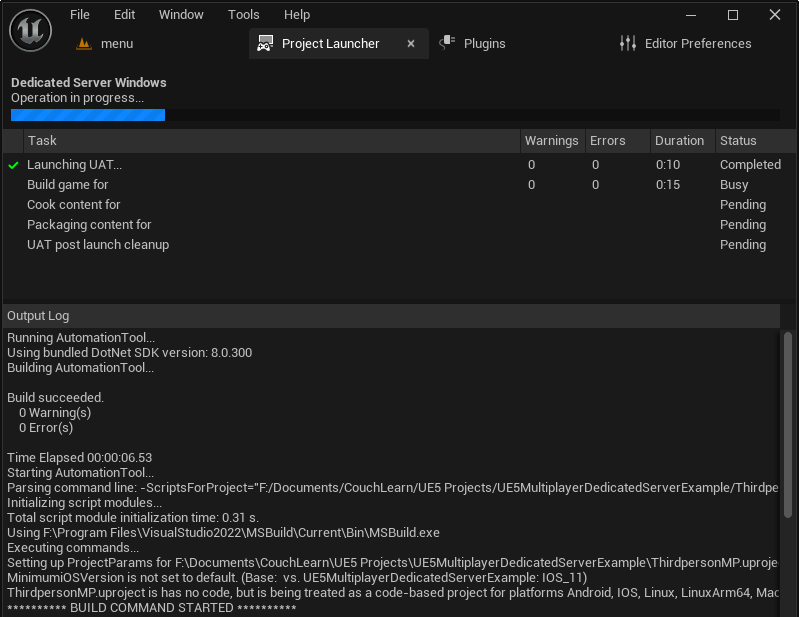
The Unreal Engine Project Launcher is a powerful, integrated tool designed to streamline the packaging, cooking, and deployment of Unreal Engine projects across various platforms. It provides a centralized interface for defining custom build profiles, enabling developers to configure specific parameters for different target builds, including dedicated servers. This tool is instrumental in automating the complex process of compiling a server executable, ensuring all necessary assets and code are correctly packaged. It abstracts away many command-line intricacies, making the build process more accessible to a broader range of developers.
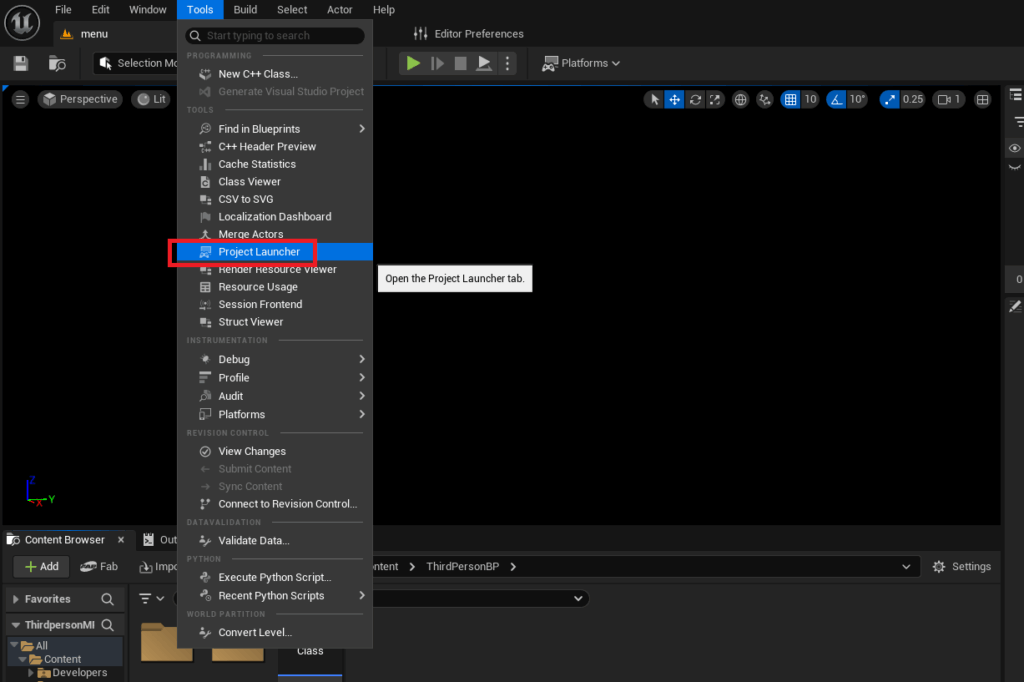
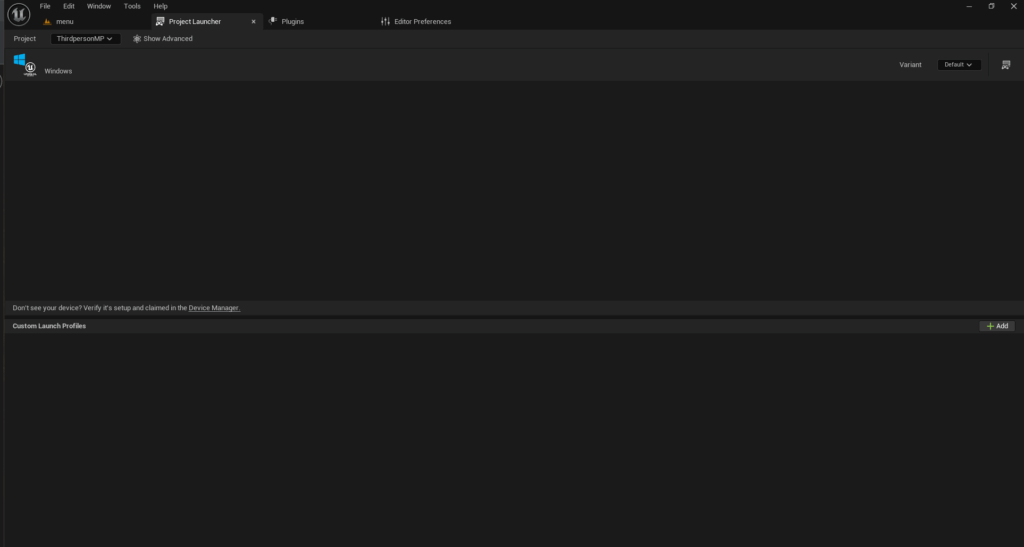
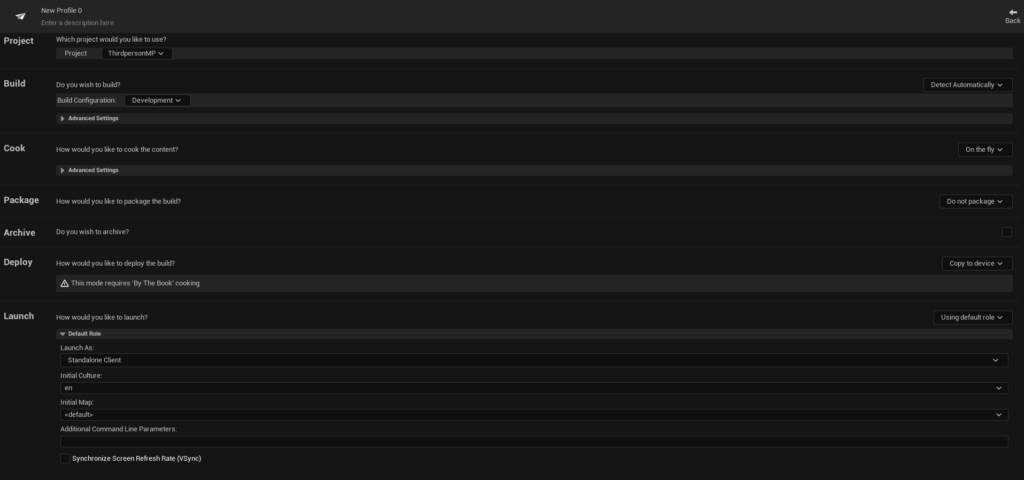
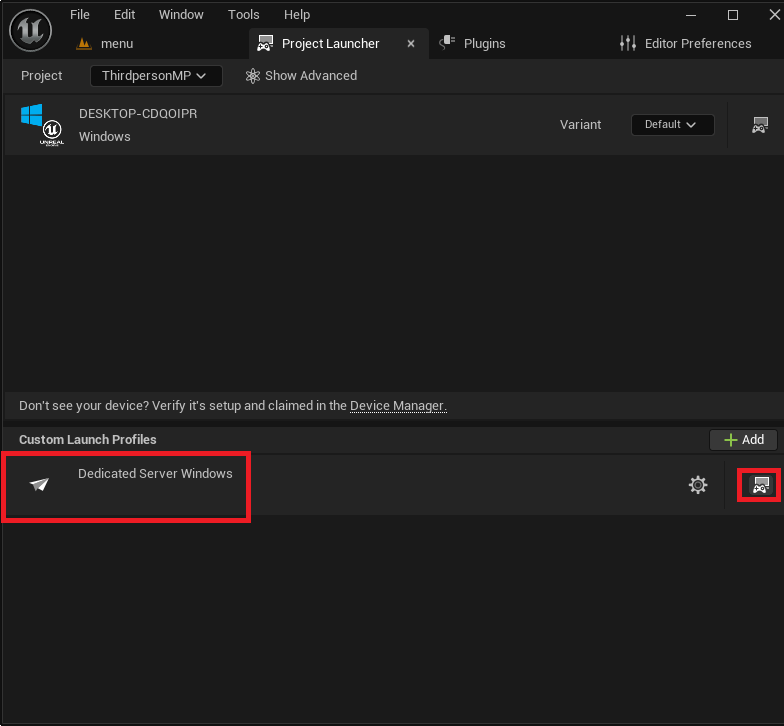
To access the Project Launcher, developers navigate to the "Tools" menu within the Unreal Editor and select "Project Launcher" from the "Tools" section. Upon opening, the launcher typically presents an empty interface, awaiting the creation of custom profiles. These profiles act as blueprints for the build process, encapsulating all the settings required for a particular deployment target. For dedicated server builds, the Project Launcher is indispensable, offering granular control over which platforms to target, which assets to include, and how the final executable is packaged. This systematic approach reduces manual errors and ensures reproducible builds, a critical aspect of professional game development and deployment pipelines, especially in teams.
Crafting a Custom Build Profile for Dedicated Servers
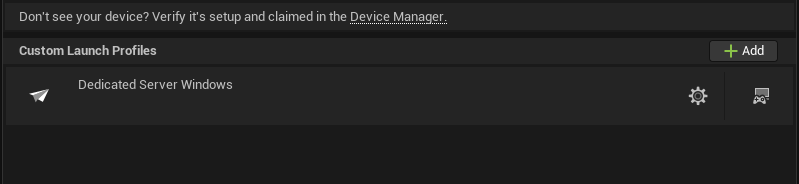
The creation of a custom profile within the Project Launcher is the cornerstone of generating a dedicated server build. This process involves a series of deliberate configurations to tailor the build output specifically for server operations.
-
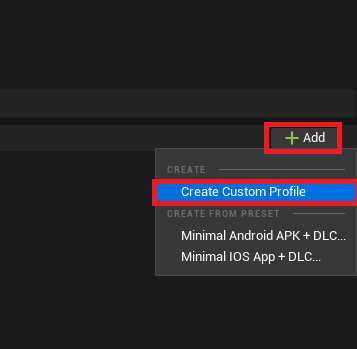
Initiating Profile Creation: Developers begin by clicking the "Add" button in the Project Launcher and selecting "Create Custom Profile." This action opens a comprehensive menu of options for the new profile.
-
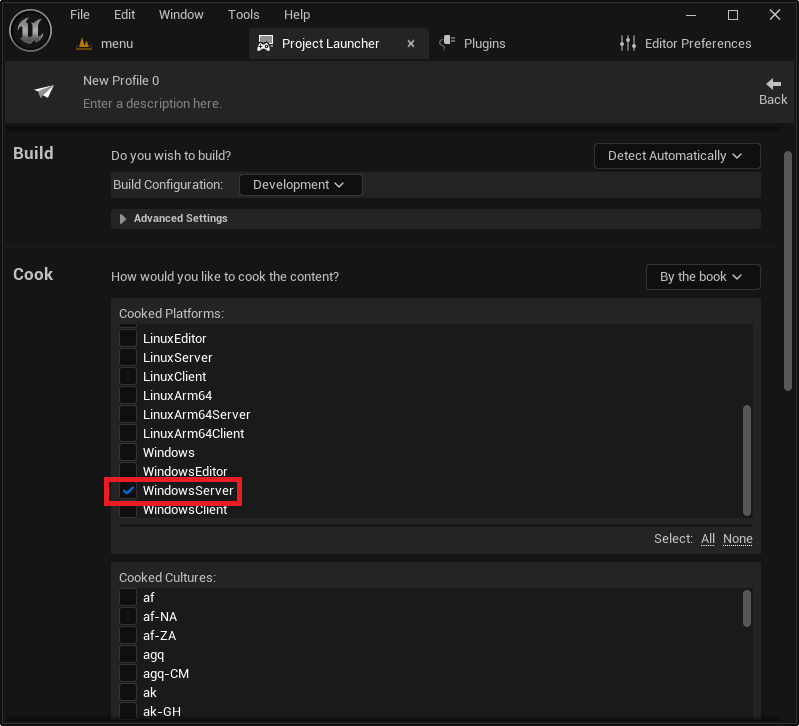
Cook Options – "By the Book": A critical adjustment is made in the "Cook" section. The default "On the fly" option, suitable for iterative testing within the editor, must be changed to "By the book." "On the fly" cooking processes assets as needed