Setting up a dedicated server for your Unreal Engine 5 game is a crucial step if you’re aiming to support multiplayer gameplay at scale, ensuring superior performance, security, and reliability over peer-to-peer hosting solutions. This comprehensive guide will detail the process of building and configuring a dedicated server for an Unreal Engine 5 project from inception to local operation, covering project preparation, server compilation, and initial testing.
The Evolving Landscape of Game Hosting
The evolution of multiplayer gaming has seen a significant shift from localized, peer-to-peer (P2P) connections to robust, centralized server infrastructures. In the early days, multiplayer experiences often relied on one player’s machine acting as a "host" or "listen server," a system adequate for small-scale games like early first-person shooters or real-time strategy titles played over local area networks (LANs). As internet speeds increased and online gaming became mainstream, the limitations of P2P hosting became increasingly apparent. Issues such as inconsistent latency dependent on the host’s connection, "host advantage" where the host experiences minimal lag, difficulties with host migration if the host disconnects, and significant vulnerabilities to cheating plagued these early online experiences.
The demand for stable, fair, and scalable online environments pushed the industry towards dedicated servers. Major titles across genres, from competitive esports games to sprawling massively multiplayer online (MMO) experiences, universally adopted dedicated server models. This shift was driven by the imperative to provide a consistent gameplay experience for all players, regardless of their individual network conditions (within reasonable limits), and to safeguard game integrity against malicious exploits. For Unreal Engine 5, a powerful platform capable of rendering incredibly detailed and complex worlds, supporting large-scale multiplayer without a dedicated server is practically infeasible for any serious commercial or large community project.
Understanding Dedicated Servers vs. Listen Servers
At its core, a dedicated server in game development is a specialized computer instance running a standalone application designed solely to manage the game world and its associated server-side logic. Crucially, it does not render graphics, process player inputs, or spawn a player character for itself. Its resources are entirely devoted to maintaining game state, handling network traffic, and enforcing game rules. This "headless" operation is a fundamental distinction from a listen server.
A listen server, while convenient for quick prototyping or small, casual multiplayer sessions, integrates the server functionality directly into one of the connected player’s game clients. This means the host player’s machine is simultaneously running their client (rendering graphics, processing input, etc.) and hosting the game world for others. This dual burden can significantly impact performance, especially as player counts increase or the game world becomes more complex. Moreover, the listen server model inherently grants the host a network advantage due to zero-latency communication with their own game instance, and it exposes the game state more readily to client-side manipulation, making effective anti-cheat measures more challenging.
The benefits of a dedicated server are manifold and directly address the shortcomings of listen servers:
- Enhanced Performance: By offloading game logic and network management to a dedicated machine, client devices are freed to focus on rendering and input, leading to smoother frame rates and more responsive gameplay for all participants. The server maintains a consistent "tick rate," ensuring synchronized game state regardless of individual player latencies.
- Superior Security: A dedicated server acts as the authoritative source of truth for the game state. This central authority makes it significantly harder for players to cheat by manipulating their local game client, as the server can validate all actions. Anti-cheat systems are more effectively deployed and enforced on a dedicated server.
- Unparalleled Reliability: Dedicated servers can be hosted on professional-grade hardware in data centers with robust internet connections, ensuring 24/7 uptime and stable network conditions. This minimizes disconnects, latency spikes, and other network-related issues that can severely disrupt player experience.
- Scalability: For games aiming for larger player counts, such as battle royales, MMOs, or persistent world simulations, dedicated servers are indispensable. They allow for flexible scaling of resources to accommodate fluctuating player numbers, providing a consistent experience for hundreds or even thousands of concurrent users.
- Centralized Control & Maintenance: Developers gain full control over the server environment, enabling easier deployment of updates, patches, and hotfixes. Server-side analytics can also be more accurately collected, providing valuable data for game balancing and optimization.
Industry data consistently supports the adoption of dedicated servers for competitive and large-scale multiplayer titles. A survey by GameAnalytics highlighted that player retention is strongly linked to game performance and stability, factors heavily influenced by server infrastructure. Epic Games itself, through its massively popular titles like Fortnite, showcases the critical importance of a robust, scalable dedicated server architecture in delivering high-quality online experiences.
The Development Journey: A Step-by-Step Guide to UE5 Dedicated Server Setup
Building a dedicated server for an Unreal Engine 5 project involves several critical configuration steps within the engine and careful preparation of the project files. This section details the chronological process, highlighting the technical rationale behind each action.
Prerequisites: Laying the Foundation
Before embarking on the server build, specific foundational requirements must be met to ensure a successful compilation and operation:
- Working Multiplayer Unreal Engine 5 Project: This guide assumes you already have an Unreal Engine 5 project configured for basic multiplayer functionality, including character replication, game state synchronization, and a method for players to join sessions. For those without, a companion guide on "Multiplayer Sessions in Unreal Engine 5" is recommended as a starting point.
- Unreal Engine Source Build: This is a non-negotiable requirement. Unlike the version downloaded from the Epic Games Launcher, an Unreal Engine built from source code provides access to crucial server-specific build targets and compilation options. The launcher version is optimized for client-side game development and lacks the necessary configurations to compile a standalone dedicated server executable. Epic Games provides detailed documentation on how to download and build the engine from source via GitHub.
- AdvancedSessions Plugin: For seamless session management and proper server visibility within game browsers, the AdvancedSessions plugin is essential. This widely used community plugin extends Unreal Engine’s native session interface, offering more robust and flexible tools for creating, finding, and joining multiplayer sessions. Without it, your dedicated server may not correctly register or appear in session lists, hindering player connectivity. Ensure this plugin is properly installed and enabled within your project.
Configuring the Game Logic for Server Operation
The dedicated server, being a headless entity, requires specific adjustments to the game’s initial logic to bypass client-centric elements and immediately establish itself as a host for incoming players.
Automating Session Creation
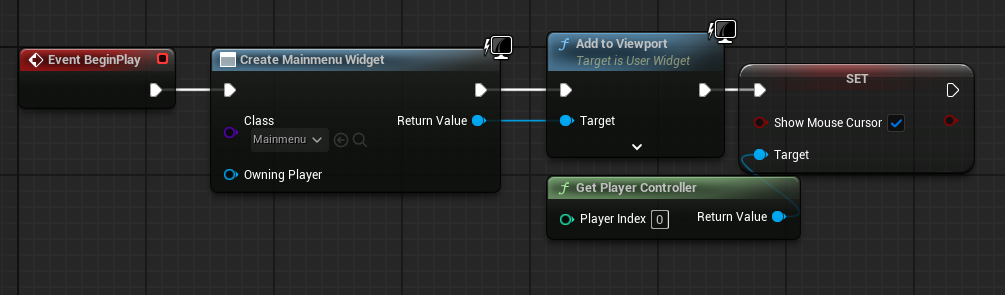
In a standard client-side game, the main menu typically involves widget creation, button presses, and player input to initiate a multiplayer session. For a dedicated server, this entire user interface flow is irrelevant and must be circumvented.
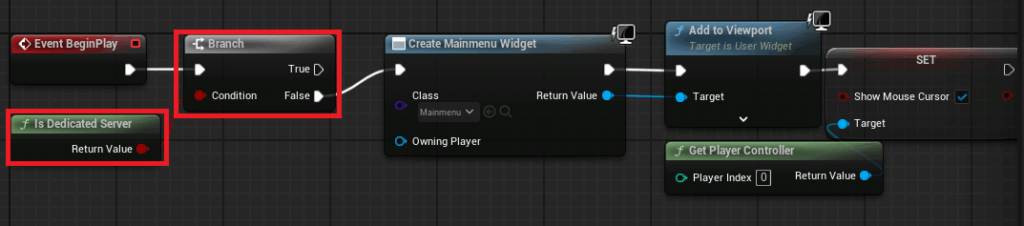
- Modify Main Menu Level Blueprint: Navigate to your main menu level blueprint (e.g.,
MainMenuor your initial starting map). Locate the event graph where your main menu widget is created and added to the viewport. - Implement ‘Is Dedicated Server’ Check: Insert an "Is Dedicated Server" node. This node returns
trueif the current executable is running as a dedicated server andfalseotherwise. - Branching Logic: Connect the output of the "Is Dedicated Server" node to a
Branchnode.- False Pin: Connect this to your existing main menu widget creation logic. This ensures that regular client instances will continue to display the menu.
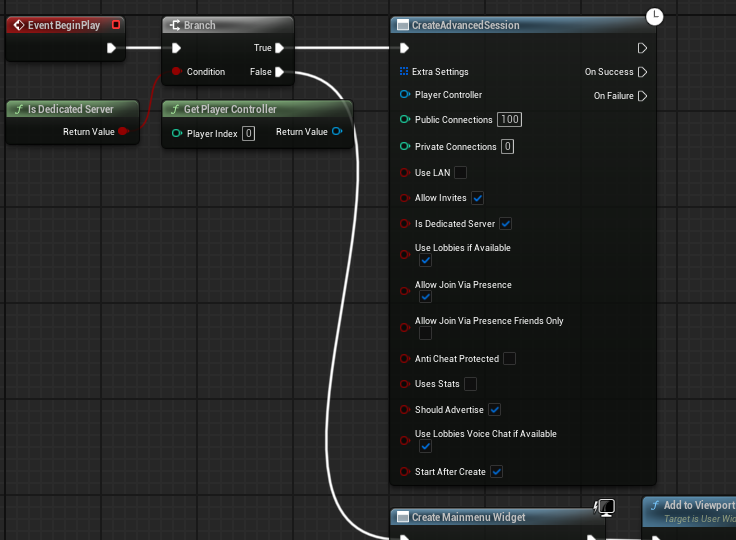
- True Pin: If the platform is a dedicated server, we want to bypass the menu entirely. Connect this to a "Create Advanced Session" node.
- Configure Session Settings: Set parameters like
MaxPlayers,bIsPublic,bAllowJoinViaPresence, andbUsesPresenceaccording to your game’s requirements. These settings dictate how players can discover and join your server.
- Configure Session Settings: Set parameters like
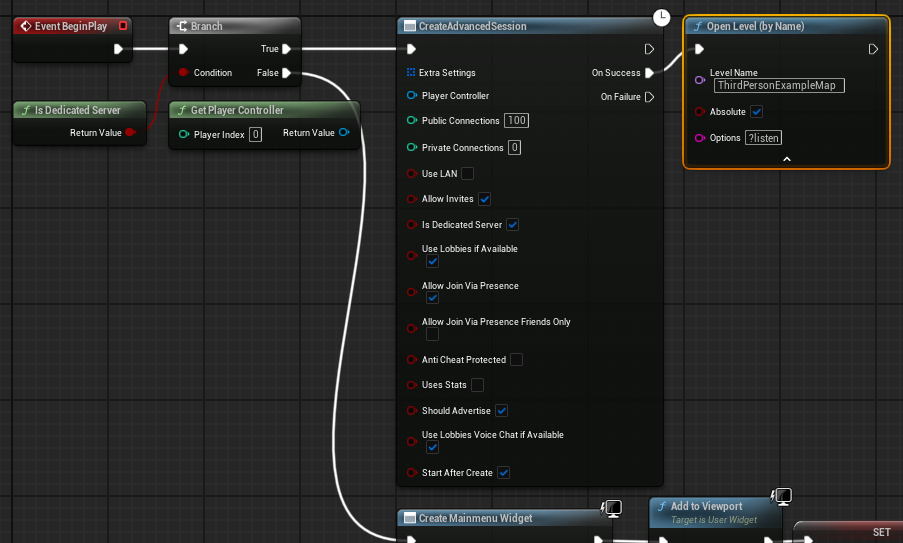
- Open Level with Listen Option: Upon successful session creation (from the "On Success" pin of the "Create Advanced Session" node), add an "Open Level" node. Crucially, append the option
?listento your target game map name (e.g.,MyGameMap?listen). This argument instructs the server to open the specified map and actively listen for incoming client connections, making it ready for players. - Compile and Save: Ensure all changes in your blueprint are compiled and saved.
Establishing the Default Server Map
By default, an Unreal Engine dedicated server attempts to load a generic engine map called "Entry" on startup. This is undesirable, as your game needs to start in a specific map to function correctly.
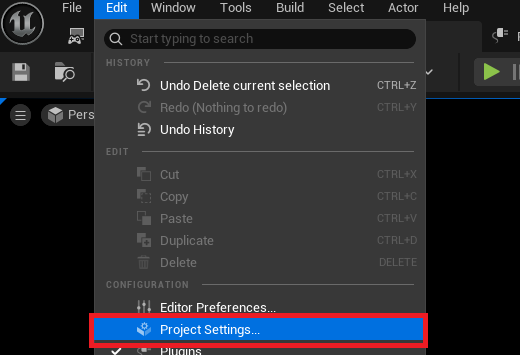
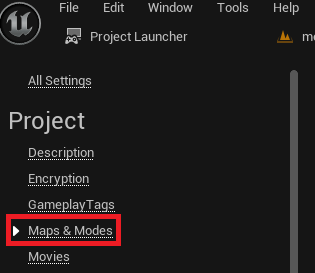
- Access Project Settings: In the Unreal Editor, go to
Edit > Project Settings. - Navigate to Maps & Modes: In the left-hand navigation pane, select the "Maps & Modes" section.
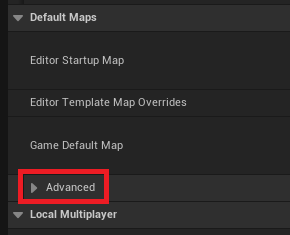
- Expand Advanced Options: Under the "Default Maps" section, locate and expand the "Advanced" dropdown.
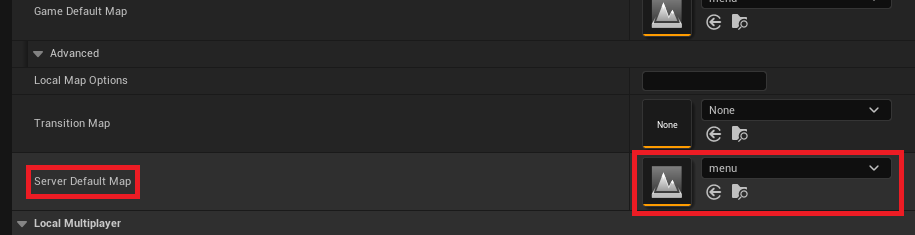
- Set Server Default Map: Change the "Server Default Map" option to the specific game map you want your dedicated server to start on (e.g., your main game level or a specific lobby map). This ensures the server initializes into the correct environment, ready to host players.
Optimizing for Server Environment: Removing Default Characters
Since a dedicated server does not represent a player, spawning a visible character for the server host is unnecessary and wastes resources.

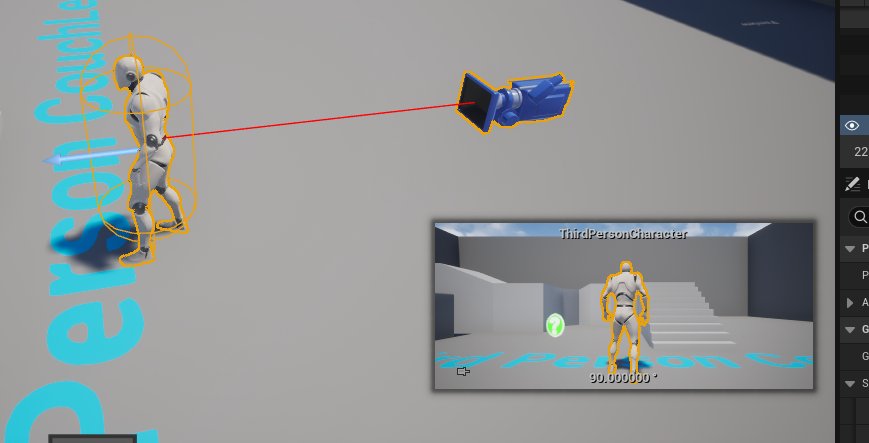
- Identify Default Character Spawns: In your game levels, locate any default character blueprints or player starts that might automatically spawn a character upon level load.
- Remove or Conditionalize: Delete these default character spawns from your levels. Alternatively, if your game uses a single player start, you might modify your
GameModeto only spawn a character ifIsDedicatedServeris false, ensuring only actual players get a character. The simplest approach for a dedicated server is to ensure no player characters are spawned by default.
Leveraging the Unreal Engine Project Launcher
The Unreal Engine Project Launcher is an indispensable built-in tool that streamlines the process of building and packaging different versions of your game, including dedicated servers. It allows developers to create and manage custom profiles, each with specific build configurations.
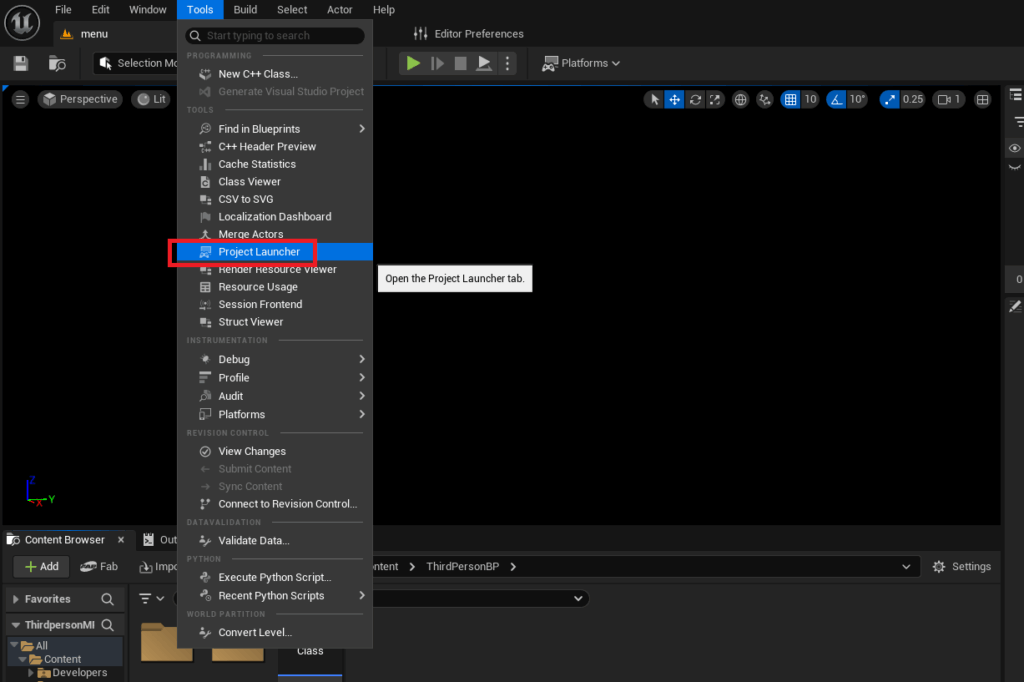
- Open Project Launcher: In the Unreal Editor, navigate to
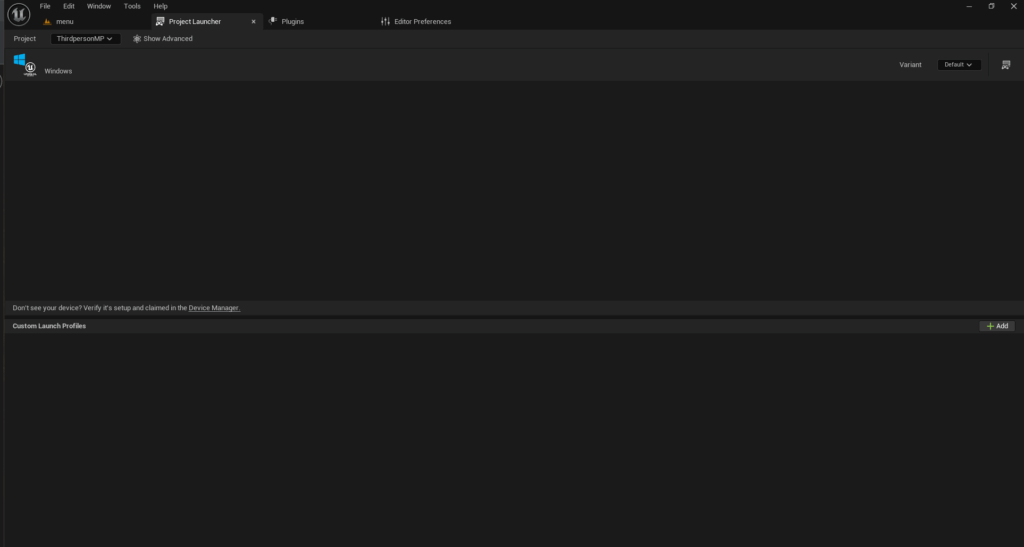
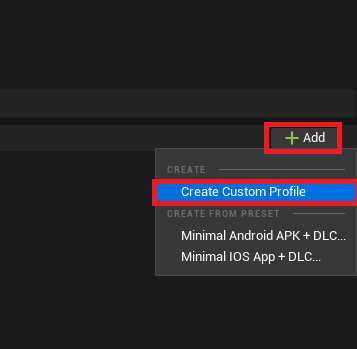
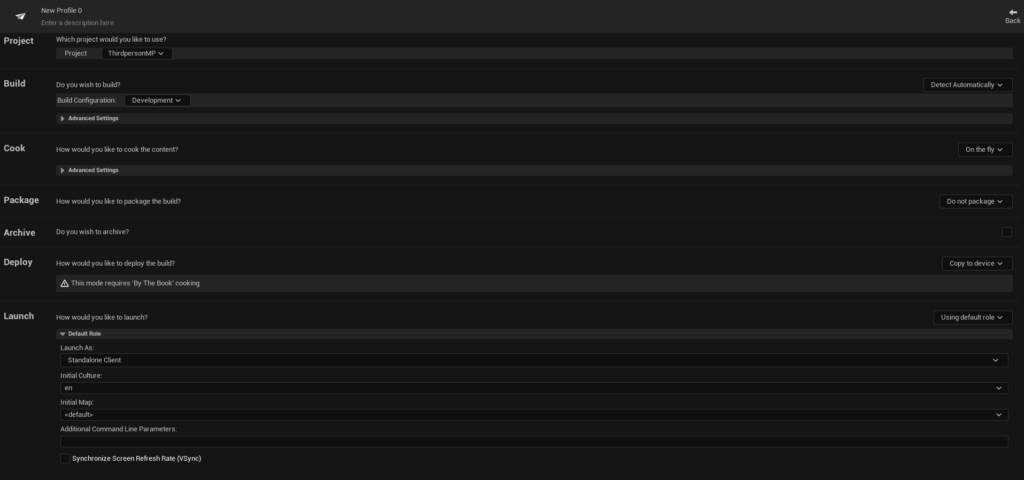
Tools > Project Launcher. - Create Custom Profile: In the Project Launcher window, click the "Add" button (often a plus sign) and select "Create Custom Profile." This will open a detailed menu of options for your new build profile.
Custom Profile Configuration
Careful configuration of your custom profile is paramount for a successful dedicated server build:
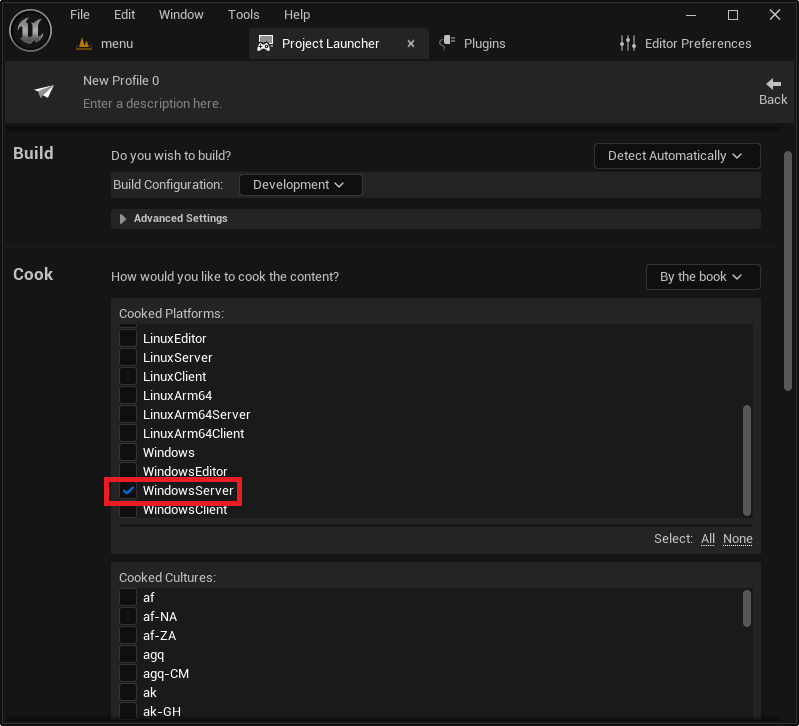
- Cook Section – Cook Method:
- Change "On the fly" to "By the book." "By the book" cooking pre-processes all necessary content assets into a deployable format, which is essential for a standalone server that doesn’t have the editor to cook content dynamically. "On the fly" is typically used during editor play sessions.
- Cooked Platforms:
- Scroll down and select the desired server platform. For this guide, "WindowsServer" is chosen, which targets the Windows operating system. Other options include "LinuxServer" for x86/64 Linux environments (often preferred for cloud hosting due to cost-effectiveness and performance) or "LinuxArm64" for ARM-based Linux servers. Choose the platform that aligns with your intended server hosting environment.
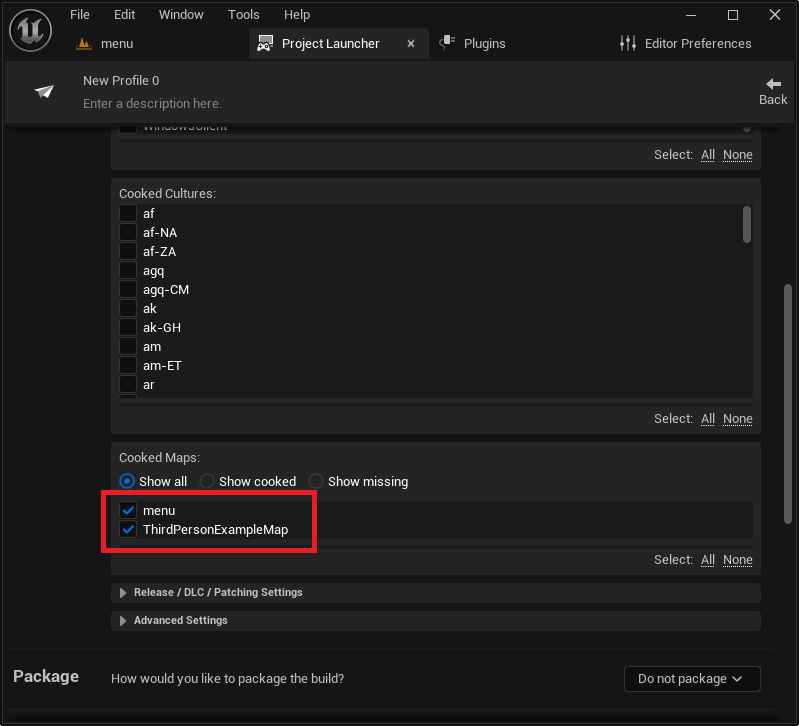
- Maps to Cook:
- Ensure you select all game maps that your dedicated server will need to access or load. This typically includes your starting menu map and all playable game levels. If a map is not cooked, the server will be unable to load it, leading to errors.
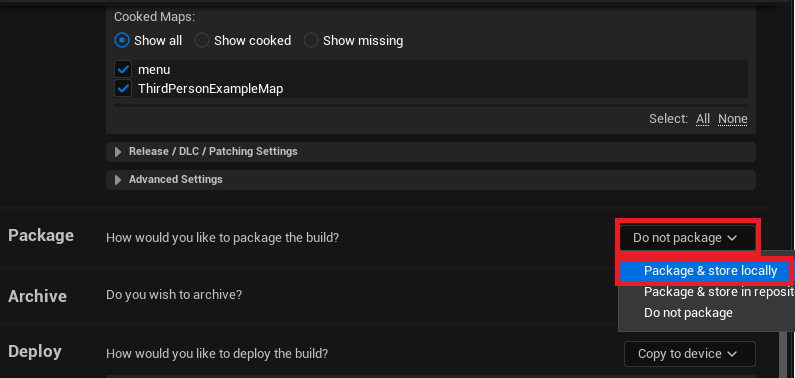
- Package Section – Package Method:
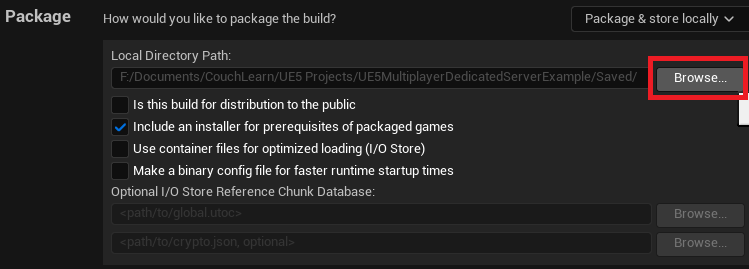
- Change "Do not package" to "Package & store locally." This instructs the Project Launcher to create a self-contained package of your server executable and all its dependencies, saving it to a specified local directory.
- Output Directory: The system will generate a default path within your project’s
Saved/StagedBuildsfolder. You can modify this using the "Browse" button to a location of your choice.
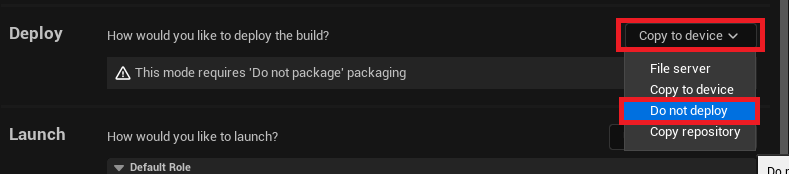
- Deploy Section – Deploy Method:
- Change "Copy to device" to "Do not deploy." For local testing, automatic deployment to a remote device is not necessary.
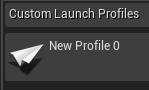
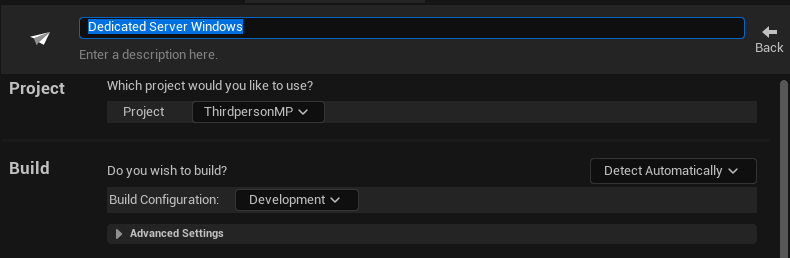
- Profile Name: Give your profile a descriptive name (e.g., "MyGameDedicatedServer") to easily identify its purpose.
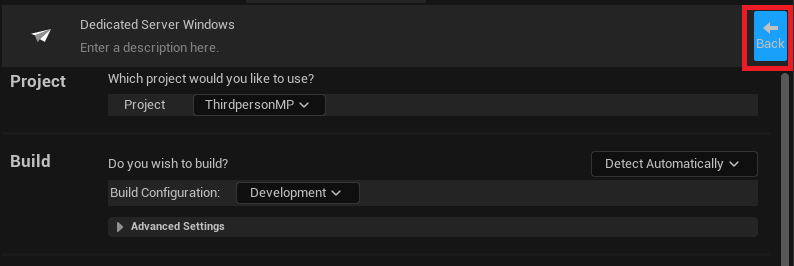
- Save Profile: Click the "Back" button to save your profile and return to the main Project Launcher menu.
Building and Deploying the Server Executable
With the custom profile configured, the next step is to initiate the build process.
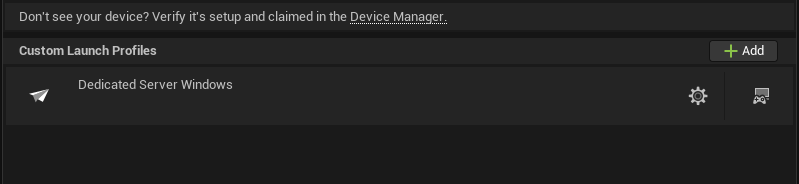
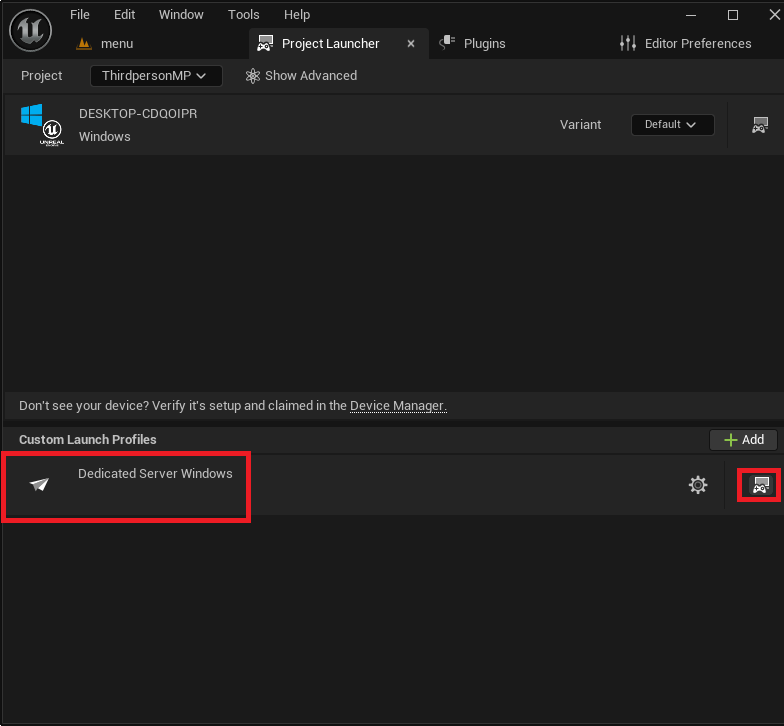
- Launch Profile: In the main Project Launcher menu, locate your newly created custom profile and click the "Launch" button (represented by a controller and display icon).
- Monitor Build Progress: The Project Launcher will display a log window showing the progress of the build process. This involves cooking content, packaging files, and compiling the server executable. The initial build can take a considerable amount of time, depending on your project size and system specifications. It is crucial to allow this process to complete entirely without interruption. Upon successful completion, the log will indicate "Success" for all tasks.
Testing the Dedicated Server
Once the build is complete, you can locate and test your dedicated server executable.
- Navigate to Build Output: Go to the output directory specified in your custom profile. If left at the default, it will be found in your project folder under
Saved/StagedBuilds/[PlatformName](e.g.,Saved/StagedBuilds/WindowsServer). Inside, you will find a folder named after your project, containing the server executable (e.g.,MyGameServer.exe). - Create a Server Shortcut: For ease of use and debugging, create a shortcut to your server executable. Right-click the
.exefile and select "Create shortcut." - Add ‘-log’ Argument: Right-click the newly created shortcut, select "Properties," and in the "Target" field, append
-logto the end of the existing path (e.g.,"C:MyProjectSavedStagedBuildsWindowsServerMyGameBinariesWin64MyGameServer.exe" -log). This argument forces the server to open in a console window, displaying real-time logging messages, which is invaluable for monitoring server activity and debugging issues. - Launch and Observe: Double-click the shortcut to launch your dedicated server. A console window will appear, filling with text as the server initializes, creates its session, and loads the default map. This indicates your server is online and ready to accept connections.
- Client Connection: From your client-side game (either launched from the editor or a packaged client), you should now be able to discover and connect to the dedicated server session. The AdvancedSessions plugin facilitates this discovery process, allowing clients to browse for active sessions and join them seamlessly.
Demonstration and Implications
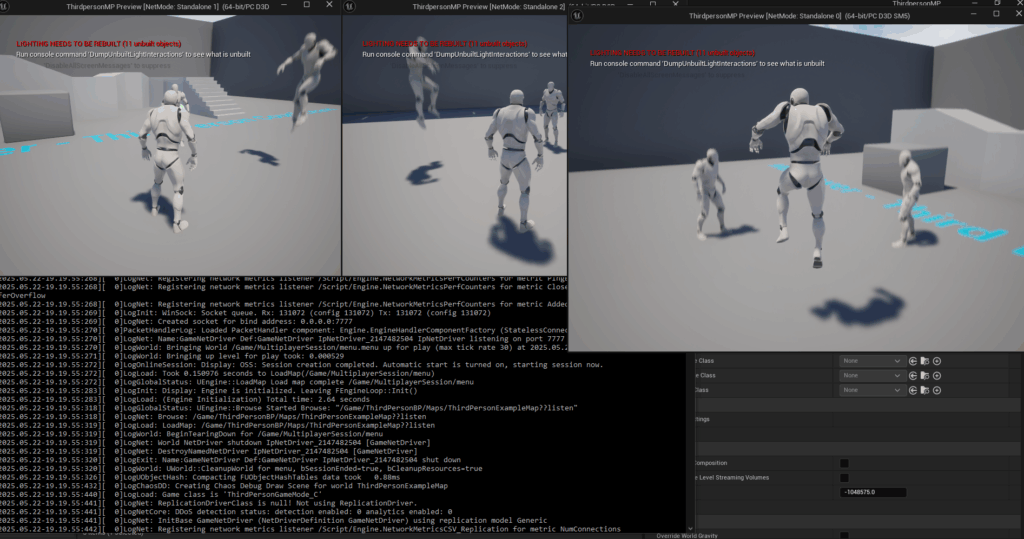
With the dedicated server running, multiple clients (e.g., launched from the editor in separate windows or as separate packaged game instances) can connect to the session. Players will observe each other’s movements and interactions, all synchronized and validated by the dedicated server, without any single client bearing the burden of hosting. This setup guarantees a more consistent and fair gameplay experience for everyone involved.
The successful deployment of a dedicated server for an Unreal Engine 5 game carries significant implications for both developers and players:
- Enhanced Player Experience: Players benefit from reduced lag, fairer gameplay (no host advantage), and a more stable online environment, fostering greater engagement and satisfaction. This consistency is vital for competitive scenes and encourages long-term player retention.
- Developer Empowerment: Developers gain greater control over their multiplayer environment. Centralized server logic simplifies debugging, allows for more robust anti-cheat implementations, and provides a single point for deploying updates and patches without requiring all clients to update simultaneously.
- Scalability for Growth: This architecture enables games to scale efficiently. As player numbers grow, additional server instances can be spun up in cloud environments (like AWS, Azure, or Google Cloud), ensuring that capacity always meets demand. This is a cornerstone for titles aiming for widespread appeal.
- Economic Considerations: While dedicated servers incur hosting costs, these are often justified by the improved player experience and the ability to monetize a more robust and popular game. The investment in server infrastructure directly translates into a higher quality product and a stronger community.
Industry leaders like Epic Games continually emphasize the importance of robust backend infrastructure for modern multiplayer titles. By leveraging Unreal Engine 5’s powerful tools and adopting a dedicated server architecture, developers are well-positioned to create immersive, stable, and highly engaging online experiences that meet the high expectations of today’s gaming community. This commitment to a solid server foundation is not merely a technical choice but a strategic one, underpinning the success and longevity of any ambitious multiplayer game.
Conclusion
You have now successfully built and configured a dedicated server for your Unreal Engine 5 game, capable of hosting multiplayer sessions. This critical step enables a level of performance, security, and reliability that is unattainable with peer-to-peer hosting. By understanding the underlying principles, navigating the Unreal Engine Project Launcher, and implementing the necessary game logic adjustments, you are well-equipped to provide a consistent and high-quality experience for your players. This knowledge is fundamental for launching a fully featured, scalable multiplayer game that stands out in today’s competitive gaming landscape, laying the groundwork for a truly robust and enjoyable online experience.
About the Author