The successful deployment of a dedicated server for an Unreal Engine 5 (UE5) game marks a pivotal achievement for developers aiming to deliver robust, scalable, and secure multiplayer gameplay. This comprehensive guide outlines the critical steps and underlying rationale for configuring a UE5 project to run on a dedicated server, a necessity for titles ranging from competitive shooters to expansive cooperative survival experiences and intricate social sandboxes. By centralizing the game instance on an independent server, developers can transcend the limitations of peer-to-peer hosting, ensuring superior performance, enhanced security, and unwavering reliability for their player base.
The Evolution of Multiplayer Hosting: From P2P to Dedicated Infrastructure
The landscape of multiplayer gaming has undergone a profound transformation, moving from rudimentary local area network (LAN) connections and early peer-to-peer (P2P) models to sophisticated dedicated server infrastructures. In the nascent days of online gaming, P2P hosting, where one player’s machine acts as the host for others, offered an accessible and cost-effective solution. This model required minimal setup and avoided the overheads associated with maintaining server hardware. However, its inherent limitations quickly became apparent as games grew in complexity and player count. P2P suffered from inconsistent performance, heavily reliant on the host’s internet connection and system specifications, leading to issues like high latency, desynchronization, and "host advantage." Moreover, security vulnerabilities were rampant, making P2P games susceptible to cheating and exploits, undermining competitive integrity.
The advent of modern competitive gaming, the rise of esports, and the proliferation of massive multiplayer online (MMO) titles fundamentally shifted industry expectations. Players demanded fair, consistent, and low-latency experiences, which P2P could not reliably provide. This propelled dedicated servers into the forefront as the de facto standard for professional-grade multiplayer games. Dedicated servers offer an authoritative source of truth for game logic, minimizing lag, preventing client-side manipulation, and ensuring a level playing field. Game engines like Unreal Engine have been instrumental in this evolution, continuously enhancing their networking stacks and providing developers with the tools to build and deploy these robust server solutions.
Unreal Engine 5: Empowering Next-Generation Multiplayer
Unreal Engine 5 stands at the vanguard of game development, offering an advanced networking framework that makes the implementation of dedicated servers more accessible than ever before. The engine’s architecture is designed to support the demands of modern multiplayer titles, facilitating complex interactions and large player counts without compromising performance. For developers, understanding and utilizing UE5’s dedicated server capabilities is not merely a technical step but a strategic imperative for long-term game success and player satisfaction.
The core advantages of a dedicated server in the UE5 ecosystem are multi-faceted. Firstly, performance is significantly boosted. By offloading game logic, physics calculations, and state management to a powerful, centralized machine, client machines are freed to focus solely on rendering and user input, leading to smoother gameplay and higher frame rates. This also ensures a consistent tick rate, crucial for precise timing in competitive genres. Secondly, security is dramatically improved. Since the server holds the authoritative game state, it can validate client actions and prevent common cheating methods like speed hacks or item spawning, which are difficult to counter in P2P environments. Finally, reliability is paramount. Dedicated servers can operate 24/7, independently of any player’s device, providing persistent game worlds and ensuring players can connect at any time. This consistency is vital for building thriving online communities and maintaining player engagement.
Prerequisites for Dedicated Server Development in UE5
Before embarking on the server build process, several foundational elements must be in place. Developers require a fully functional multiplayer Unreal Engine 5 project. This project should already incorporate basic networking functionalities, such as player connections and replication. For those starting without a multiplayer-ready project, resources detailing UE5 Multiplayer Sessions are readily available and serve as an essential preliminary step.
Crucially, building a dedicated server for Unreal Engine necessitates a source build of Unreal Engine, rather than a version downloaded directly from the Epic Games Launcher. The source build provides access to the engine’s underlying code, which is essential for compiling server-specific binaries. This requirement underscores a deeper level of engagement with the engine, offering developers greater control and customization over their build process. Instructions for obtaining and building the engine from source are provided by Epic Games, guiding developers through the initial setup of their development environment.
Furthermore, for efficient session management and discovery, plugins like Advanced Sessions are often recommended. This plugin extends UE5’s default session functionalities, offering more robust tools for creating, finding, and joining multiplayer sessions. Its integration ensures that the dedicated server can correctly advertise itself within the game’s session browser, allowing players to easily discover and connect to active game instances.
Adapting Project Logic for a Headless Server
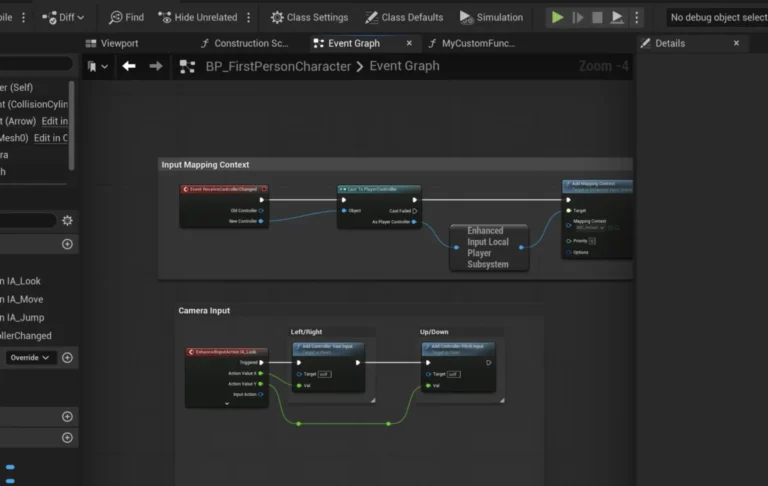
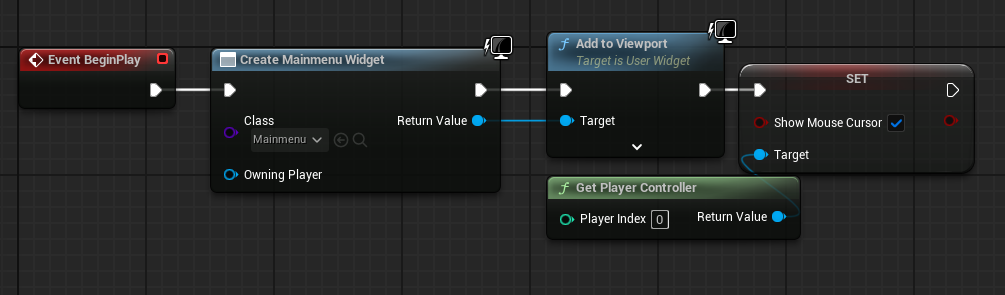
A fundamental difference between a game client and a dedicated server is the absence of a graphical user interface or player character on the server. The server’s sole purpose is to run game logic. Therefore, the project’s blueprints, particularly those related to initial game setup, must be adjusted.
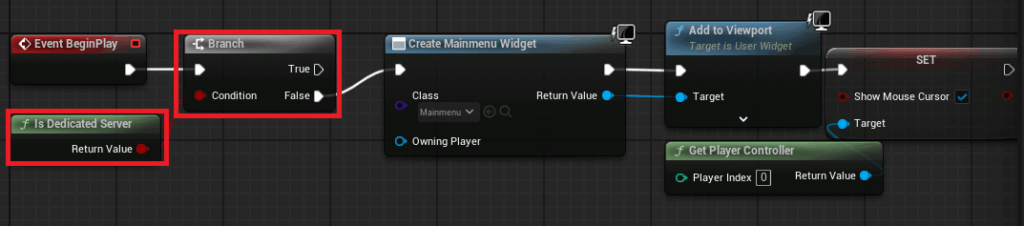
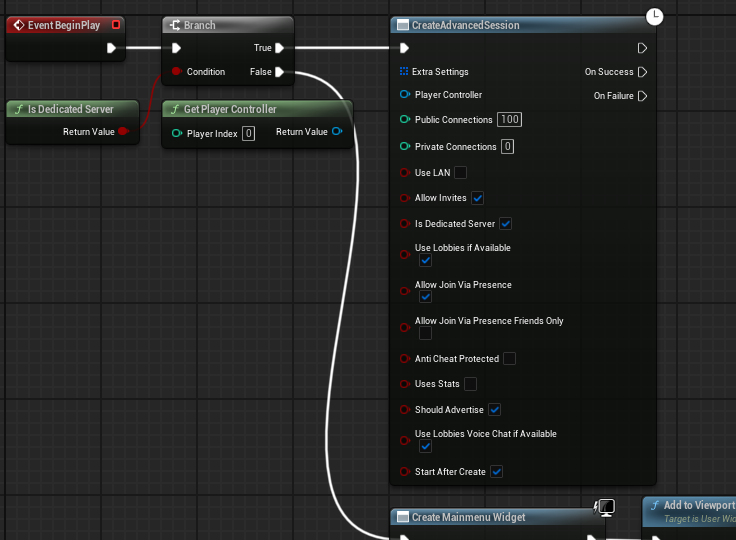
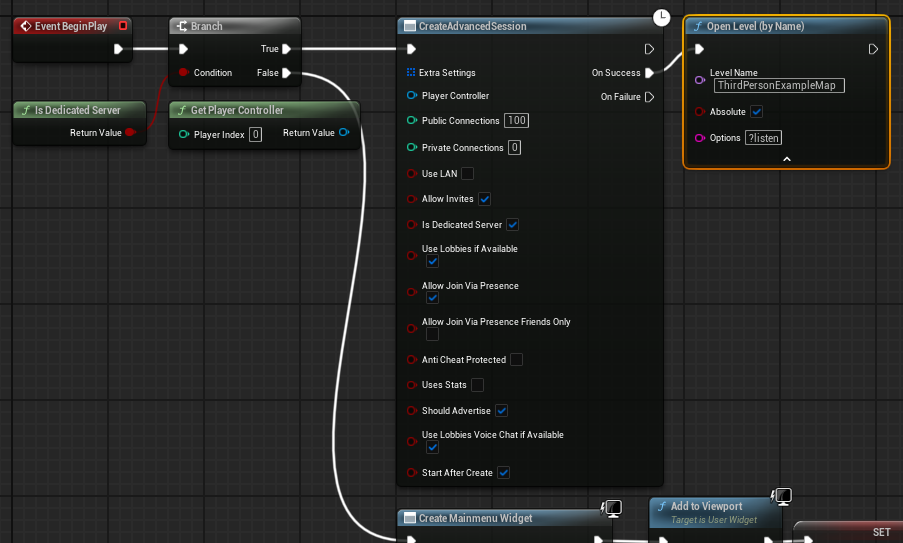
The first critical modification involves the game’s main menu logic. In a standard client application, the main menu widget is created and displayed upon launch. However, a dedicated server should bypass this entirely, automatically initiating a game session and loading the appropriate map. This is achieved by incorporating an "Is Dedicated Server" node within the main menu level blueprint. This node checks the current platform; if it identifies as a dedicated server, the code path for UI creation is skipped. Instead, a "Create Advanced Session" node is triggered, configured with the desired session settings (e.g., max players, server name, public/private status). Upon successful session creation, the server then executes an "Open Level" command, loading the designated game map with the "?listen" option appended. This option instructs the server to listen for incoming client connections, effectively making it ready for players. This logical branching ensures that the server efficiently transitions from launch to an active game state without unnecessary client-side overhead.
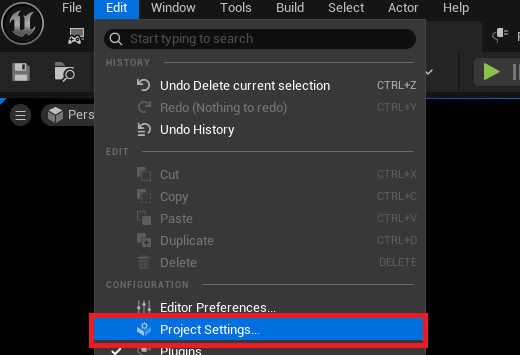
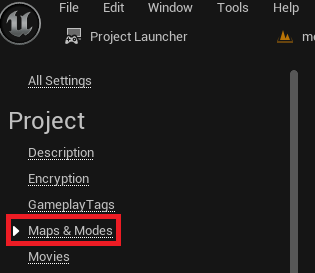
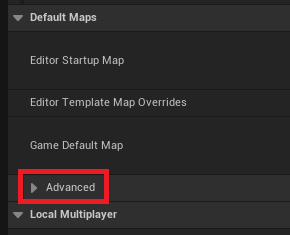
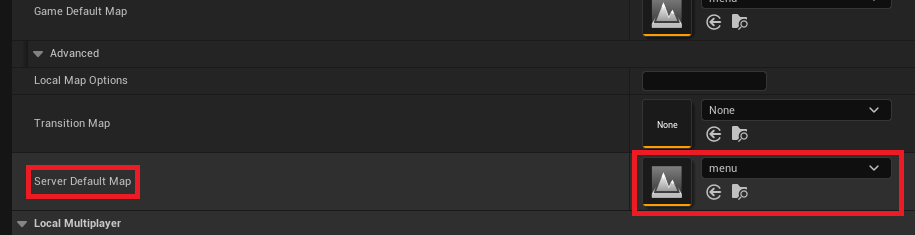
Beyond the initial session setup, the default server map must be explicitly defined. By default, UE5 dedicated servers might load into an engine-specific "Entry" map, which is unsuitable for gameplay. This setting is managed within the Project Settings under the "Maps & Modes" section. By expanding the "Default Maps" advanced options, developers can specify the "Server Default Map" to be the desired game level, ensuring the server initializes directly into the correct game environment.
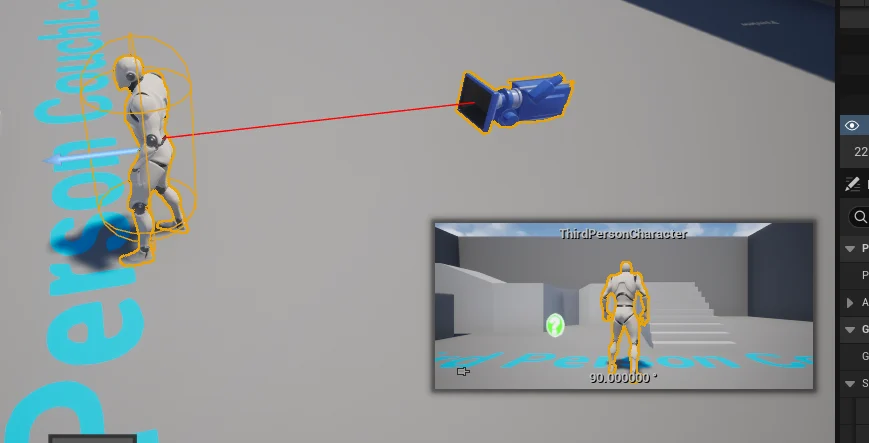
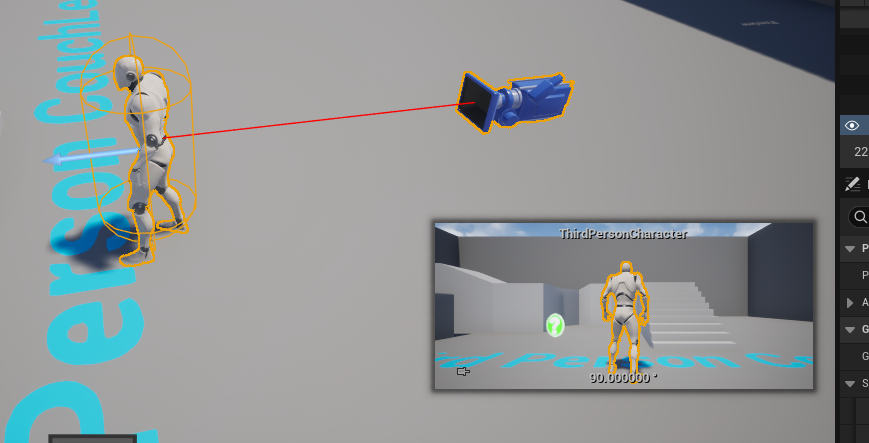
Finally, in a dedicated server environment, there is no need for a default player character to be spawned by the server itself. Game levels often include a default player start or a character blueprint that would typically be controlled by the first connected player (or the host in a listen server scenario). For a dedicated server, this character instance would simply exist in the world without an active player, consuming resources unnecessarily. Therefore, it is standard practice to remove any default character blueprints or ensure that character spawning logic is conditioned to only execute for actual clients, preventing a "ghost" character from populating the server’s game world.

The Unreal Project Launcher: Streamlining Server Builds
Unreal Engine’s Project Launcher is an indispensable tool for packaging and deploying various builds of a game, including dedicated servers. It provides a structured interface for creating custom profiles that define specific build configurations, streamlining an otherwise complex compilation process.
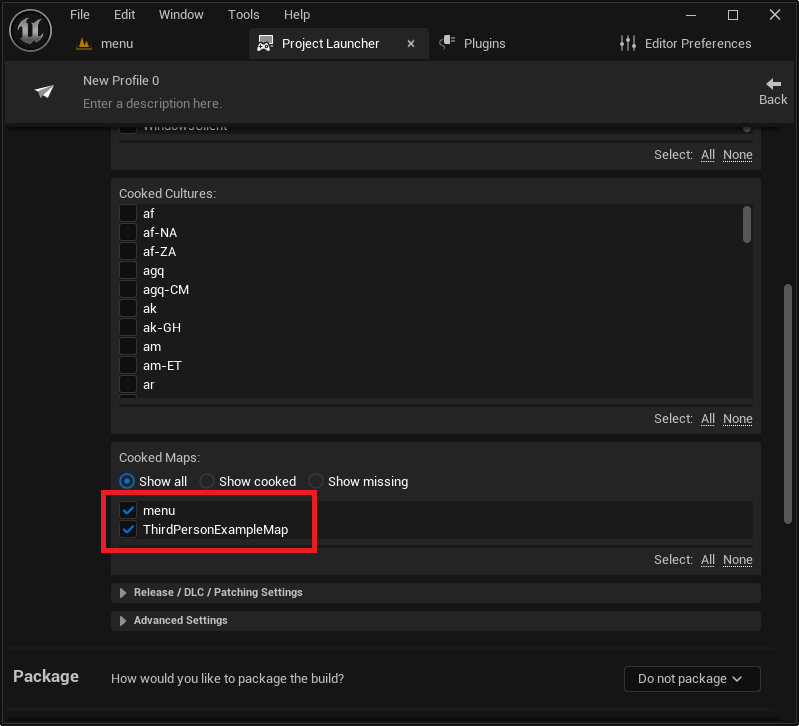
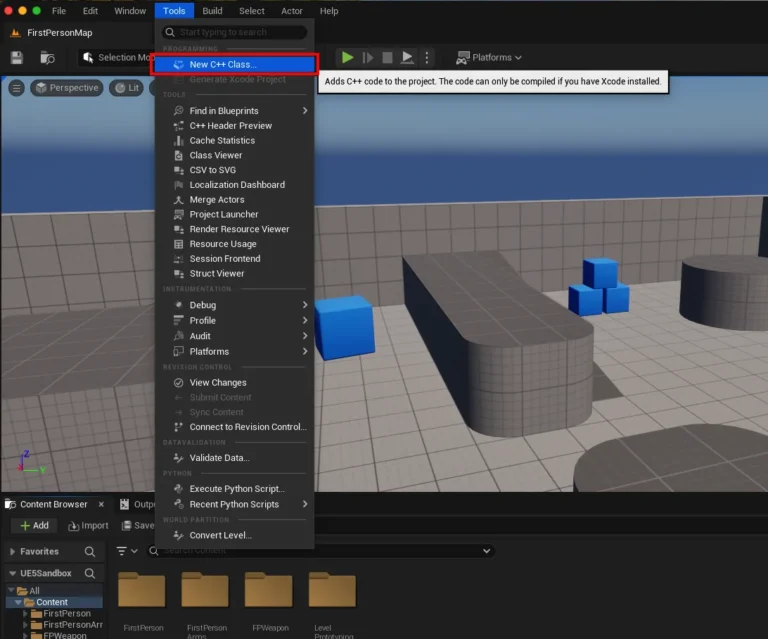
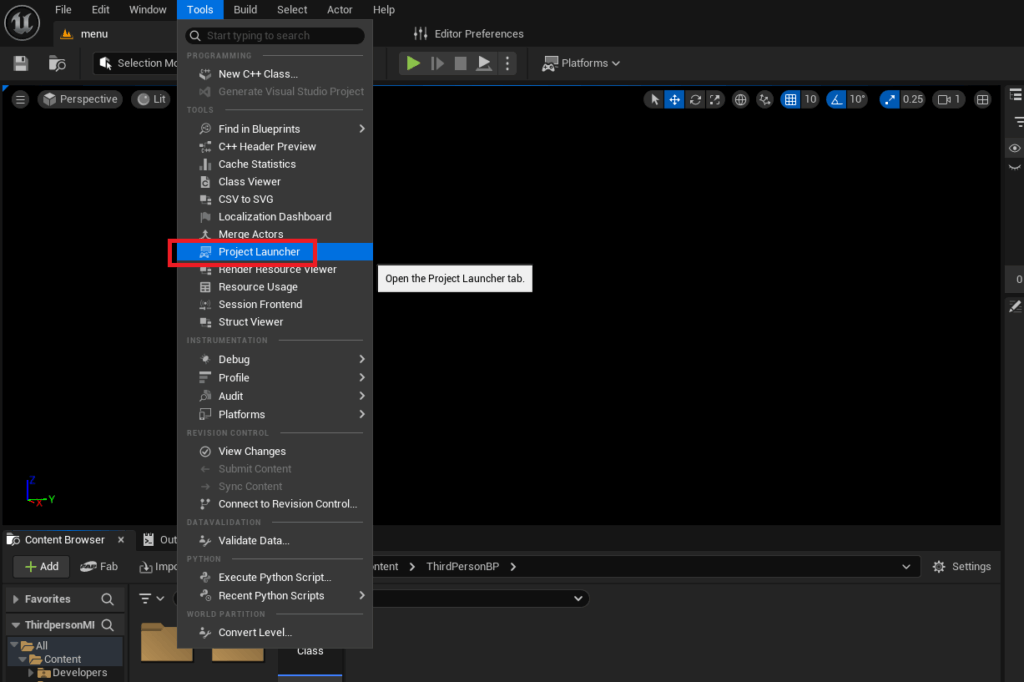
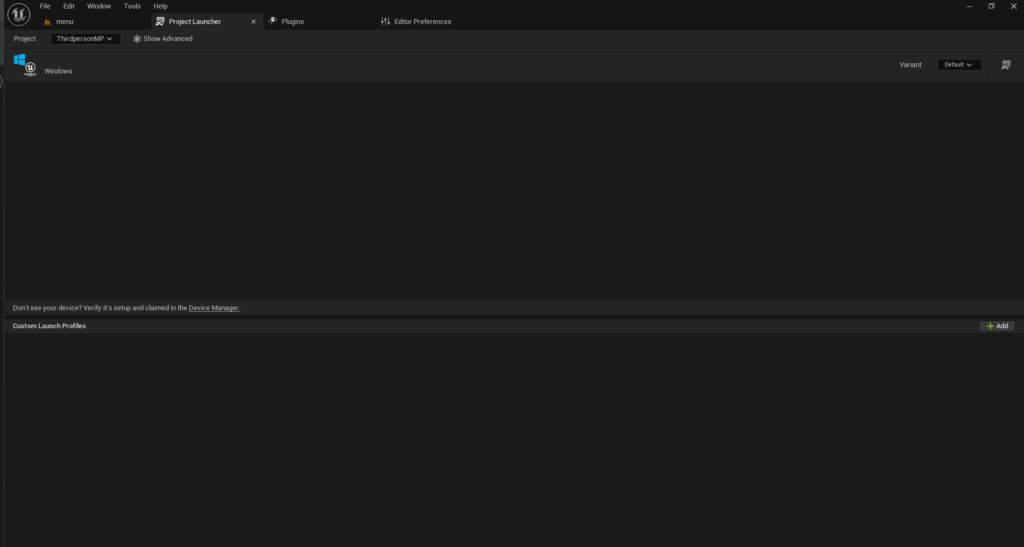
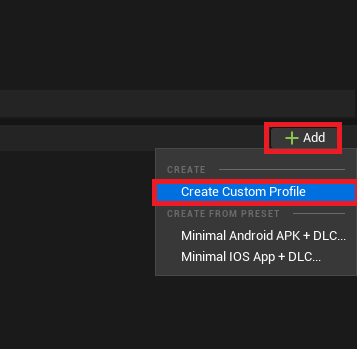
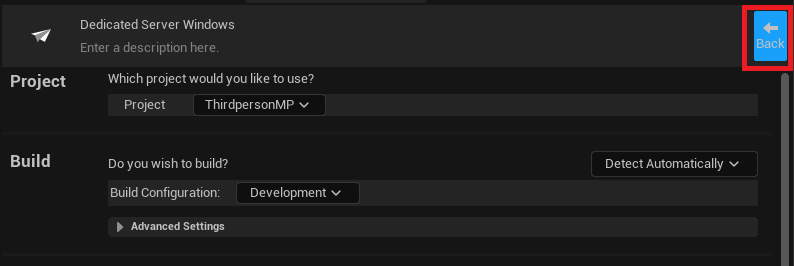
To access the Project Launcher, navigate to the "Tools" menu in the Unreal Editor and select "Project Launcher." Upon opening, developers are presented with an empty canvas, ready for the creation of custom launch profiles. The process begins by selecting "Create Custom Profile."
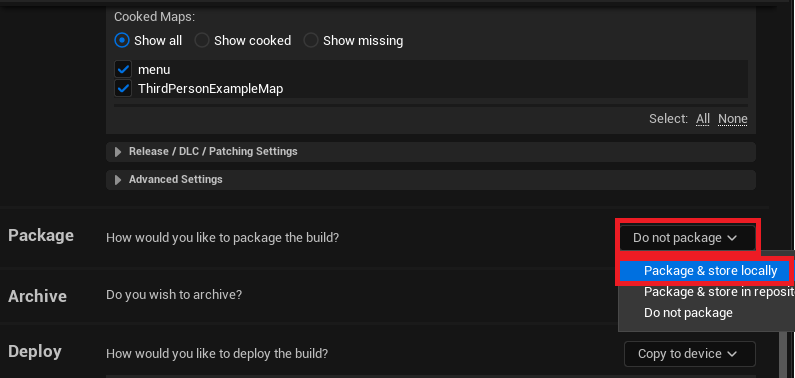
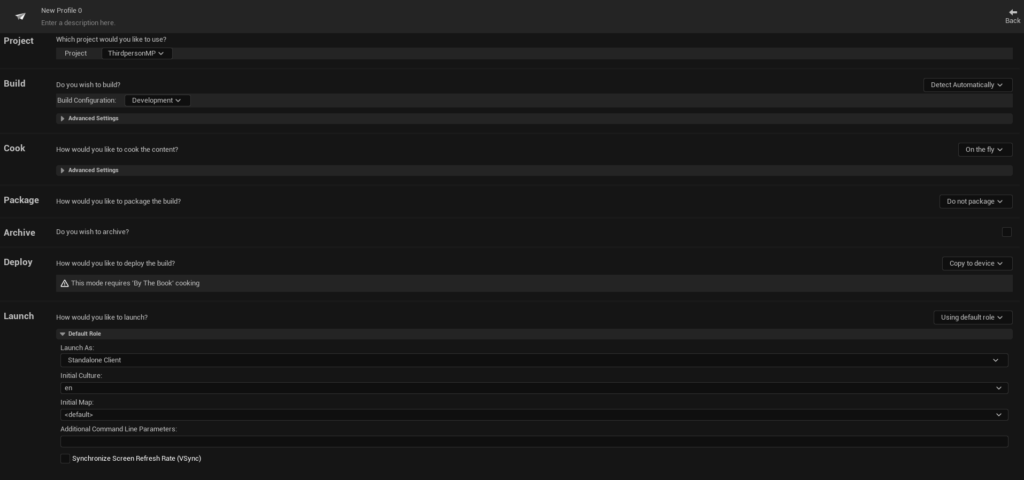
Within the custom profile settings, several key configurations are required:
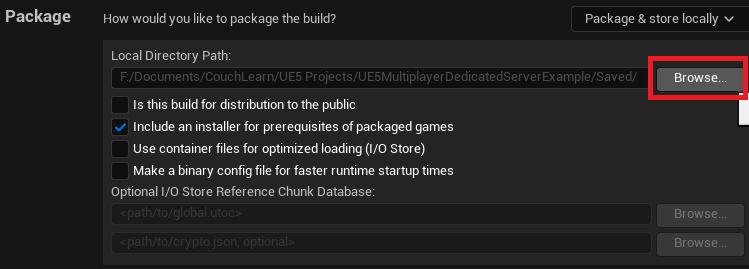
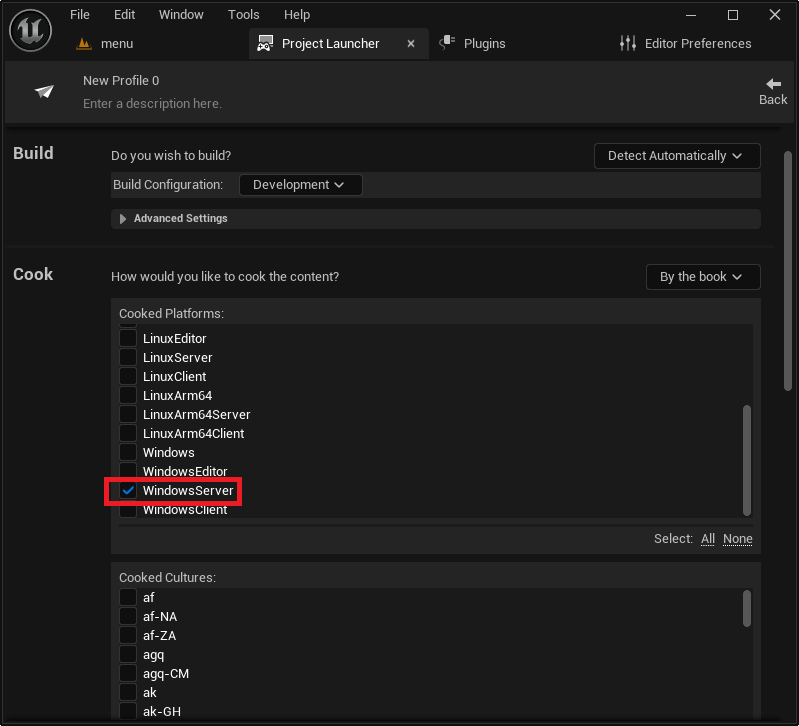
- Cook Section: The "Cook" option should be changed from "On the fly" to "By the book." This ensures that all necessary game content is properly processed and packaged, preventing runtime issues that can arise from dynamic content loading.
- Cooked Platforms: Developers must select the target server platform. For Windows-based hosting, "WindowsServer" is the appropriate choice. For Linux deployments, options like "LinuxServer" (for x86/64 architectures) or "LinuxArm64" (for ARM-based Linux servers) are available, catering to diverse hosting environments, including cloud-based virtual machines.
- Maps to Cook: All maps intended to be used by the server, including the main game map and any sub-levels, must be explicitly selected for inclusion. This ensures that the server build contains all required game assets.
- Package Section: The "Package" option should be set to "Package & store locally." This instructs the Project Launcher to compile and bundle the server executable and its associated files into a specified local directory, typically within the project’s "Saved/StagedBuilds" folder. Developers can customize this output path if desired.
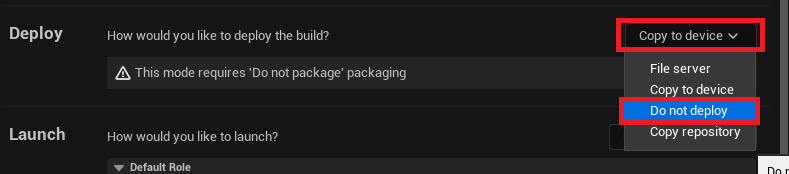
- Deploy Section: The "Deploy" option should be set to "Do not deploy." This prevents the Project Launcher from attempting to automatically transfer the build to a device, as dedicated server builds are typically deployed manually to hosting environments.
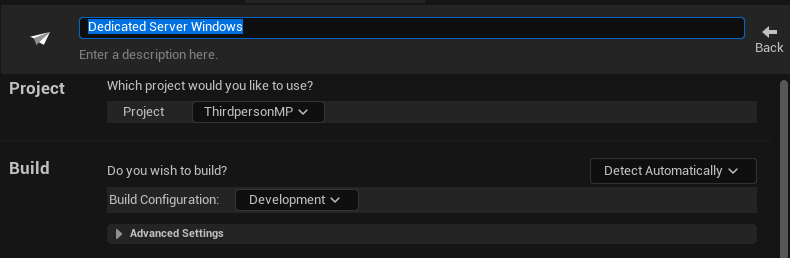
- Profile Naming: Finally, assign a clear, descriptive name to the custom profile, such as "MyGame_DedicatedServer," to easily identify its purpose.
Building and Testing the Dedicated Server
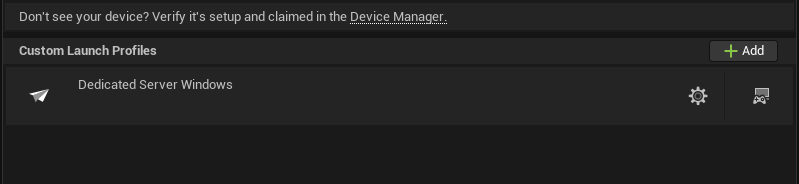
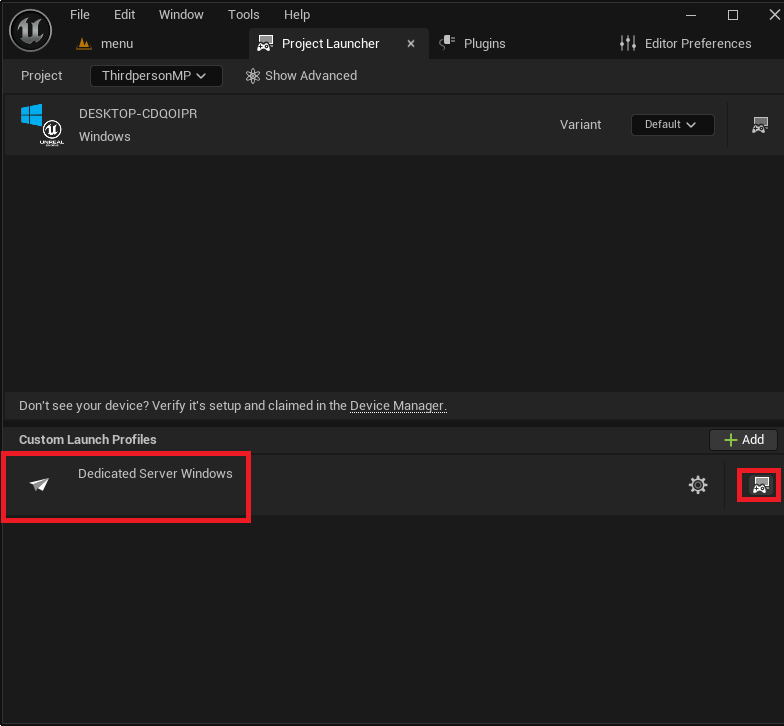
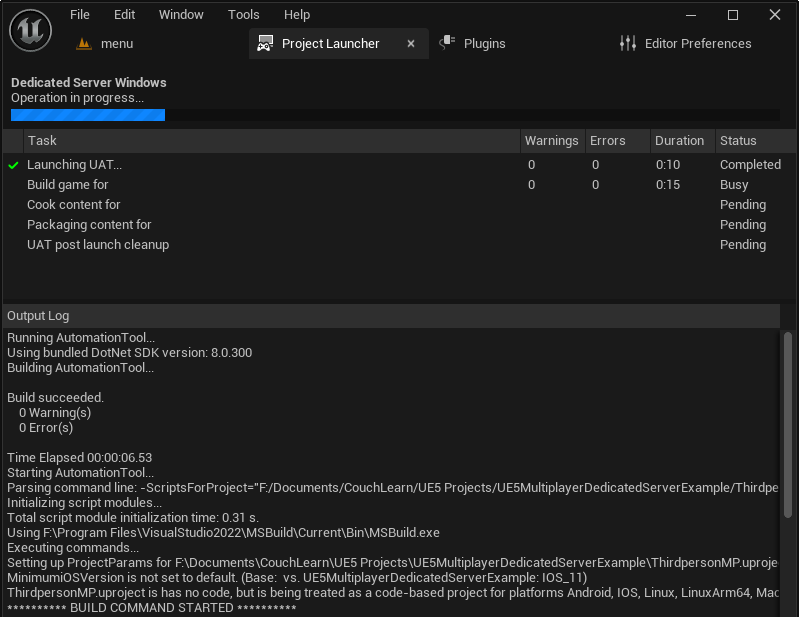
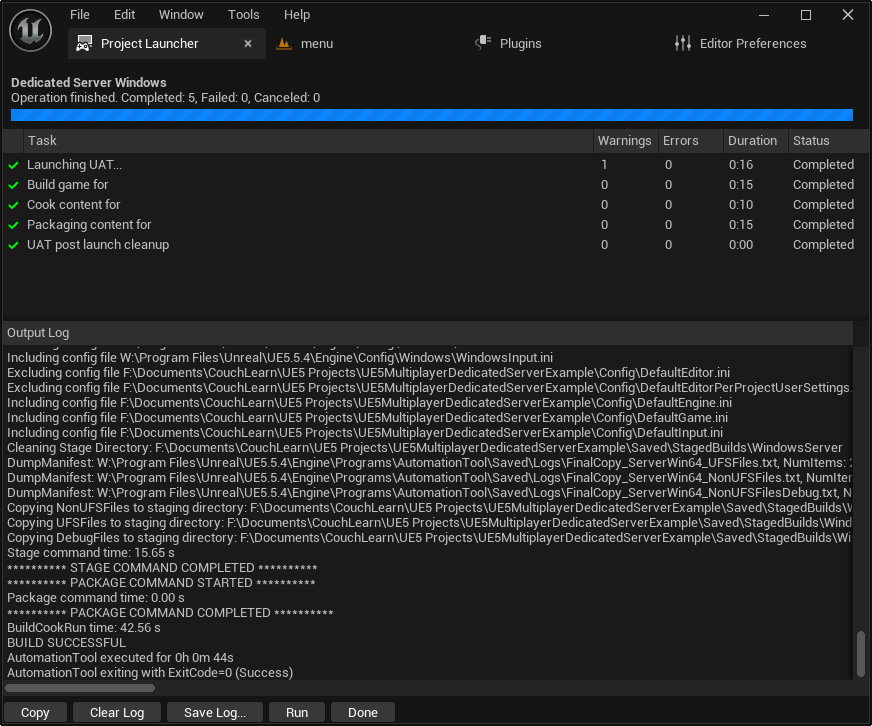
Once the custom profile is meticulously configured, the dedicated server can be built. Returning to the main Project Launcher menu, the newly created profile will appear in the list. Clicking the "Launch" button (represented by a controller and display icon) initiates the build process. This phase involves compiling the server-specific code, packaging assets, and staging the final files. The initial build can be time-consuming, depending on project size and system specifications, but subsequent builds may be faster due to incremental compilation. The Project Launcher provides detailed logs, allowing developers to monitor progress and troubleshoot any errors. Upon successful completion, the logs will indicate that all tasks have been finalized.
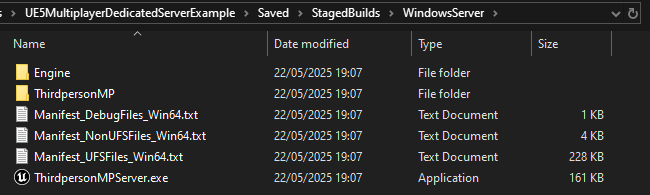
With the server successfully built, the next step is testing. Navigate to the designated output folder, typically [YourProjectFolder]/Saved/StagedBuilds/WindowsServer/ (or the corresponding Linux directory). Inside, locate the server executable (e.g., MyGameServer.exe). To facilitate testing and monitoring, it is highly recommended to create a shortcut to this executable. By editing the shortcut’s properties, append the launch argument "-log" to the end of the "Target" field. This crucial argument forces the server to open in a console window, displaying real-time logging messages, which is invaluable for debugging and verifying server initialization.
Launching the server shortcut will open a command-line window, which will quickly fill with diagnostic text as the server initializes, creates its session, and loads the default map. This log output confirms the server’s readiness for client connections. From a client’s perspective (e.g., running multiple instances of the game editor or separate client builds), the dedicated server session should now be discoverable in the game’s session browser. Clients can then connect to this session, and the server will manage their gameplay interactions, demonstrating the seamless operation of the dedicated server.
Demonstration and Broader Implications
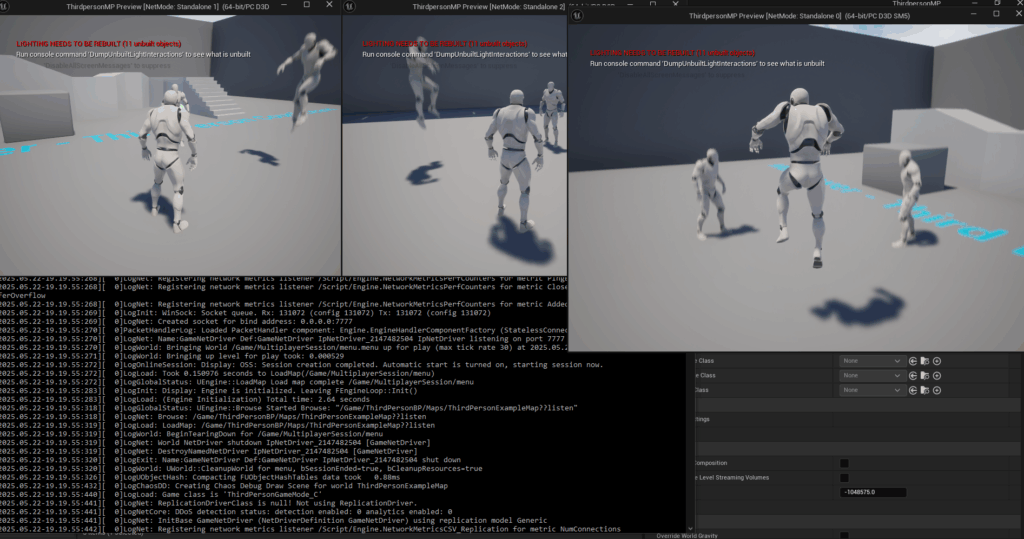
A practical demonstration of a dedicated server in action typically involves launching the server executable alongside multiple client instances, perhaps within the Unreal Editor itself. As clients connect, their characters appear and interact within the server’s authoritative game world. All player movements, actions, and game state changes are processed and replicated by the dedicated server, showcasing the fundamental benefits of this architecture. Players experience fluid gameplay, consistent latency, and a shared, synchronized environment, free from the inconsistencies often associated with P2P setups.
This capability carries significant implications for game development. For studios, it enables the creation of truly competitive and large-scale online experiences, positioning their titles for success in the burgeoning esports and live-service markets. It simplifies anti-cheat implementation, offers a more stable platform for content updates, and facilitates easier debugging in a controlled server environment. From a player perspective, dedicated servers translate directly into a superior gaming experience: fairer matches, reduced lag, and a more reliable online presence.
The strategic decision to utilize dedicated servers also impacts scalability and deployment. A dedicated server build is inherently suited for deployment on cloud platforms such as Amazon Web Services (AWS), Google Cloud Platform (GCP), or Microsoft Azure. These services allow developers to dynamically provision server instances based on player demand, ensuring high availability and cost-efficiency. This flexibility is vital for games expecting fluctuating player counts, enabling rapid scaling during peak hours and scaling down during off-peak times.
In conclusion, the process of building and configuring a dedicated server for an Unreal Engine 5 project is a fundamental step towards crafting a high-quality multiplayer game. It provides the essential backbone for performance, security, and reliability that modern players demand. By leveraging UE5’s robust tools, understanding the nuances of server-side logic, and diligently following the build and testing procedures, developers gain the power to create immersive, scalable, and fair online experiences, solidifying their game’s foundation for enduring success in the competitive gaming landscape. This mastery is not just about technical proficiency but about realizing the full potential of online interactivity in the next generation of gaming.
About the Author