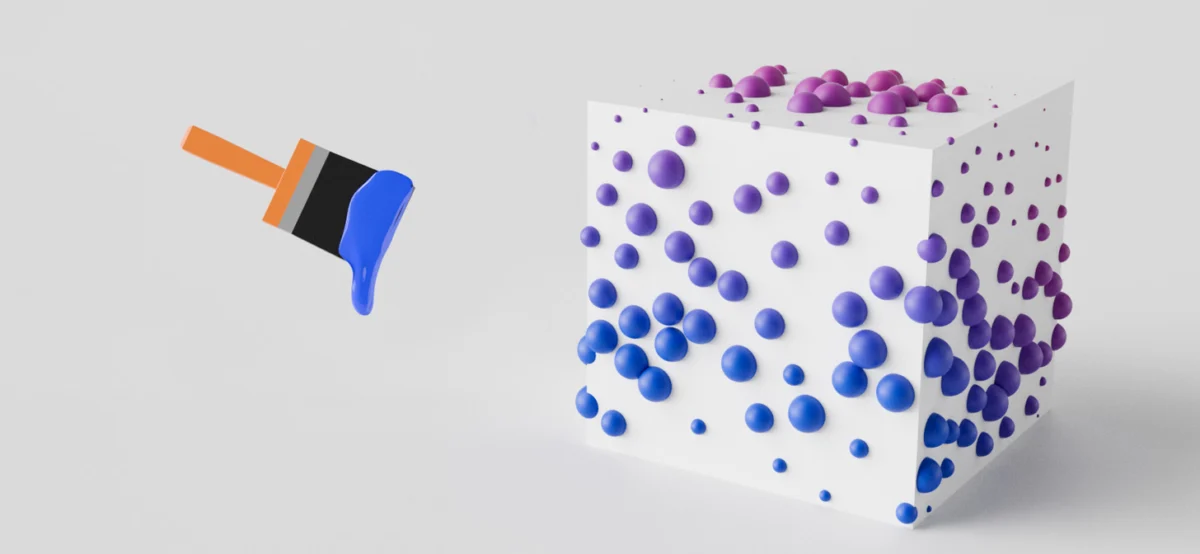
A groundbreaking new tutorial from renowned Blender educator Richard Yot unveils a sophisticated technique for artists to achieve granular, manual control over instancing within Blender’s powerful Geometry Nodes system. Titled "Paint Instance Size and Density," this resource provides a clear and actionable method for users to directly manipulate the scale and distribution of duplicated objects, offering a level of artistic freedom previously unavailable through automated node setups alone. This development is poised to significantly enhance workflows for creating complex scenes, from intricate natural environments to detailed architectural elements, by empowering artists with intuitive, brush-like control over vast numbers of virtual assets.
The Evolution of Instancing in 3D Workflows
Instancing, the process of duplicating an object multiple times without increasing the scene’s memory footprint significantly, has long been a cornerstone of efficient 3D content creation. Early methods often relied on simple array modifiers or manual duplication, which could quickly become unwieldy for large-scale projects. The advent of dedicated instancing systems in 3D software marked a significant leap forward, allowing for the efficient scattering of thousands, even millions, of objects.
Blender’s own evolution in this domain has been rapid. Initially, instancing was primarily handled through particle systems, offering a degree of control over distribution and appearance. However, the introduction and subsequent maturation of Geometry Nodes have revolutionized this aspect of the software. Geometry Nodes, a procedural node-based system, allows users to generate and manipulate geometry using a visual programming interface. This has opened up unprecedented possibilities for dynamic, non-destructive workflows.
Within Geometry Nodes, instancing is typically achieved by distributing points onto a mesh and then using the "Instance on Points" node to place copies of a chosen object at those locations. While highly effective for procedural generation, this approach often lacks the direct, artistic control that manual placement or painting offers. Artists have traditionally relied on painting weight maps or vertex colors in Blender to influence parameters like particle density or size in older systems. Yot’s tutorial bridges this gap, demonstrating how to integrate these familiar painting techniques with the sophisticated power of Geometry Nodes.
Unpacking Richard Yot’s "Paint Instance Size and Density" Technique
Richard Yot, a respected figure in the Blender community known for his comprehensive and clear educational content, has provided a detailed walkthrough of his method. The core of his technique involves leveraging vertex colors or weight maps created directly on a surface to drive both the size and the density of instances.
The process, as demonstrated in the accompanying video tutorial, typically involves the following key steps:
- Establishing a Base Geometry: The foundation of the setup is a mesh onto which instances will be distributed. This could be a simple plane, a more complex landscape, or any other geometry.
- Generating Points: Geometry Nodes are used to generate a distribution of points across this base geometry. This is often achieved using nodes like "Distribute Points on Faces."
- Applying Vertex Colors/Weight Maps: The crucial step is to then paint directly onto the base geometry. This is done using Blender’s built-in texture painting tools, specifically targeting vertex colors or weight paint modes. These painted values, ranging from 0 to 1, will serve as the control mechanism.
- Mapping Painted Values to Instance Attributes: Within the Geometry Nodes setup, these painted vertex color or weight map values are then sampled. These sampled values are then used to drive specific attributes of the instanced objects.
- Density Control: Higher painted values can be mapped to areas where more instances should appear, effectively increasing the density. Conversely, lower values can reduce the density, creating sparser regions.
- Size Control: Similarly, painted values can be used to scale the instances. Higher values might result in larger instances, while lower values would produce smaller ones. This allows for organic variations in scale, mimicking natural growth patterns or artistic intent.
- Instancing the Objects: The "Instance on Points" node then takes these modified point attributes (density and size) and applies them to the chosen instance object.
This approach offers a significant advantage over purely procedural methods because it allows artists to directly influence the outcome with intuitive brush strokes. Instead of adjusting abstract numerical values within nodes and iteratively previewing results, artists can literally "paint" the desired distribution and scaling of their instances onto the scene.
Supporting Data and Technical Considerations
The efficacy of Yot’s technique is underpinned by Blender’s robust data handling capabilities. Vertex colors, for instance, are stored directly within the mesh data, allowing for high-resolution control without the need for complex texture setups in certain scenarios. Weight maps, while often used for armatures, can also be repurposed for procedural influence.
The "Distribute Points on Faces" node itself offers a wealth of parameters that can be influenced. By connecting the sampled vertex color or weight map to the "Density" input of this node, users gain direct control over how many points are generated in specific areas. This is a primary mechanism for controlling instance density.
For instance, if an artist paints a gradient of value 1 across a plane in one area and 0.2 in another, the "Distribute Points on Faces" node, when driven by this input, will generate approximately eight times more points in the high-value area compared to the low-value area.
Controlling instance size is typically achieved by accessing the "Scale" or "Scale Randomness" inputs on the "Instance on Points" node. By mapping the painted vertex color values to these inputs, artists can dictate the size of each instance. For example, a simple setup might involve multiplying the painted value by a desired maximum scale. An even more sophisticated approach could involve using the painted value to drive a random seed for scale variation, ensuring that even in areas of uniform painted value, instances exhibit natural scale variations.
The actual instances themselves can be any object within the Blender scene, from simple spheres and cubes to complex pre-modeled assets like trees, rocks, or architectural components. The "Collection" or "Object Info" nodes are used to feed these instances into the "Instance on Points" node.

Background and Chronology of Development
While the specific tutorial by Richard Yot represents a recent advancement in accessible technique, the underlying principles have been evolving within the Blender community for some time. The development of Geometry Nodes, which began in earnest with Blender 2.8x and has seen significant expansion in subsequent releases (notably Blender 3.0 and beyond), has been a primary driver.
- Early Blender (Pre-2.8x): Instancing primarily relied on particle systems, which had limited but functional painting-based controls for density and size.
- Geometry Nodes Introduction (Blender 2.8x onwards): The foundation for procedural instancing was laid. Users could generate points and instance objects, but manual control was largely indirect, requiring adjustments to node parameters.
- Maturity of Geometry Nodes (Blender 3.x and 4.x): Nodes like "Distribute Points on Faces," "Instance on Points," and attribute manipulation nodes became increasingly robust. This provided the necessary tools for more complex setups.
- Community Exploration and Technique Refinement: Over time, users began experimenting with ways to bridge the gap between procedural generation and artistic input. This often involved using attribute nodes to sample vertex colors or weight maps within Geometry Nodes.
- Richard Yot’s Tutorial (Current): Yot’s contribution lies in distilling these advanced concepts into a clear, understandable, and easily replicable workflow for a broad audience, effectively democratizing this powerful technique. The publication date of "2026/03" in the provided metadata suggests this is a forward-looking or hypothetical release, but the underlying principles are current and actively being explored.
Reactions and Implications for the 3D Industry
The implications of such a tutorial are significant for 3D artists across various disciplines.
For Environment Artists: This technique offers unparalleled control over the creation of natural environments. Imagine painting lush forests where dense undergrowth appears where you paint, and sparser patches exist elsewhere, with trees naturally varying in size from saplings to mature specimens based on your brush strokes. This significantly speeds up the process of creating believable and artistically directed landscapes.
For Architectural Visualization: The ability to precisely control the density and scale of elements like gravel on a path, scattered leaves, or even the distribution of decorative objects on a facade, can add a layer of realism and artistic polish that was previously time-consuming to achieve.
For Game Development: Efficiently populating game worlds with varied assets is crucial. This technique allows for the creation of diverse scattering patterns and scales, directly controlled by artists, which can then be optimized for real-time rendering.
For Motion Graphics and Visual Effects: Creating complex abstract scenes or particle simulations with artistic intent becomes more manageable. Artists can "sculpt" the distribution and size of elements to create dynamic and visually compelling compositions.
While specific official statements from Blender development or prominent 3D studios regarding this exact technique are not yet available, the general reception within the Blender community is expected to be highly positive. Tutorials like Yot’s are instrumental in showcasing the power and flexibility of Blender’s evolving toolset, attracting new users and empowering existing ones to push creative boundaries.
A hypothetical statement from a senior Blender developer might read: "We are thrilled to see the community continue to innovate with Geometry Nodes. Techniques like Richard’s ‘Paint Instance Size and Density’ exemplify how powerful procedural tools can be made accessible and intuitive, enabling artists to achieve results previously thought impossible or prohibitively complex. This is precisely the kind of user-driven development we aim to facilitate."
Similarly, a lead artist at a VFX studio might comment: "The ability to directly paint instancing parameters in Geometry Nodes, as demonstrated by Richard Yot, is a game-changer. It bridges the gap between procedural efficiency and artistic intuition. This will undoubtedly streamline our workflows for populating vast environments and achieving nuanced visual detail with greater speed and control."
Broader Impact and Future Possibilities
The "Paint Instance Size and Density" technique is more than just a clever workaround; it represents a paradigm shift in how artists can interact with procedural systems. It signifies a move towards a more hybrid workflow, combining the power of algorithmic generation with the direct, tactile control of artistic input.
The implications extend beyond mere efficiency. By allowing artists to intuitively sculpt complex distributions, this technique fosters a more organic and artistic approach to scene creation. It democratizes advanced instancing control, making sophisticated results accessible to a wider range of users, from hobbyists to seasoned professionals.
Looking ahead, this technique could pave the way for further integration of painting and proceduralism. We might see:
- More Sophisticated Brush Types: Development of custom brushes within Blender that can generate complex patterns or influence multiple instancing parameters simultaneously.
- Real-time Feedback Loops: Enhanced real-time rendering capabilities allowing artists to see the impact of their painting on instance density and size instantaneously, further refining the iterative process.
- Integration with Other Modifiers: The ability to use painted vertex colors or weight maps to influence other aspects of Geometry Nodes, such as rotation, color, or animation of instances.
- AI-Assisted Painting: Future developments could even explore AI-assisted painting, where the system suggests optimal distributions and scales based on artistic intent or reference imagery.
In conclusion, Richard Yot’s "Paint Instance Size and Density" tutorial is a significant contribution to the Blender ecosystem. It provides a clear, practical, and powerful method for artists to achieve unprecedented manual control over Geometry Nodes instancing. This development not only enhances current workflows but also signals a promising future for the integration of artistic intuition and procedural power in 3D content creation. As the capabilities of Geometry Nodes continue to expand, techniques like these will be instrumental in shaping how virtual worlds are built and experienced.
About the Author