Unreal Engine 5 (UE5) offers a robust feature set for game developers, and among its most impactful tools for managing dynamic game content are Data Tables. These powerful assets provide a structured, accessible, and editable means for programmers and designers to define and store vast amounts of game-related information, streamlining development workflows and enhancing project scalability. This guide delves into the core mechanics, practical implementation, and broader implications of utilizing Data Tables within your UE5 projects.
The Foundational Role of Data Tables in Game Development
In contemporary game development, the sheer volume and complexity of data—ranging from item statistics and enemy behaviors to quest details and localization strings—necessitate sophisticated management solutions. Traditionally, much of this data might have been hardcoded directly into gameplay logic or spread across numerous individual assets, leading to cumbersome updates, increased potential for errors, and significant bottlenecks in collaborative environments. Unreal Engine 5’s Data Tables emerge as a critical architectural choice, addressing these challenges by centralizing data into easily digestible and manipulable tabular formats.
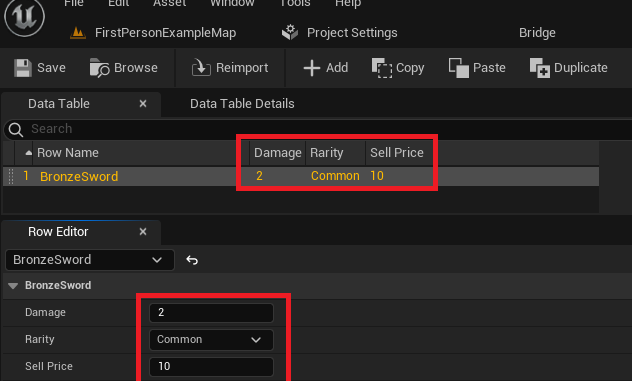
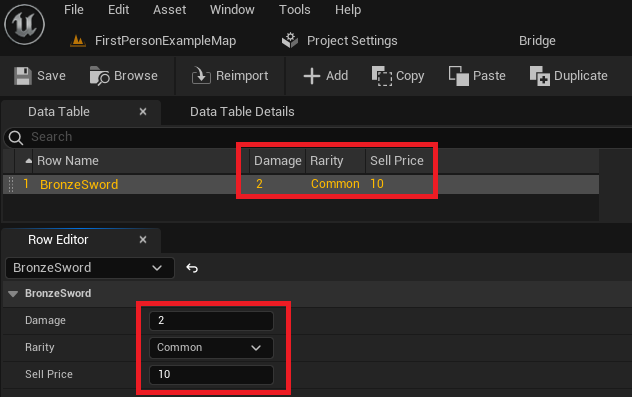
A Data Table in UE5 serves as a predefined list of information, structured based on a user-selected Blueprint or C++ struct (structure). Each row in the table represents a distinct entry, uniquely identified by a "Row Name," while the columns correspond to the variables defined within the chosen struct. This key-value pair system allows for rapid retrieval and modification of data, making it an indispensable tool for content-heavy games. The data is stored as an asset within the project, ensuring persistence across development sessions and facilitating version control. This approach not only empowers designers to iterate on content parameters without requiring programmer intervention but also ensures that the game’s logic consistently references a single source of truth for its data at runtime.
For instance, consider a role-playing game (RPG) with hundreds of items. Instead of creating a unique asset for each sword, shield, or potion, a developer can define a single ItemData struct containing properties like Damage, Rarity, SellPrice, Weight, and Description. A Data Table based on this struct can then house all specific item instances—e.g., "BronzeSword," "IronShield," "HealingPotion"—each with its unique set of values for the defined properties. This modularity drastically reduces overhead and simplifies content management.
Prerequisites: Laying the Groundwork for Structured Data
Before a Data Table can be created and populated, its underlying data structure must be established. This typically involves defining custom Enumerations (Enums) and Structures (Structs), which dictate the types and organization of data that the Data Table will hold. This preparatory phase is crucial for ensuring data consistency and type safety.
Defining Data Quality: The Role of Enumerations
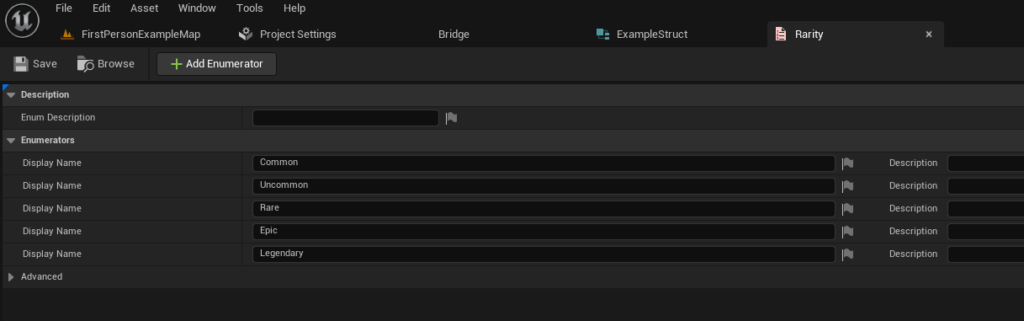
Enumerations are fundamental for creating clear, type-safe categories within your game data. An Enum defines a set of named integer constants, allowing developers to represent distinct states or qualities in a human-readable format rather than raw numbers. For game items, an item rarity Enum (e.g., Common, Uncommon, Rare, Epic, Legendary) provides a precise and unambiguous way to classify item quality.
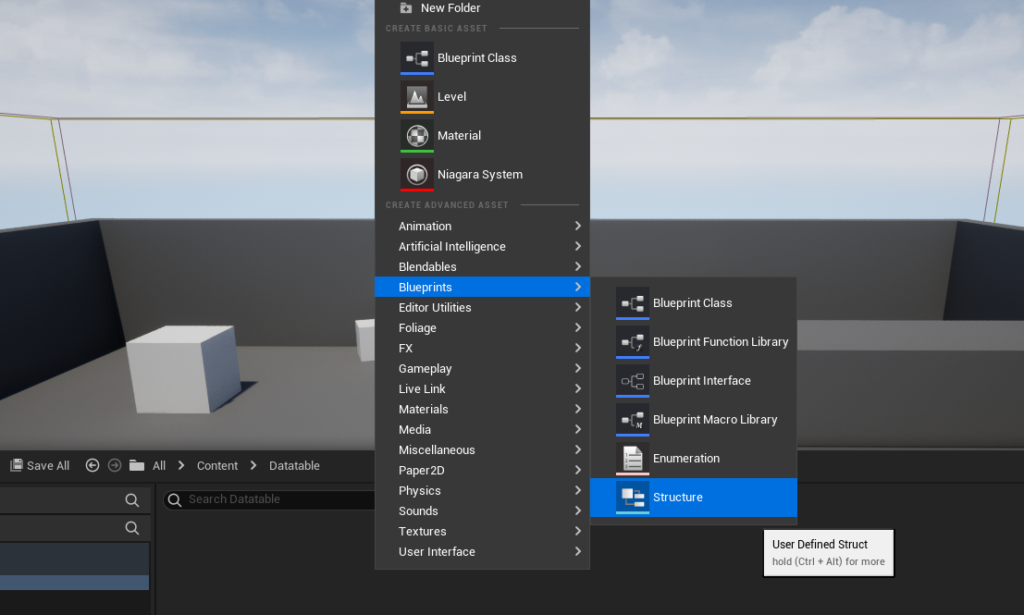
To create an Enum in Unreal Engine 5:
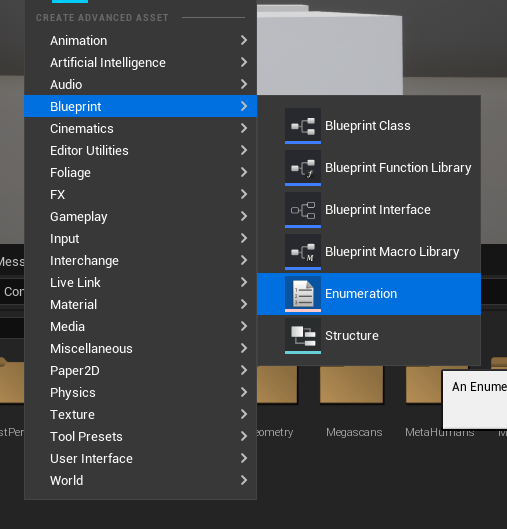
- Right-click anywhere in the Content Browser.
- Navigate to the "Blueprints" category.
- Select "Enumeration."
- Provide a meaningful name (e.g.,
E_ItemRarity). - Open the newly created Enum asset and add the desired values. For an item rarity system, these might include:
CommonUncommonRareEpicLegendary
This structured approach ensures that when assigning rarity to an item in the Data Table, designers are presented with a fixed list of valid options, minimizing data entry errors and maintaining consistency across the project.
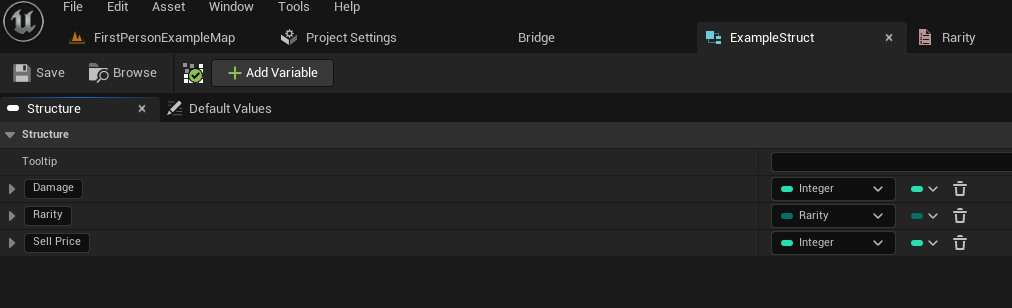
Building the Data Blueprint: Crafting the Structure (Struct)
The core of any Data Table is the Struct it is based upon. A Struct acts as a custom data type, bundling together multiple variables of different types (integers, floats, booleans, Enums, other Structs, or even asset references) into a single, cohesive unit. When creating a Data Table, you are essentially telling Unreal Engine, "Every row in this table will conform to the blueprint defined by this Struct." Critically, for a Struct to be compatible with Data Tables, it must inherit from FTableRowBase. In Blueprint-created Structs, this inheritance is handled automatically.
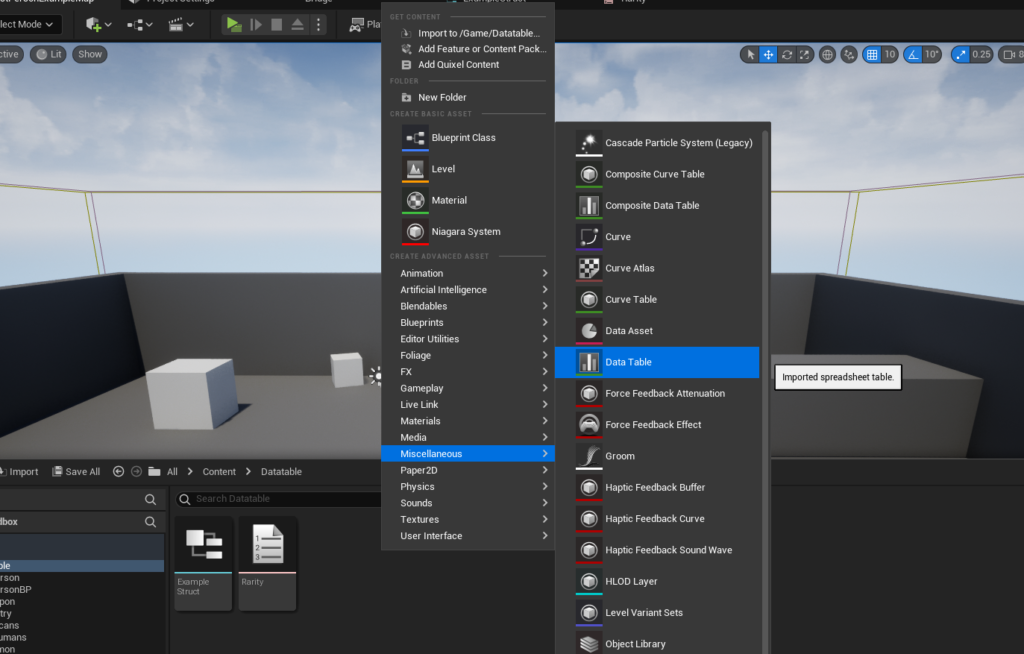
To create the Struct that will define your Data Table’s columns:
- Right-click anywhere in the Content Browser.
- Navigate to the "Blueprints" category.
- Select "Structure."
- Name your Struct appropriately (e.g.,
F_ItemData). - Open the Struct asset and add variables corresponding to the data points you wish to store for each row. For our RPG item example, this might include:
Damage(Type: Integer)Rarity(Type:E_ItemRarity– the Enum we just created)SellPrice(Type: Integer)ItemName(Type: Text)ItemIcon(Type: Texture2D Object Reference)
By meticulously defining the Struct, developers establish a clear schema for their game data, ensuring that all related information is consistently organized and easily expandable in the future.
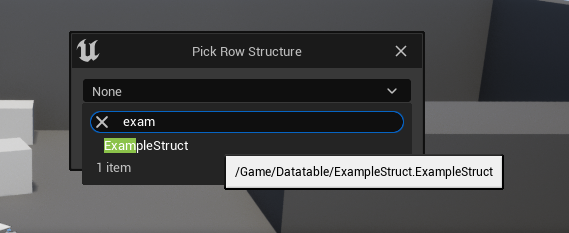
The Data Table Asset: Centralizing Game Information
With the foundational Enum and Struct in place, the creation of the Data Table asset itself is a straightforward process. This asset will serve as the actual container for your game’s content data.
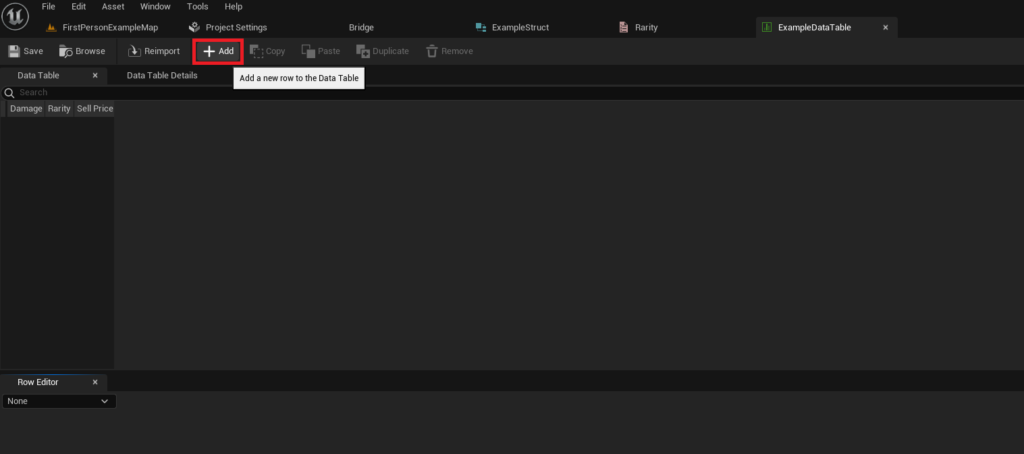
To create the Data Table:
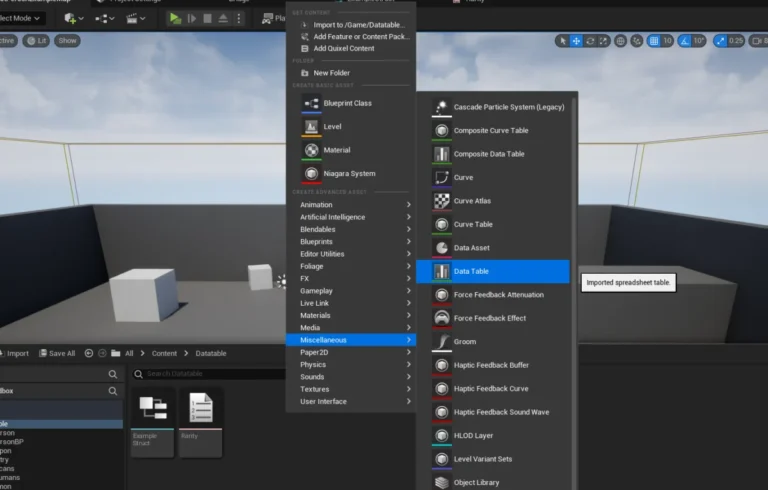
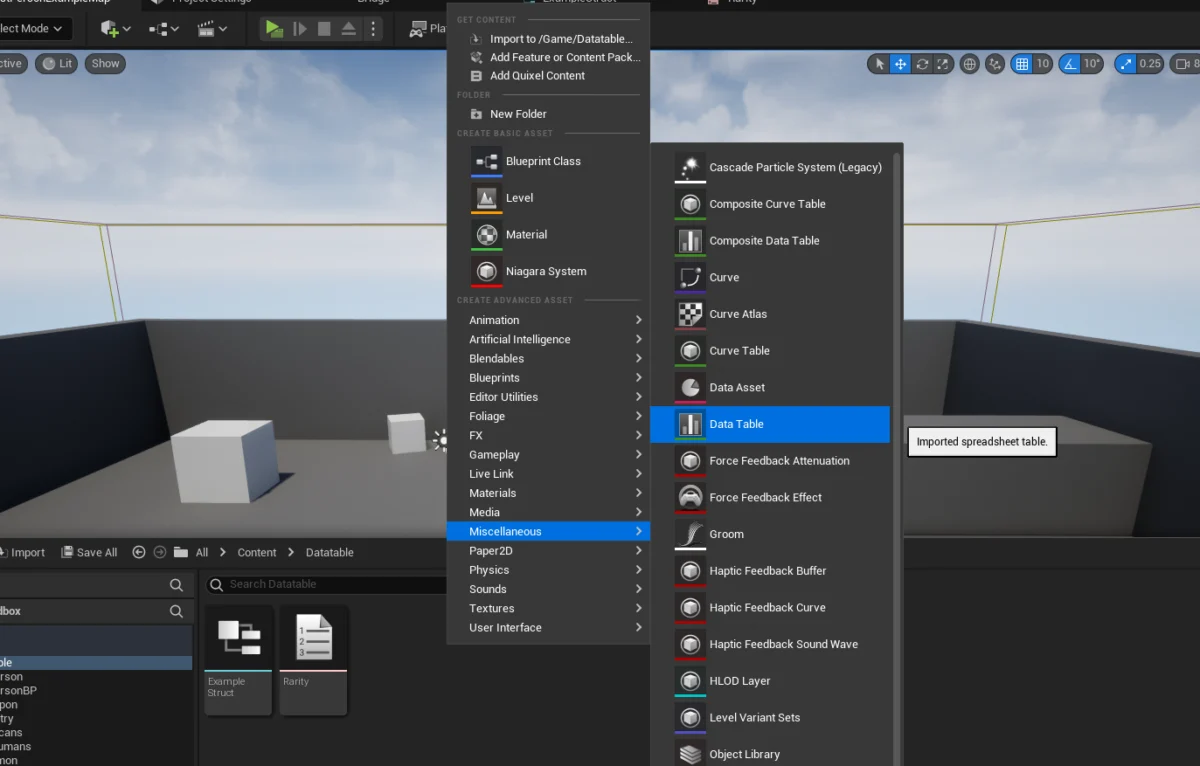
- Right-click inside the Content Browser.
- Navigate to the "Miscellaneous" category.
- Select "Data Table."
- Upon selection, a pop-up window will appear, prompting you to "Choose Data Table Row Type." This is a crucial step where you must select the Struct you created earlier (e.g.,
F_ItemData). This selection irrevocably links the Data Table to the chosen Struct’s definition, determining the available columns and data types for all rows. - Provide a name for your Data Table (e.g.,
DT_ItemStats).
Once created, the Data Table asset is ready to be populated with specific game data. This asset-based approach means that Data Tables can be easily referenced, duplicated, and managed like any other asset in Unreal Engine, including integration with source control systems for collaborative development.
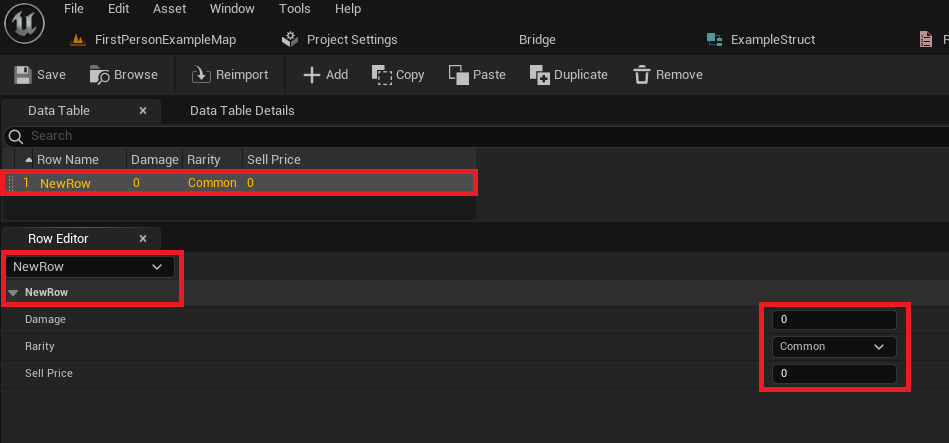
Populating the Data Table: Content Creation at Your Fingertips
The power of Data Tables truly shines during the data population phase, where designers and content creators can directly input and modify game values through a user-friendly interface within the Unreal Editor.
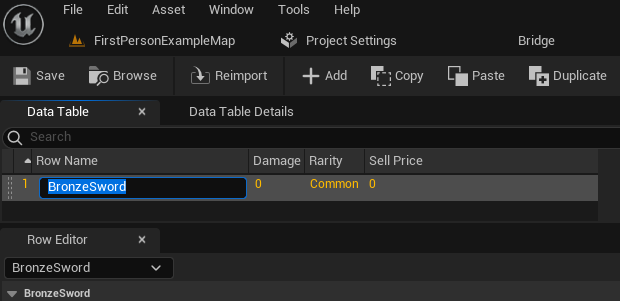
- Adding Rows: Open your newly created Data Table asset. You will find an "Add" button, which, when clicked, generates a new row. Each new row will initially display default values based on the variables defined in your chosen Struct.
- Naming Rows: Crucially, each row requires a unique "Row Name." This name acts as the primary key for accessing that specific row’s data. For item data, descriptive names like "BronzeSword," "SilverBow," or "GreaterHealingPotion" are highly effective.
- Editing Values: Below the table view, a "Row Editor" panel provides a detailed view of the currently selected row’s data. Here, individual values for
Damage,Rarity,SellPrice,ItemName,ItemIcon, etc., can be entered or adjusted. The dropdown forRaritywill automatically present the options defined in yourE_ItemRarityEnum, reinforcing data integrity. - Iterative Content Design: This visual and direct editing capability is a game-changer for iteration speed. Designers can balance item stats, tweak enemy parameters, or adjust quest rewards in real-time without ever touching a line of code or compiling Blueprints. Changes made in the Data Table are immediately available for testing within the game.
- Saving: It is paramount to frequently save the Data Table asset to prevent loss of changes.
The ability to create and manage numerous data entries within a single, organized table significantly accelerates content development for projects of all scales, from indie games to large-scale AAA productions.
Accessing Data: Bringing Values into Gameplay Logic
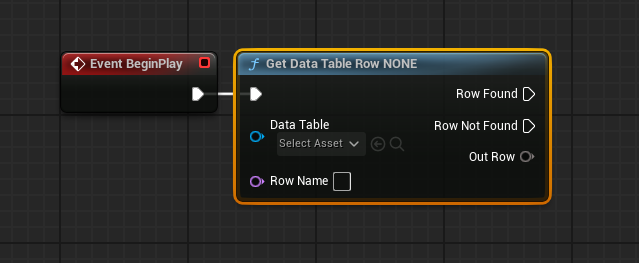
Once a Data Table is populated, the next critical step is to retrieve and utilize this data within the game’s Blueprint scripts or C++ code. Unreal Engine provides specific nodes for this purpose, enabling developers to query the table efficiently.
Retrieving a Specific Row:
The primary node for accessing Data Table information is Get Data Table Row. This node allows you to fetch all the data associated with a particular Row Name.
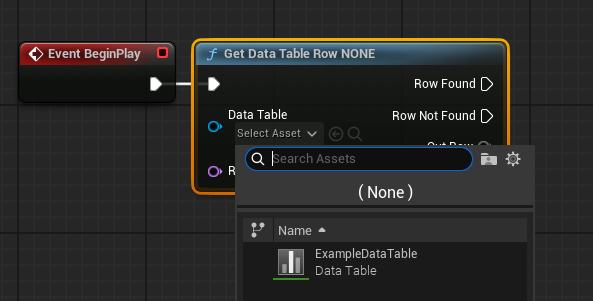
- Placement: In a Blueprint (e.g., a Level Blueprint, Character Blueprint, or Item Blueprint), add an
Event BeginPlaynode (or any other event where data retrieval is needed). - Add
Get Data Table Row: Search for and add theGet Data Table Rownode. - Data Table Reference: Connect your
DT_ItemStatsData Table asset to the "Data Table" input pin of the node. This tells the node which table to query. - Row Name Input: The "Row Name" input pin is where you specify the unique identifier for the data you want. You can either directly type a name (e.g., "BronzeSword") or connect a variable that dynamically provides the row name. If the Data Table reference is set, this pin will often display a dropdown with all available row names, aiding in selection and reducing typos.
- Handling Outcomes: The
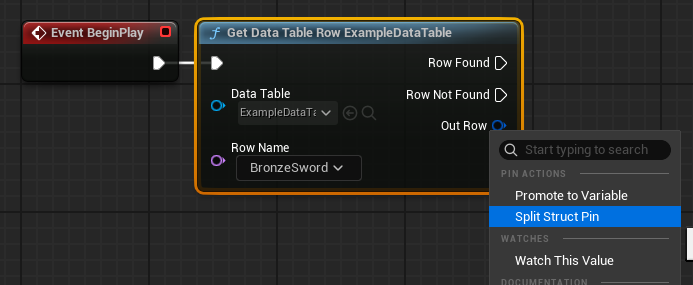
Get Data Table Rownode has two execution output pins:Row FoundandRow Not Found. This allows for robust error handling. If the specified row name exists, execution proceeds viaRow Found, and the "Out Row" pin will contain the data. If not,Row Not Foundexecutes, and "Out Row" will be invalid. - Splitting the Struct: The "Out Row" pin outputs the entire Struct (
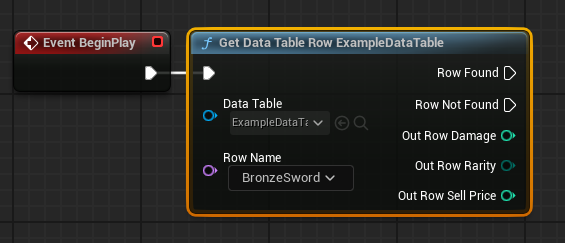
F_ItemData) for the retrieved row. To access individual data points (e.g.,Damage,Rarity,SellPrice), right-click on the "Out Row" pin and select "Split Struct Pin." This will expand the pin into its constituent variables, allowing you to connect them to other nodes (e.g., aPrint Stringnode for debugging, or directly to gameplay logic).
This method is ideal for scenarios where you need specific data for a known item, such as when a player equips a "BronzeSword" and you need to apply its Damage value to their stats.
Looping Over Data Table Rows: Dynamic Content Generation
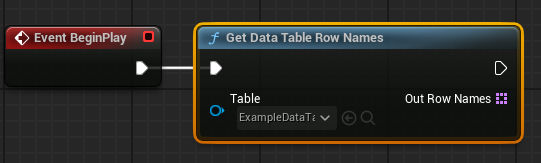
Often, developers need to process all or multiple entries within a Data Table, rather than just a single, known row. This is common for tasks like populating an in-game shop, generating a list of available quests, or validating data entries.
- Getting All Row Names: First, use the
Get Data Table Row Namesnode. This node requires a Data Table reference and outputs an array of allRow Names(FNames) present in the specified table. - Iterating with
For Each Loop: Connect the output array fromGet Data Table Row Namesto the "Array" input of aFor Each Loopnode. This loop will execute its "Loop Body" once for each row name in the array. - Retrieving Data within the Loop: Inside the
For Each Loop, connect the "Array Element" (which will be the currentRow Namein the iteration) to the "Row Name" input of aGet Data Table Rownode. - Processing Data: From the
Get Data Table Rownode’s "Out Row" (split into its individual pins), you can then access and utilize the data for each item within the loop. For example, you could dynamically create UI elements for each item in an inventory, display their stats, or perform calculations based on their properties.
This looping mechanism provides immense flexibility for dynamic content generation and processing, allowing games to scale gracefully as new content is added to Data Tables.
Broader Implications and Best Practices for Unreal Engine Development
The strategic adoption of Data Tables within Unreal Engine 5 projects offers far-reaching benefits beyond simple data storage:
- Enhanced Collaboration: Data Tables establish a clear division of labor. Programmers define the
struct(the data schema), while designers populate the tables with actual content. This separation minimizes dependencies, allowing different team members to work concurrently without stepping on each other’s toes. - Rapid Prototyping and Iteration: The ability to modify game data directly within the editor empowers designers to quickly test and balance gameplay elements. This iterative feedback loop is crucial for refining game mechanics and accelerating the development cycle.
- Scalability and Maintainability: As projects grow in complexity, Data Tables ensure that data remains organized and manageable. Adding new items, enemies, or quests simply involves adding new rows to the appropriate table, rather than modifying extensive code or creating new individual assets. Updates and bug fixes become localized to the data itself, simplifying maintenance.
- Localization Efficiency: Data Tables are exceptionally well-suited for managing localized text. A single table can hold all game text, with columns for different languages, making it simple to switch between languages at runtime and manage translation efforts.
- Performance Considerations: While Data Tables are highly efficient for data retrieval, developers should be mindful of performance when looping over extremely large tables (thousands of rows) on a per-frame basis. For most typical game data, however, their performance impact is negligible.
- Version Control Integration: As assets, Data Tables integrate seamlessly with standard version control systems (e.g., Perforce, Git), allowing teams to track changes, revert to previous versions, and resolve conflicts effectively.
Conclusion
Unreal Engine 5’s Data Tables represent a cornerstone of efficient and scalable game development. By providing a structured, accessible, and designer-friendly method for managing game data, they empower development teams to create richer, more dynamic experiences with greater agility. From defining item rarities and crafting complex character statistics to streamlining localization efforts and facilitating collaborative content creation, Data Tables are an indispensable tool in the modern game developer’s arsenal. Mastering their creation, configuration, population, and implementation is not merely a technical skill but a strategic advantage, laying the groundwork for robust, flexible, and content-rich interactive experiences.
About the Author