Setting up a dedicated server for games developed with Unreal Engine 5 (UE5) represents a critical milestone for studios aiming to deliver robust and scalable multiplayer experiences. This comprehensive guide outlines the essential steps and considerations for building and configuring a dedicated server, transforming a local multiplayer project into a globally accessible, high-performance gaming environment. This process is fundamental for ensuring optimal gameplay, enhanced security, and consistent reliability, moving beyond the inherent limitations of peer-to-peer (P2P) hosting models.
The landscape of multiplayer gaming has evolved significantly, with player expectations for seamless, lag-free interactions at an all-time high. While early online games often relied on P2P connections, where one player’s machine acted as the host, this approach introduced vulnerabilities such as host advantage, susceptibility to cheating, and performance bottlenecks tied directly to the host’s internet connection and hardware. The shift towards dedicated servers addresses these challenges head-on, providing a neutral, powerful, and persistent environment for game sessions. This centralized infrastructure ensures that game logic, physics, and world state are processed independently of any individual player’s device, leading to a fairer, more stable, and ultimately more enjoyable experience for all participants.
The Strategic Imperative of Dedicated Servers
For developers of competitive shooters, sprawling cooperative survival games, or expansive social sandboxes, a dedicated server is not merely a technical choice but a strategic imperative. The benefits are manifold:
- Performance and Latency: Dedicated servers, typically hosted in professional data centers with high-bandwidth connections, significantly reduce latency and provide consistent server tick rates. This ensures that game state updates are synchronized efficiently across all clients, crucial for fast-paced action and precise hit detection. According to industry reports, games leveraging dedicated servers often report an average latency reduction of 20-50ms compared to P2P models in geographically diverse player bases, translating directly to a smoother gameplay experience.
- Security and Anti-Cheat: By centralizing game logic on a trusted server, developers gain a robust defense against common cheating methods. The server acts as the authoritative source of truth, validating player actions and detecting anomalies that might indicate tampering. This is particularly vital in esports and competitive titles, where integrity is paramount.
- Reliability and Uptime: A dedicated server can run 24/7, independent of player presence, allowing for persistent game worlds and uninterrupted access. This contrasts sharply with P2P, where the game session ends if the host disconnects. This continuous availability fosters stronger communities and supports dynamic, evolving game content.
- Scalability: Dedicated servers offer superior scalability, allowing developers to easily provision additional server instances to accommodate fluctuating player numbers. Cloud hosting solutions further amplify this capability, enabling dynamic scaling based on demand, which is a critical consideration for games expecting large player bases or experiencing viral growth.
The global multiplayer gaming market is projected to reach over $300 billion by 2027, underscoring the immense demand for high-quality online experiences. This growth is heavily reliant on the underlying technical infrastructure that supports these games, with dedicated servers forming the backbone for a significant portion of successful titles. Epic Games, through Unreal Engine 5, continues to refine its tools to empower developers to meet these exacting standards.
Prerequisites for Server Development in UE5
Before embarking on the dedicated server build process, several foundational elements must be in place to ensure a smooth development workflow:
- A Working Multiplayer Unreal Engine 5 Project: The core game project must already be configured for multiplayer functionality, meaning characters, replication, and basic networking are established. This guide builds upon an existing multiplayer framework, often developed using Epic Games’ own multiplayer session guidelines or community-driven solutions.
- Unreal Engine Built from Source: Crucially, a dedicated server cannot be built using the version of Unreal Engine downloaded directly from the Epic Games Launcher. Developers must have a version of UE5 compiled from its source code. This is because the source build provides access to specific server-only modules and build configurations that are omitted from the client-focused launcher version to optimize download size and general user experience. Accessing the Unreal Engine source code typically involves connecting an Epic Games account to a GitHub account, then cloning the repository and compiling the engine locally. This step, while requiring additional setup time, grants unparalleled control and flexibility over the engine’s capabilities, which is essential for server deployments.
- AdvancedSessions Plugin: For seamless session management and discovery, particularly across different platforms and with robust features, the AdvancedSessions plugin is highly recommended. This community-developed plugin simplifies the complexities of creating, finding, and joining game sessions, offering an enhanced abstraction layer over UE5’s native online subsystem interfaces. Without it, implementing a functional session browser for dedicated servers can be significantly more challenging. Ensuring this plugin is correctly integrated into your project is paramount for server visibility to clients.
Adapting Game Logic for Dedicated Server Operations
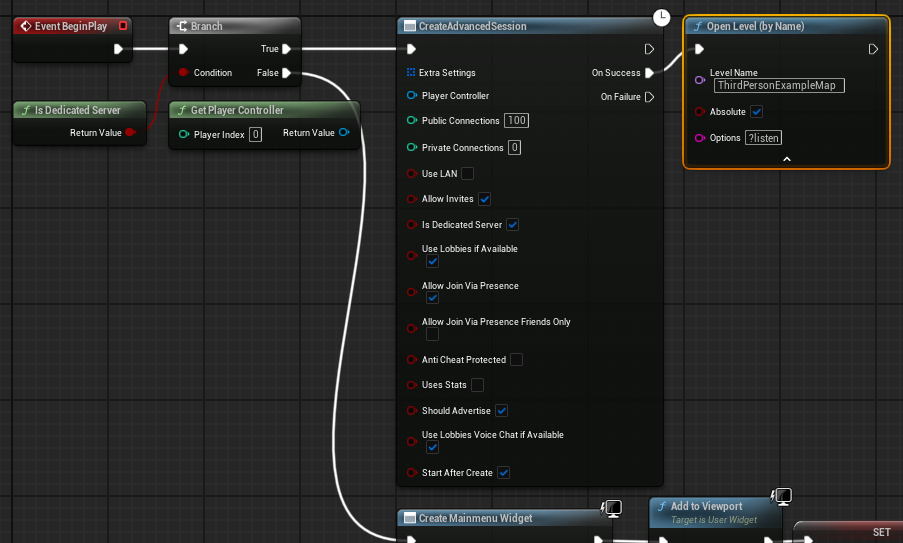
The transition from a listen server (where a player’s client also acts as the host) to a dedicated server requires specific adjustments to the game’s initial logic. The primary goal is to ensure the dedicated server initializes correctly, creates a game session, and loads the appropriate map without attempting to render graphics or spawn player characters.
Automatic Session Creation and Map Loading:
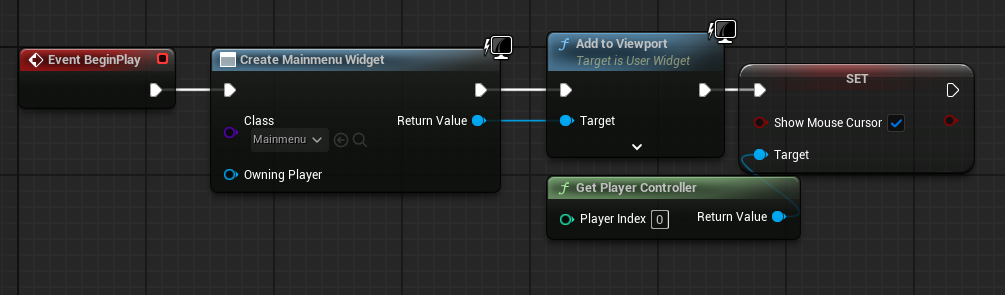
In a typical UE5 multiplayer project, the main menu level often handles widget creation and player input for joining or hosting games. For a dedicated server, this client-side menu logic is entirely irrelevant. The server needs to bypass all UI elements and immediately establish a game session.
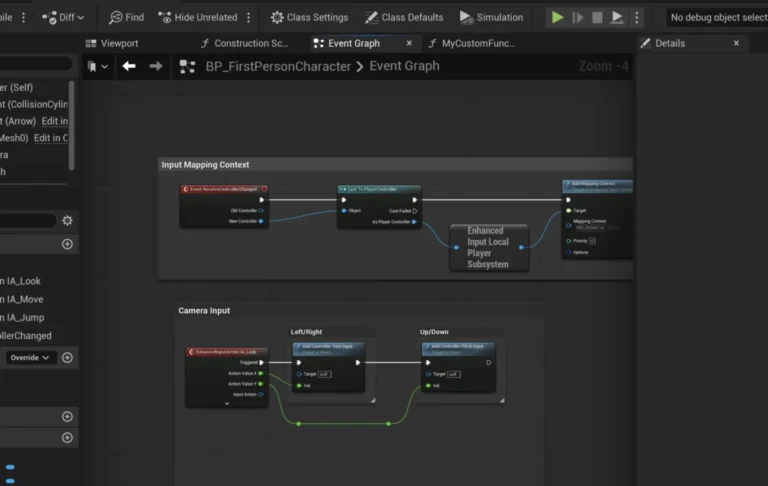
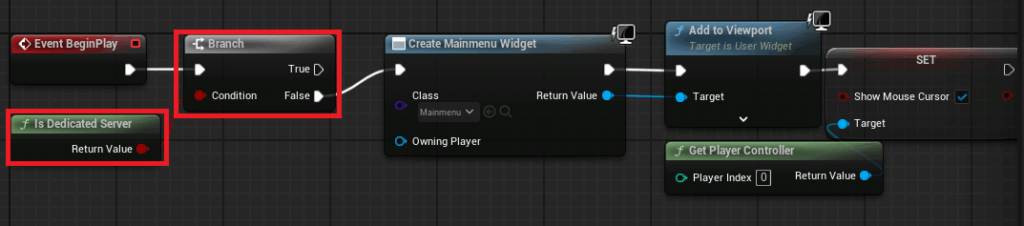
This is achieved by introducing a conditional check within the main menu level blueprint (or an equivalent initialization point). A Is Dedicated Server node in Unreal Engine’s Blueprint system evaluates to true if the current executable is running as a dedicated server instance.
- Logic Branch: A
Branchnode is used. IfIs Dedicated Serveris False, the standard client-side menu widget creation and display flow proceeds. - Dedicated Server Path: If
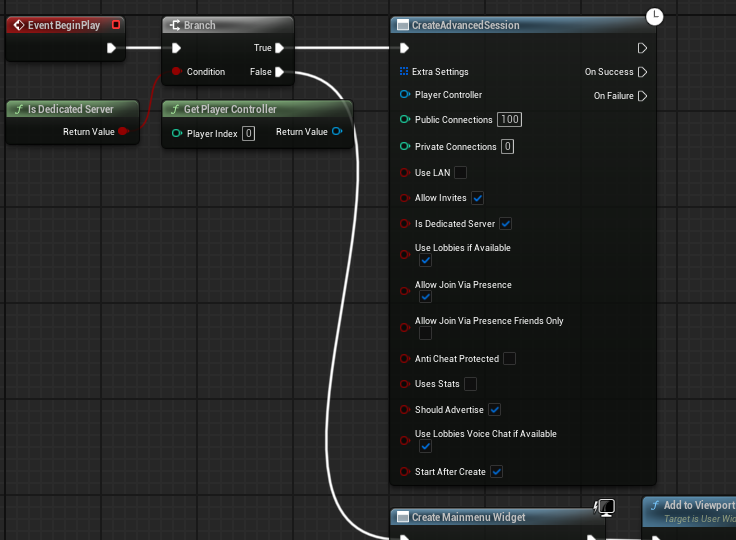
Is Dedicated Serveris True, the logic diverges. Instead of displaying a menu, the server directly executes aCreate Advanced Sessionnode (from the AdvancedSessions plugin). This node is configured with desired session parameters such as max players, public visibility, and game type. - Level Loading: Upon successful session creation, the server then loads the primary game map using an
Open Levelnode. Crucially, the level name must be appended with the?listenoption (e.g.,/Game/Maps/MyGameMap?listen). This command-line argument instructs the engine to open the map in a listening state, ready to accept incoming client connections. This sequence ensures that the dedicated server boots up, registers itself with the online subsystem, and prepares the game world for players without any unnecessary graphical overhead.
Configuring the Default Server Map:
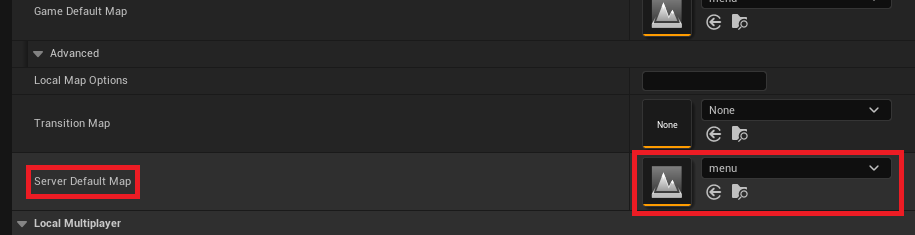
By default, an Unreal Engine dedicated server often loads an internal engine map called "Entry." This is not suitable for a production game. The default server map must be explicitly set to the intended game level.
This configuration is performed within the Unreal Editor’s Project Settings:
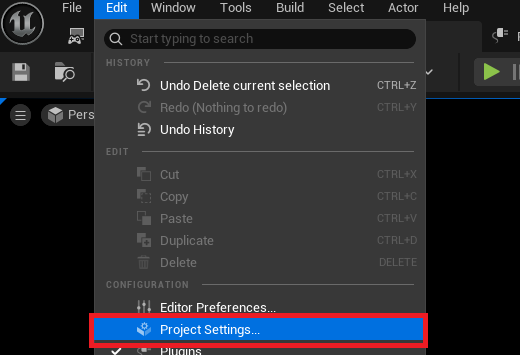
- Navigate to Edit > Project Settings.
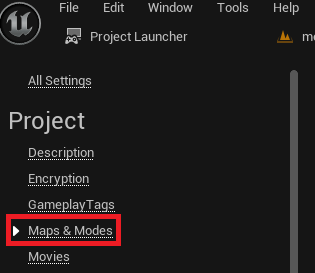
- In the left-hand menu, select Maps & Modes.
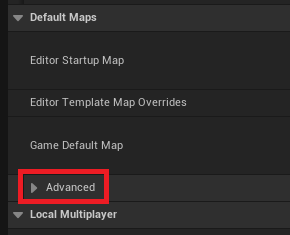
- Under the "Default Maps" section, expand the Advanced dropdown.
- Locate the Server Default Map option and set it to the full path of your desired game map (e.g.,
/Game/Maps/MyGameMap). This ensures that when the dedicated server executable is launched, it immediately loads the correct game environment.
Eliminating Default Character Spawns:
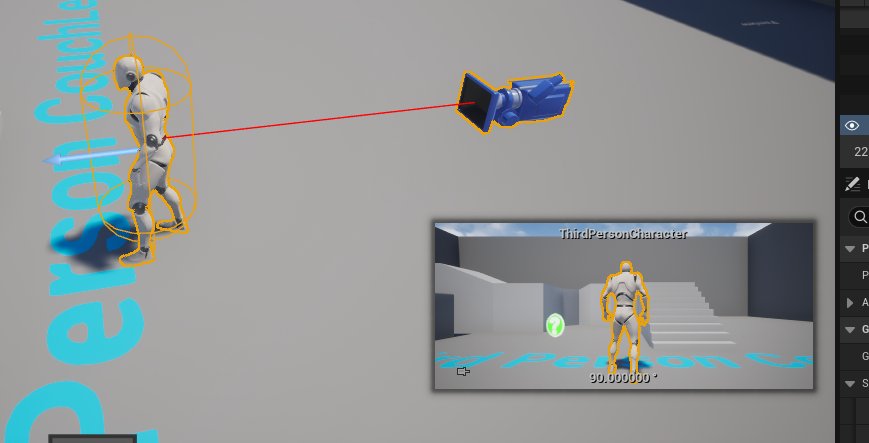
Dedicated servers do not host a local player character; they merely manage the game world and replicate its state to connected clients. If the game level blueprint or game mode is configured to automatically spawn a default player character or pawn for the "authority" (server host), this will result in an unnecessary, unpossessed character occupying the game world. To prevent this, developers should review their level blueprints and game modes to ensure that character spawning logic is either conditionally executed (e.g., only for listen servers or clients) or removed entirely for dedicated server builds. Often, simply deleting any default character blueprints placed directly in the level is sufficient.
Building the Dedicated Server with the Project Launcher
Unreal Engine’s Project Launcher is a powerful built-in tool designed to streamline the packaging, cooking, and deployment of game builds. It allows developers to create custom profiles that define specific build configurations, making it indispensable for generating dedicated server executables.

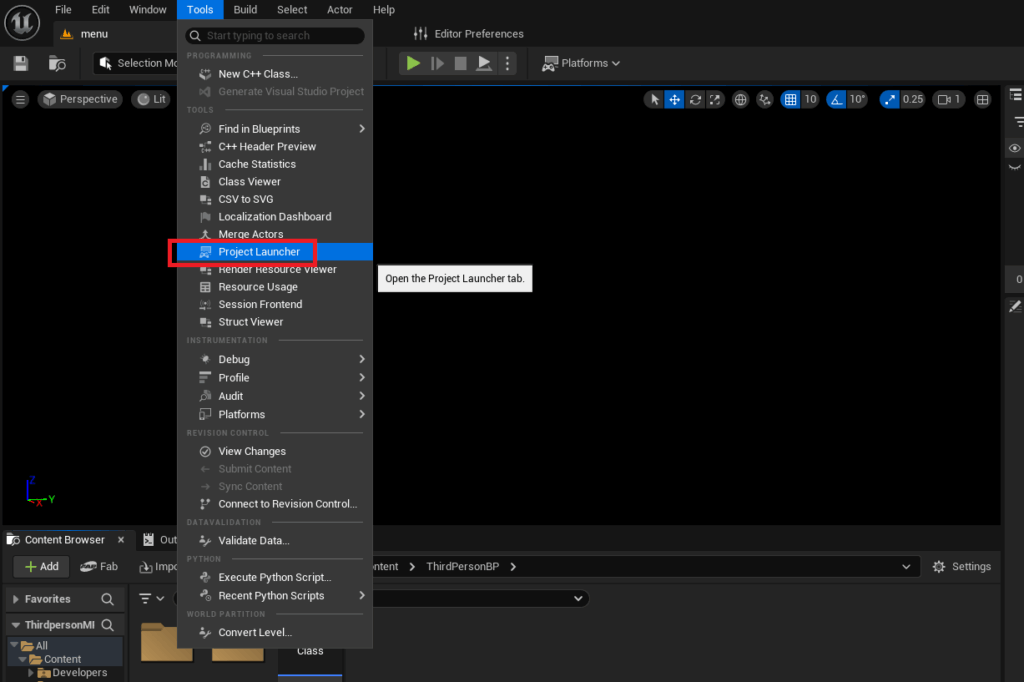
To access the Project Launcher:
- In the Unreal Editor, navigate to Tools > Project Launcher.
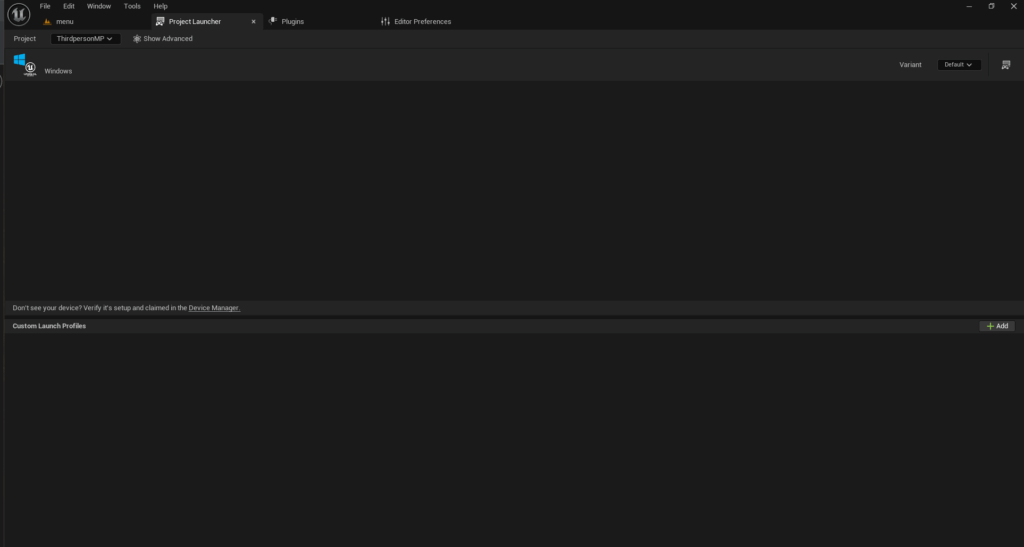
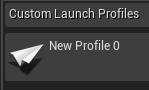
The Project Launcher interface initially appears empty, awaiting the creation of custom profiles.
Creating a Custom Launch Profile for the Dedicated Server:
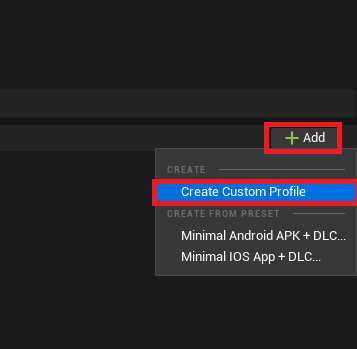
- Click the Add button in the bottom right, then select Create Custom Profile.
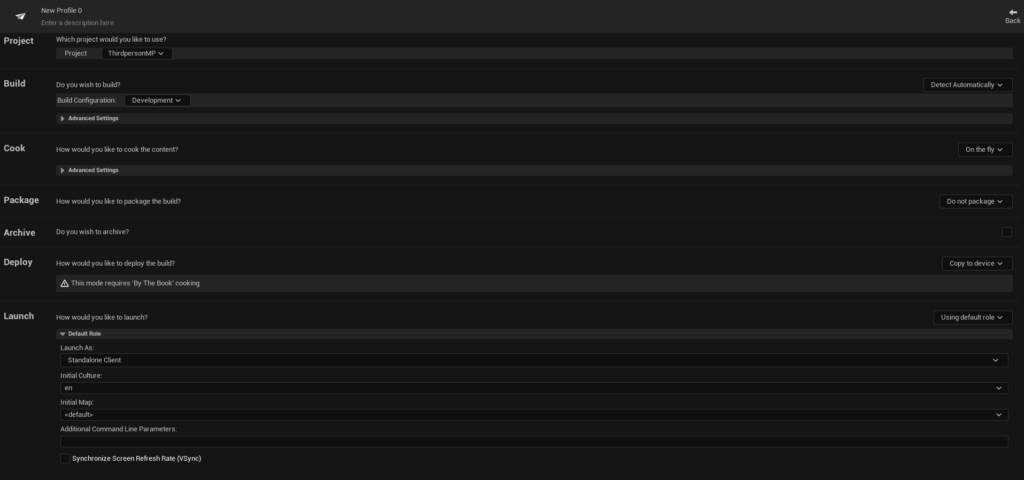
- A detailed menu of options will appear, allowing for granular control over the build process.
Key settings within the custom profile include:
- Cook Section:
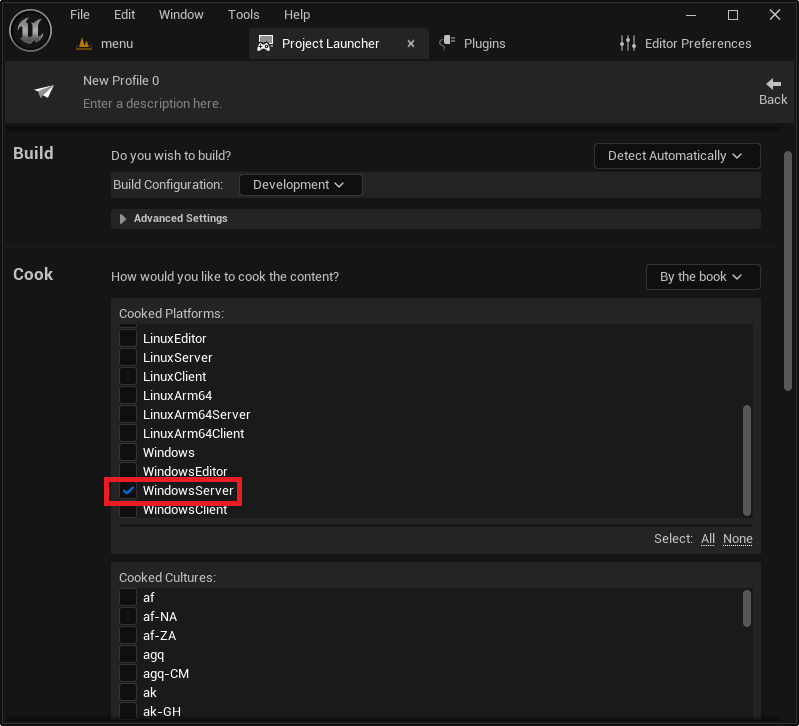
- Change the "Cook" option from "On the fly" to "By the book." This ensures that all necessary assets are pre-cooked and packaged into the build, rather than being cooked dynamically at runtime.
- Cooked Platforms:
- Scroll down and enable the specific server platform. For Windows-based servers, select "WindowsServer." Developers targeting Linux environments would choose "LinuxServer" (for x86/64 architectures) or "LinuxArm64" (for ARM-based systems, such as specific cloud instances or embedded devices). Choosing the correct platform is crucial for compatibility with your intended deployment environment.
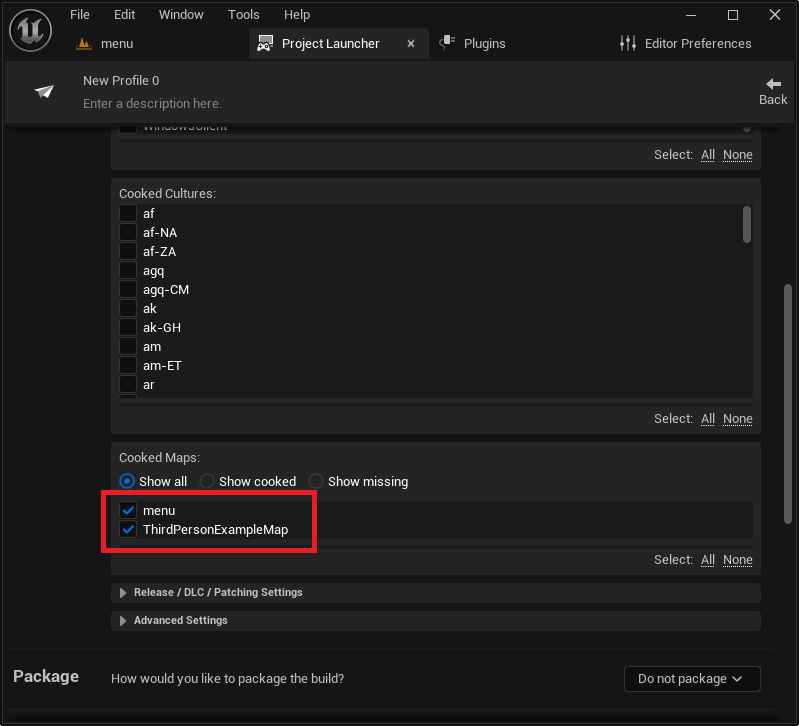
- Cooked Maps:
- Select all the game maps that need to be included in the server build. This typically includes the main game levels and any sub-levels that the server might need to load during gameplay.
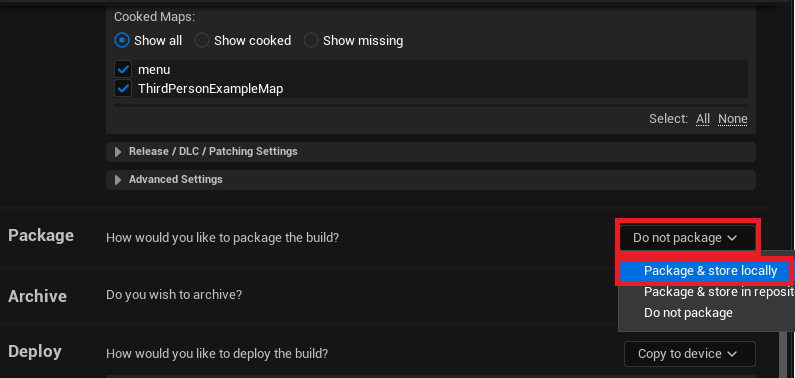
- Package Section:
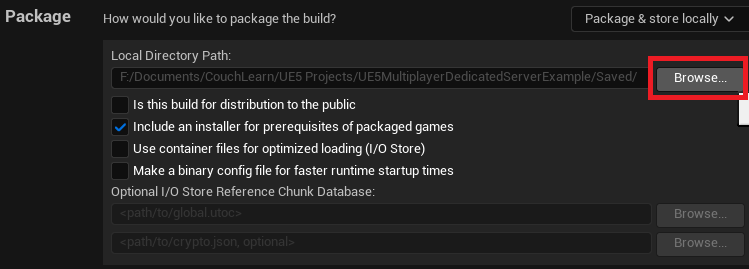
- Change the "Package" option from "Do not package" to "Package & store locally." This instructs the Project Launcher to create a self-contained game package.
- A default output path within your project’s
Saved/StagedBuildsdirectory will be generated. This path can be customized using the "Browse" button to a preferred location.
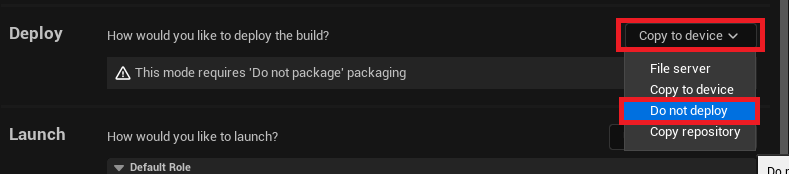
- Deploy Section:
- Change the "Deploy" option from "Copy to device" to "Do not deploy." For dedicated servers, the build is typically deployed manually or through automated CI/CD pipelines to a server environment, so direct deployment from the editor is usually unnecessary.
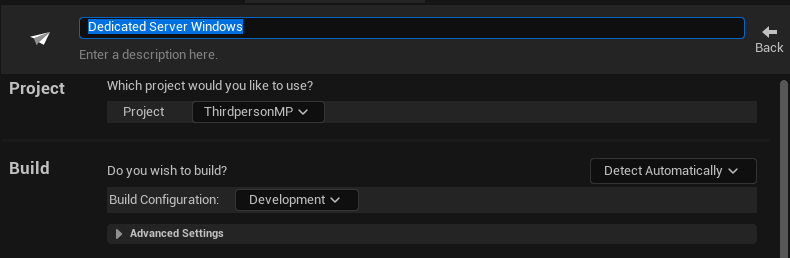
- Profile Name: Assign a clear, descriptive name to the custom profile (e.g., "Windows Dedicated Server Build") for easy identification.
Initiating the Server Build:
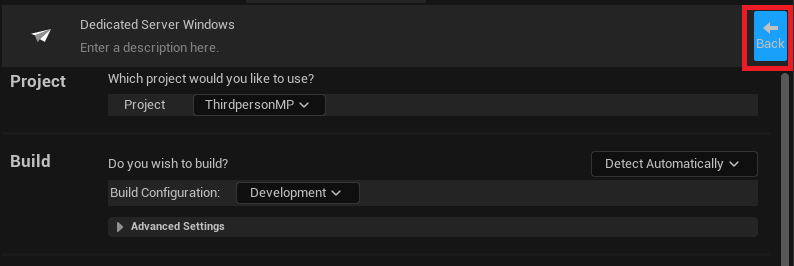
- After configuring the profile, click the Back button to return to the main Project Launcher menu.
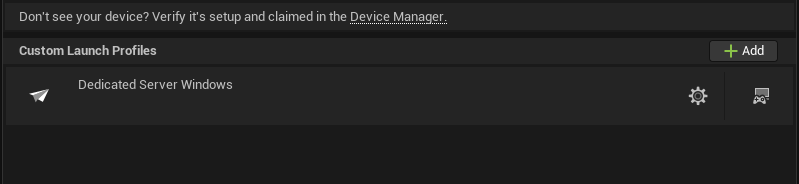
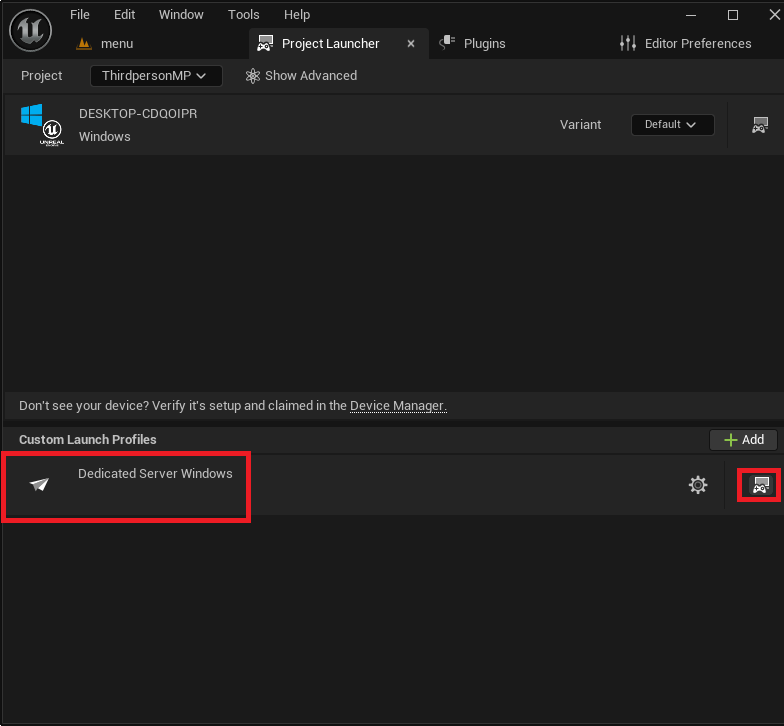
- The newly created custom profile will now be visible in the list. To start the build process, click the Launch button (represented by a controller and display icon) next to your profile.
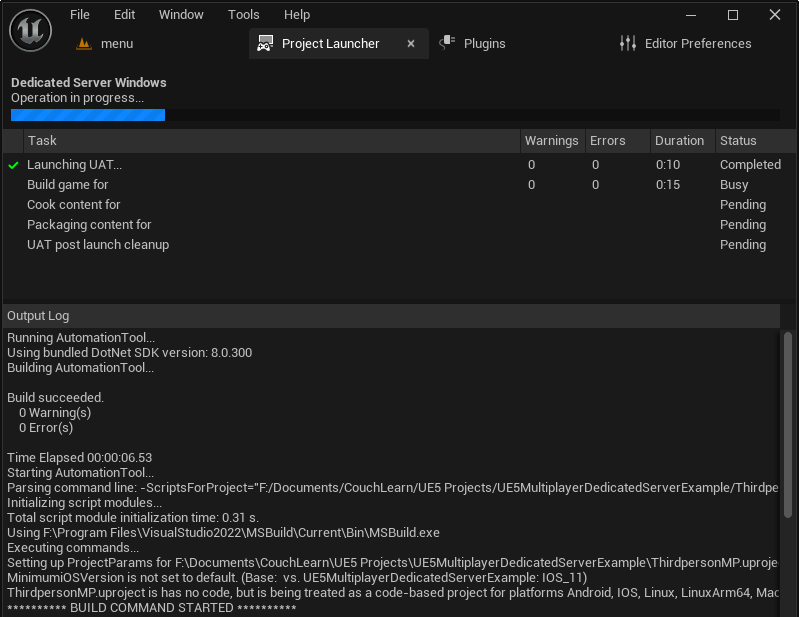
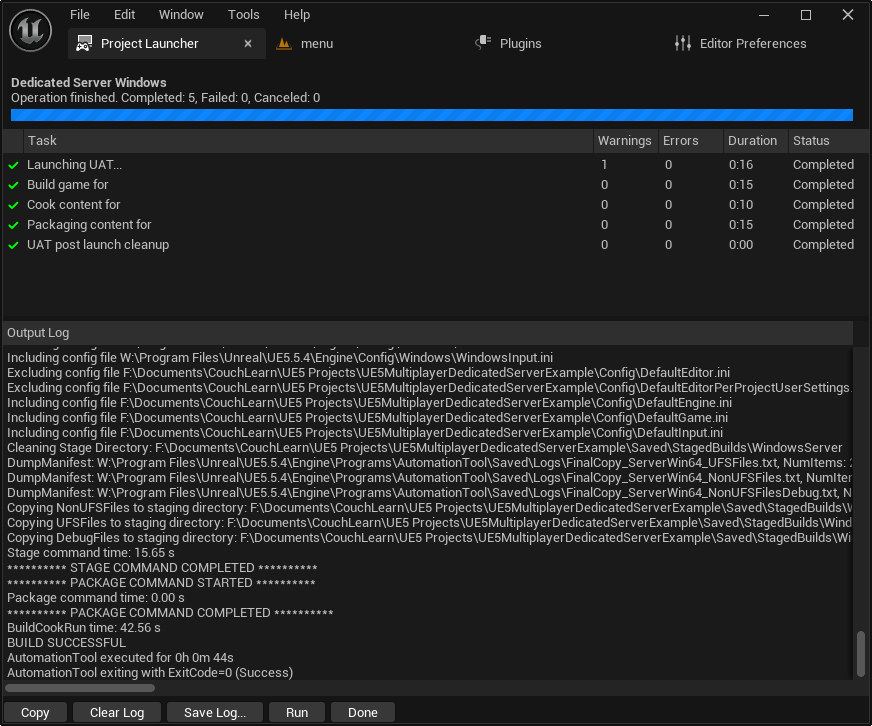
The Project Launcher will display a log window showing the progress of the cooking and packaging process. This can be time-consuming, especially for the initial build, as it involves compiling code, cooking assets, and staging all necessary files. It is crucial to allow this process to complete fully without interruption. A successful build will show "Success" messages for each task.
Testing the Dedicated Server Locally
Once the build process is complete, the dedicated server executable will be located in the specified output directory, typically [YourProjectFolder]/Saved/StagedBuilds/[PlatformName] (e.g., WindowsServer). Inside, you will find a folder named after your project, containing the server executable (e.g., MyGameServer.exe).
Launching and Monitoring the Server:
By default, launching MyGameServer.exe might run it silently in the background, making it difficult to monitor or close. To facilitate local testing and debugging:
- Create a Shortcut: Right-click on the server executable (
MyGameServer.exe) and select "Create shortcut." - Add Launch Argument: Right-click on the newly created shortcut, select "Properties," and navigate to the "Shortcut" tab. In the "Target" field, append
-logto the end of the existing path (e.g.,"C:PathToMyGameSavedStagedBuildsWindowsServerMyGameBinariesWin64MyGameServer.exe" -log). - Launch the Shortcut: Double-click the modified shortcut. This will open a console window displaying real-time logging messages from the server, providing valuable insights into its initialization, session creation, and client connection attempts.
The console window will fill with text indicating the server’s progress: initializing the engine, loading the default server map, creating the advanced session, and finally listening for connections. Once the session is active, clients (launched either from the Unreal Editor as separate instances or as packaged client builds) should be able to discover and connect to this local dedicated server.
Demonstration and Implications
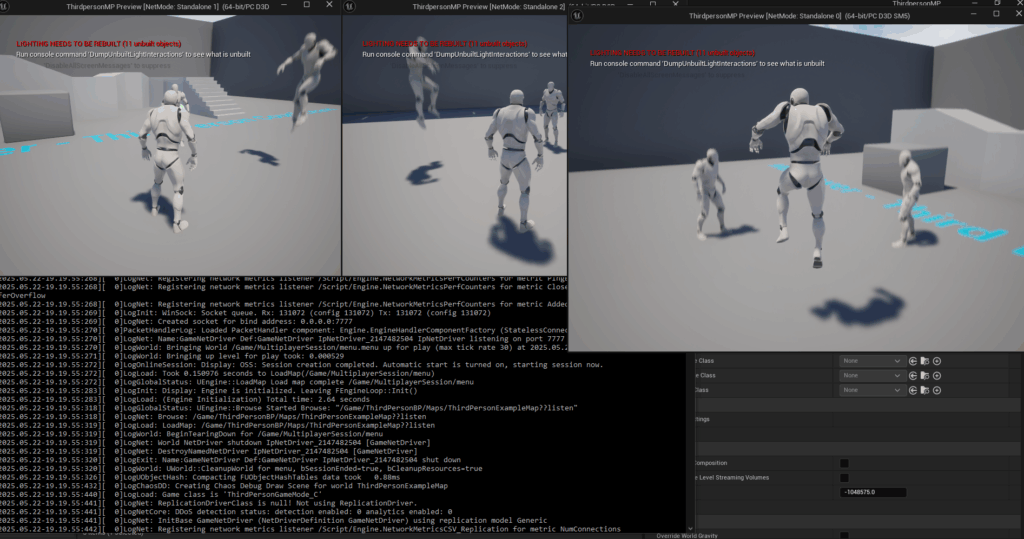
With the dedicated server running locally, launching multiple client instances (e.g., three clients within the editor) and having them connect to the server demonstrates the core functionality. Players on these clients will be able to interact within the game world, their actions replicated and synchronized by the central server, without any single client bearing the burden of hosting the game logic. This real-time interaction, free from the inconsistencies of P2P, underscores the value of dedicated server architecture.
The successful implementation of a dedicated server in Unreal Engine 5 empowers developers to deliver high-quality, scalable multiplayer experiences that meet modern player expectations. This foundational knowledge is crucial for aspiring and established game studios alike, enabling them to build games that not only perform well but also foster thriving, secure, and reliable online communities. The capabilities provided by Unreal Engine, coupled with strategic server architecture, are instrumental in shaping the future of interactive entertainment. Further steps for deployment would involve considerations for cloud hosting, port forwarding configurations, and continuous integration/continuous deployment (CI/CD) pipelines for efficient updates and scaling in a production environment.
About the Author