Setting up a dedicated server for an Unreal Engine 5 (UE5) game is a foundational step for any developer aiming to deliver a robust, scalable, and fair multiplayer experience. In an era where online connectivity and competitive integrity are paramount, relying on a centralized, authoritative server instance ensures optimal performance, heightened security, and unwavering reliability, fundamentally transforming the player experience from a potentially chaotic peer-to-peer (P2P) environment to a professional, controlled ecosystem. This comprehensive guide details the process of building and configuring a dedicated server for Unreal Engine 5 projects, covering everything from initial project preparations and critical engine settings to the compilation process and local testing, empowering developers to support multiplayer gameplay at scale.
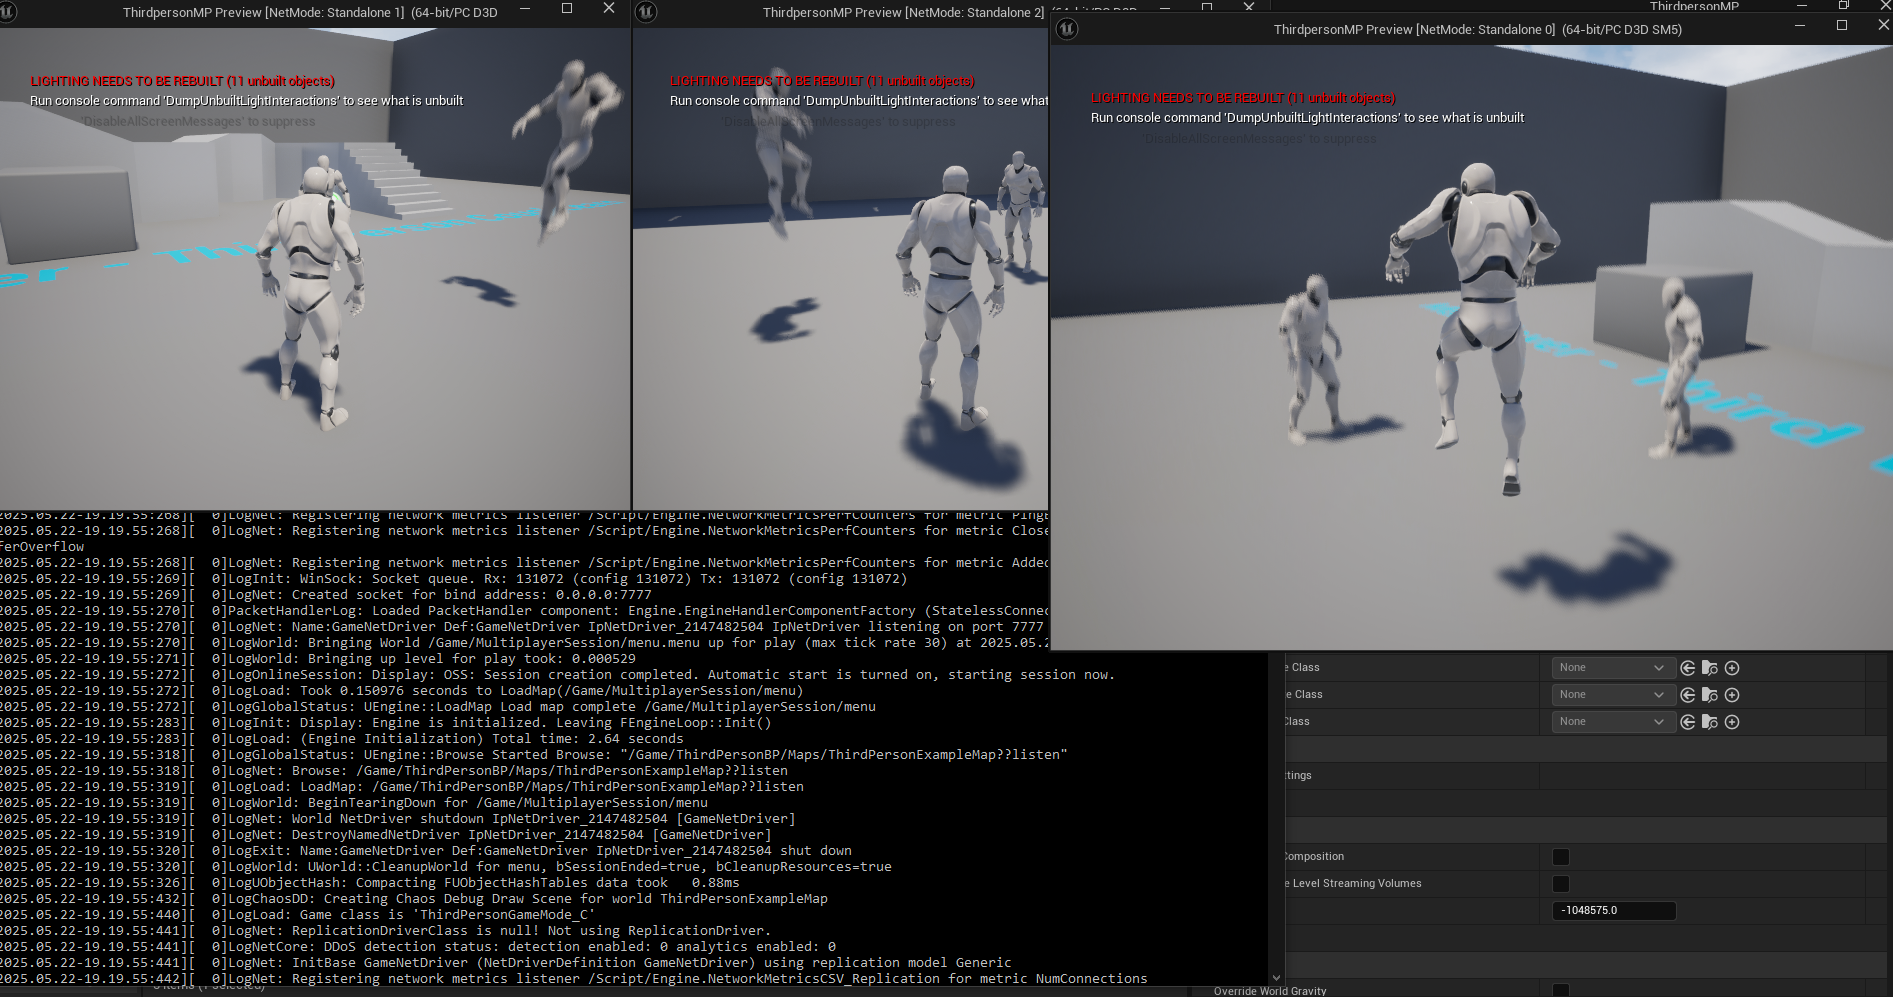
The Evolution of Multiplayer Hosting: Why Dedicated Servers Prevail
The landscape of multiplayer gaming has evolved significantly, driven by technological advancements and rising player expectations. Early online games often relied on peer-to-peer (P2P) hosting, a model where one player’s machine acts as the server, and others connect directly to it. While cost-effective and relatively simple to implement for small-scale games (typically 2-16 players), P2P hosting comes with inherent limitations that are increasingly unacceptable in modern gaming.
One of the most significant drawbacks of P2P is the "host advantage." The player hosting the game experiences minimal latency to their own machine, often leading to unfair advantages in fast-paced competitive genres like first-person shooters or fighting games. Furthermore, P2P networks are highly susceptible to cheating, as malicious players can manipulate game data on their local machine, directly impacting the integrity of the match for everyone else. Network instability is another major concern; if the host’s internet connection falters or they disconnect, the entire game session can suffer from severe lag spikes or terminate abruptly, leading to frustrating player experiences. The host’s hardware limitations also cap the potential player count and the complexity of the game world, making large-scale battles or persistent online worlds unfeasible. According to recent industry analyses, over 70% of top-grossing multiplayer titles utilize dedicated servers, reflecting a clear industry standard for quality and performance.
Dedicated servers address these critical issues by providing a centralized, independent game instance that runs on specialized hardware, often hosted in data centers with high-bandwidth internet connections. This server is authoritative, meaning it processes all game logic, validates player actions, and maintains a consistent game state for every connected client. This eliminates host advantage, significantly reduces opportunities for client-side cheating, and provides a stable, reliable connection for all players regardless of their individual network conditions (within reasonable latency bounds). For genres like competitive shooters, cooperative survival experiences, or expansive social sandboxes, a dedicated server is not merely an option but a necessity to ensure a fair, performant, and enjoyable experience for a large player base. The investment in dedicated server infrastructure often translates directly into higher player retention and a more positive brand reputation.
Unreal Engine 5: A Powerful Foundation for Online Experiences
Unreal Engine 5, with its cutting-edge rendering technologies like Nanite and Lumen, and its expansive world-building capabilities through World Partition, provides a robust foundation for creating visually stunning and technically ambitious games. Crucially, Epic Games has also invested heavily in the engine’s networking architecture, offering developers powerful tools to build complex and scalable online experiences. This commitment ensures that games built on UE5 can leverage state-of-the-art server infrastructure to deliver seamless multiplayer gameplay.
The engine’s networking framework allows for fine-grained control over replication, prediction, and server-side logic, giving developers the flexibility to optimize their game’s network performance. Furthermore, the Unreal Engine ecosystem benefits from a vibrant community and a wealth of plugins that extend its capabilities. For instance, the AdvancedSessions plugin, frequently used in UE5 multiplayer projects, streamlines session management, enabling robust features like session discovery, joining, and player enumeration, which are critical for any public-facing dedicated server. These tools collectively empower developers to craft sophisticated online interactions that meet the high standards of modern gamers.
Preparing for Dedicated Server Development: Essential Prerequisites
Before embarking on the dedicated server build process, several critical prerequisites must be met to ensure a smooth and successful deployment. These foundational steps are non-negotiable and lay the groundwork for a stable server environment.
Firstly, a working multiplayer Unreal Engine 5 project is indispensable. The game’s core logic, including player movement, interaction, and any networked gameplay features, must already be designed and implemented with multiplayer in mind. This means actors and components should be set up for replication, and game states should be synchronized across clients. Developers are often advised to follow comprehensive guides on Unreal Engine 5 Multiplayer Sessions to establish this baseline functionality.
Secondly, and crucially, developers must use a source build of Unreal Engine, not a version downloaded directly from the Epic Games Launcher. The launcher version of the engine typically does not include the necessary build targets and configurations required to compile a dedicated server executable. A source build, obtained from Epic Games’ GitHub repository, provides full access to the engine’s source code, allowing developers to compile custom configurations, including the specific server targets needed for dedicated server deployment. This involves a process of downloading the source, setting up the development environment (e.g., Visual Studio), and compiling the engine, which can be a time-consuming but essential initial step.
Finally, for optimal session management and discovery, the AdvancedSessions plugin is highly recommended, if not mandatory, for many projects. This third-party plugin significantly simplifies the complexities of creating, finding, and joining multiplayer sessions, especially when integrating with platform-specific online subsystems. Without it, the dedicated server might not correctly advertise its presence in session browsers, making it difficult for players to find and connect. Ensuring this plugin is installed and properly configured within the project is vital for the server to function as intended in a public multiplayer setting.
Architecting the Server: Core Project Configurations
Once the prerequisites are met, the next phase involves configuring the Unreal Engine 5 project itself to behave correctly when running as a dedicated server. This requires adjusting certain game logic and project settings to differentiate the server’s behavior from that of a standard client.
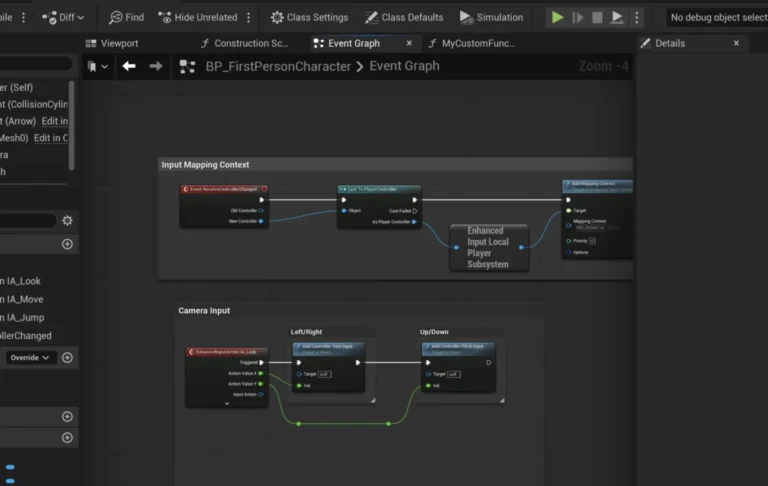
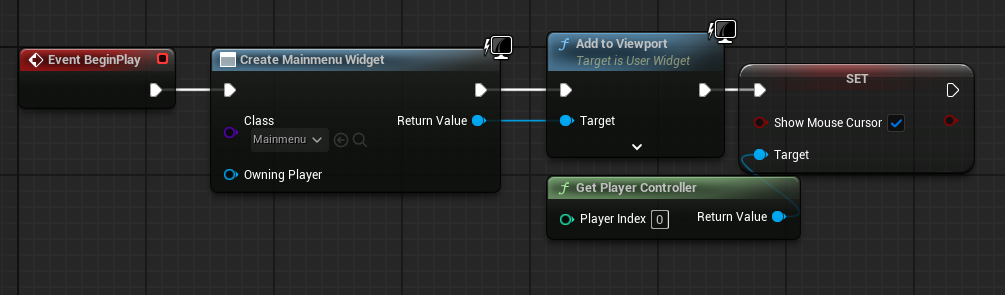
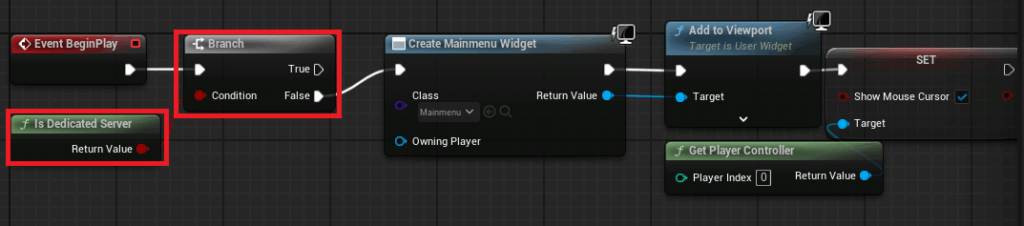
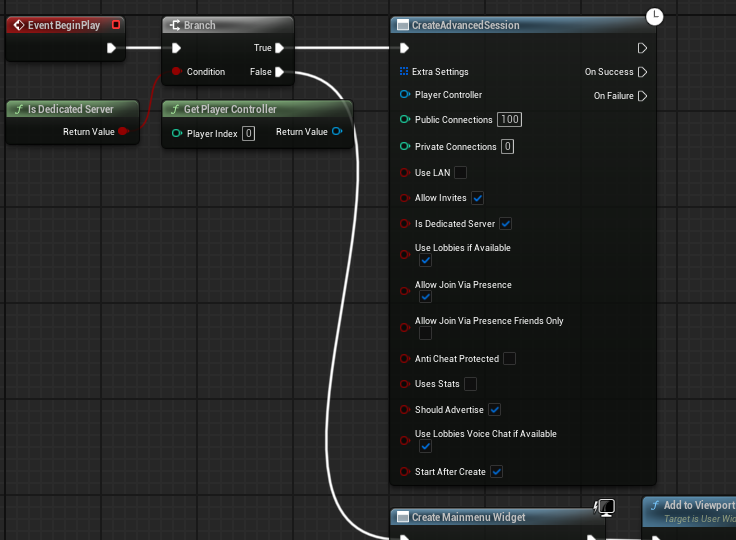
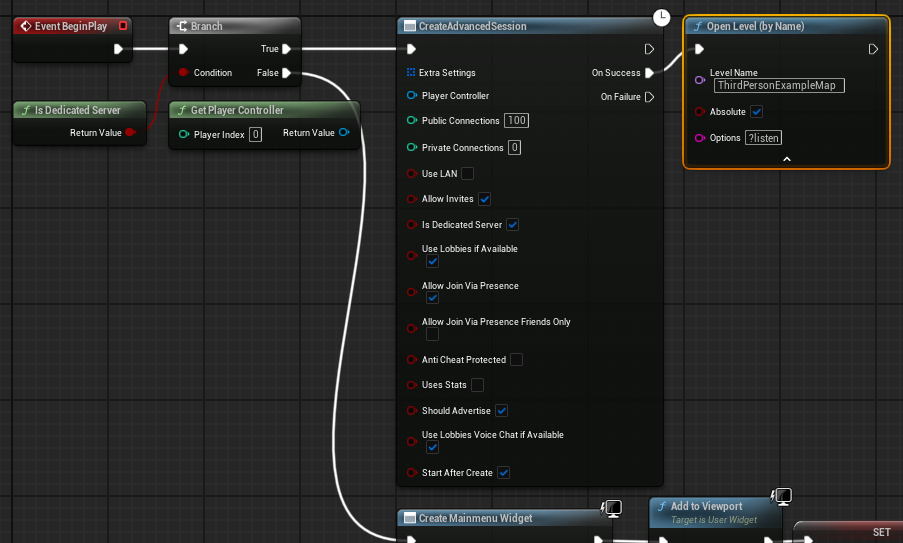
Automated Session Creation: A dedicated server operates autonomously, without player input or a graphical user interface. Therefore, it must automatically initialize and create a game session upon launch. This is typically handled within the game’s initial level blueprint, such as the Main Menu level. The core logic involves checking if the current instance is a dedicated server and, if so, bypassing client-specific UI elements and directly initiating a game session.
This is achieved by introducing a "Branch" node and an "Is Dedicated Server" node. When the "Is Dedicated Server" node returns True, the execution flow is diverted away from the UI creation logic (e.g., creating and adding the MainMenu widget to the viewport). Instead, on the True pin of the branch, a "Create Advanced Session" node is invoked. This node, provided by the AdvancedSessions plugin, handles the complexities of creating a multiplayer session with specified parameters such as maximum players, session name, and public/private visibility. Upon successful session creation, the server then loads the designated game map using an "Open Level" node, critically appending the "?listen" option to the map name (e.g., GameMap?listen). The ?listen parameter instructs the server to listen for incoming client connections on that specific map, effectively making it available for players to join. This ensures that when the dedicated server executable is run, it seamlessly transitions from initialization to hosting a playable game session.
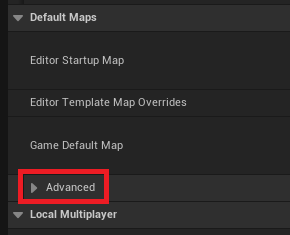
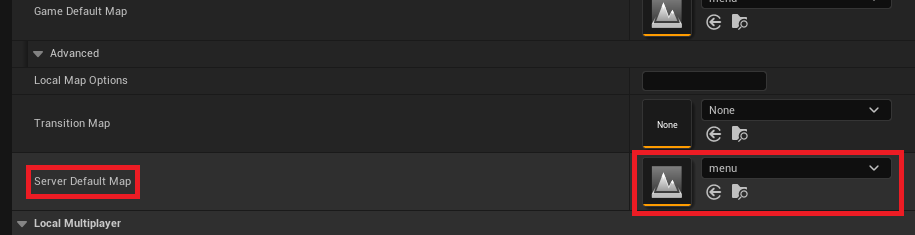
Choosing the Default Server Map: By default, an Unreal Engine build will often load into a generic engine map, sometimes named "Entry," which is unsuitable for a game server. To ensure the dedicated server loads the correct game world, developers must explicitly define the "Server Default Map" within the project settings.
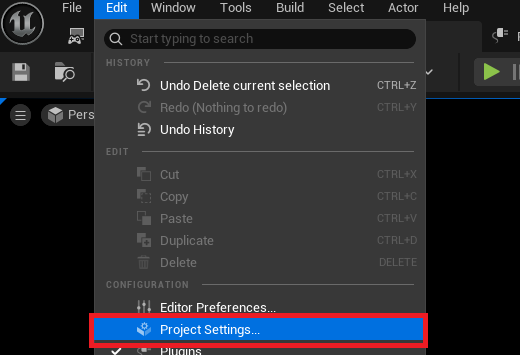
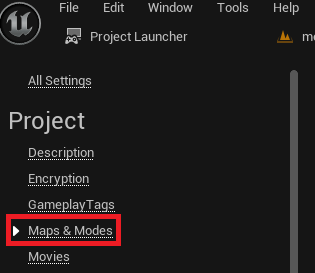
This configuration is accessed via the Unreal Editor’s "Edit" menu, then "Project Settings." Within the Project Settings, navigate to the "Maps & Modes" section. Under the "Default Maps" category, expand the "Advanced" dropdown options. Here, the "Server Default Map" setting can be found. Developers should select the desired starting map for their server from the available project maps. For instance, if the game’s lobby or primary gameplay map is named "GameLevel," this should be chosen. This ensures that upon launch, the dedicated server immediately loads into the intended environment, ready to host players, without requiring manual intervention or relying on incorrect defaults.
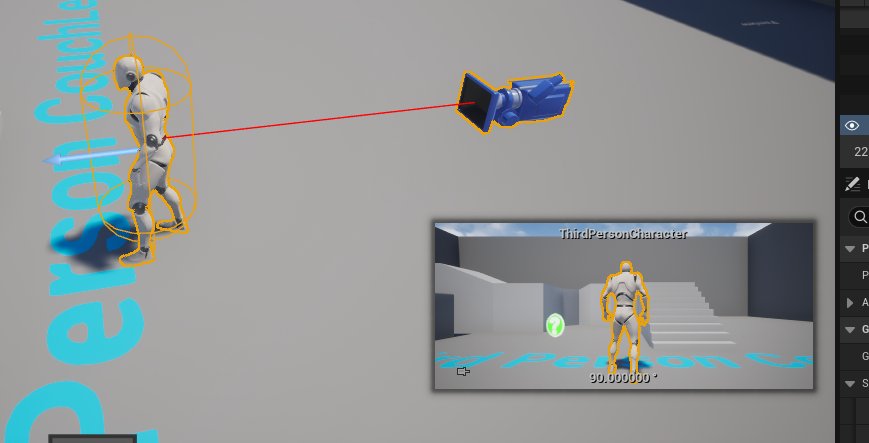
No Default Character in the Level: In many multiplayer game templates, the initial level might contain a default player character or a PlayerStart actor that automatically spawns a character for the host. When running a dedicated server, this is unnecessary and can consume valuable server resources or lead to unintended behavior. A dedicated server’s role is to manage the game world and network state, not to render or control a player character itself.
Therefore, it is best practice to remove any such default character blueprints or PlayerStart actors from the server’s default map, especially if that map is intended solely for server-side logic or a lobby state. This optimization ensures that the server’s resources are exclusively dedicated to processing game logic, networking, and maintaining the authoritative game state, without the overhead of rendering or simulating an unnecessary player character.
The Project Launcher: Streamlining the Build Process
With the project configured, the next phase is to compile the dedicated server executable. Unreal Engine provides a powerful built-in tool for this purpose: the Project Launcher. This utility allows developers to create custom build profiles, defining exactly how the game should be packaged and for which platforms.
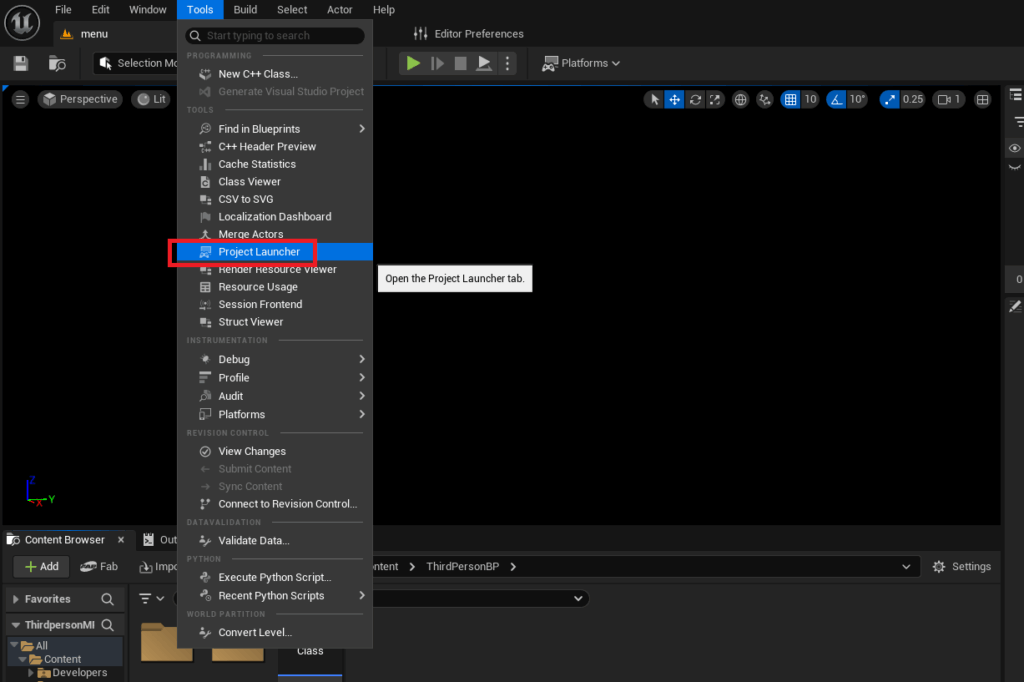
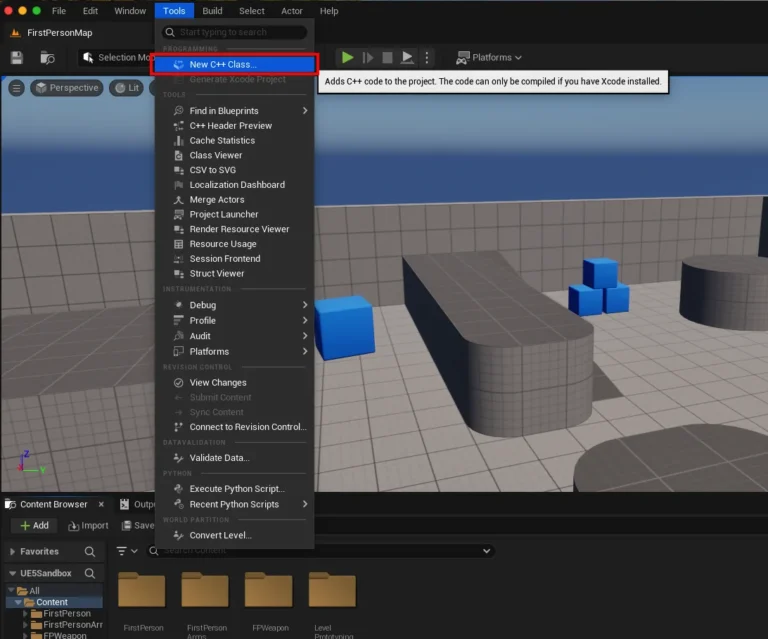
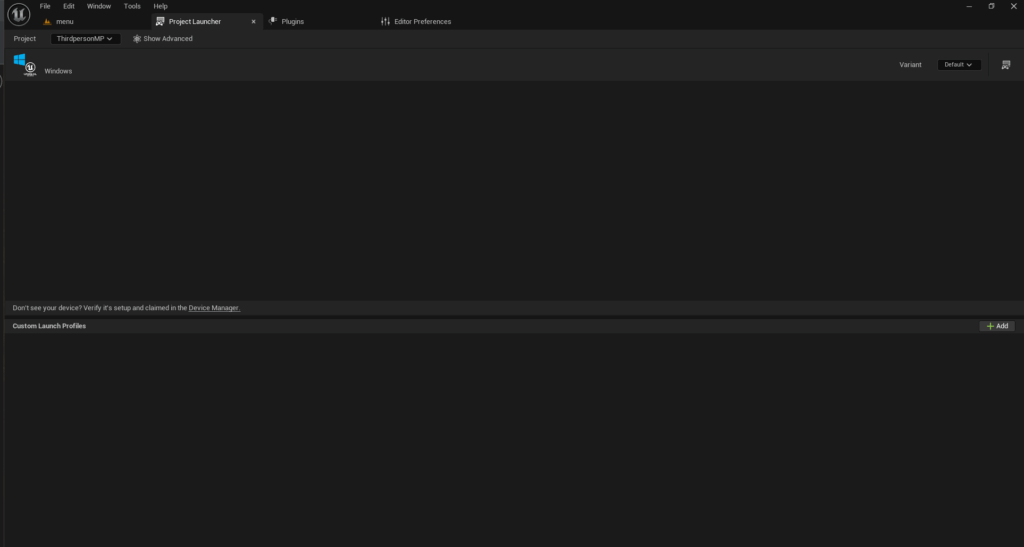
The Project Launcher can be accessed from the Unreal Editor by navigating to the "Tools" menu at the top of the editor window and selecting "Project Launcher" from the "Tools" section. Upon opening, the Project Launcher initially presents a blank interface, indicating no custom profiles have been created.
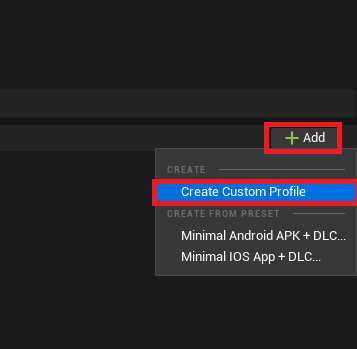
Creating the Custom Profile: To build a dedicated server, a custom profile must be created. This is initiated by clicking the "Add" button in the bottom right corner of the Project Launcher window, then selecting "Create Custom Profile." A comprehensive menu of options will then appear, allowing for granular control over the build process.
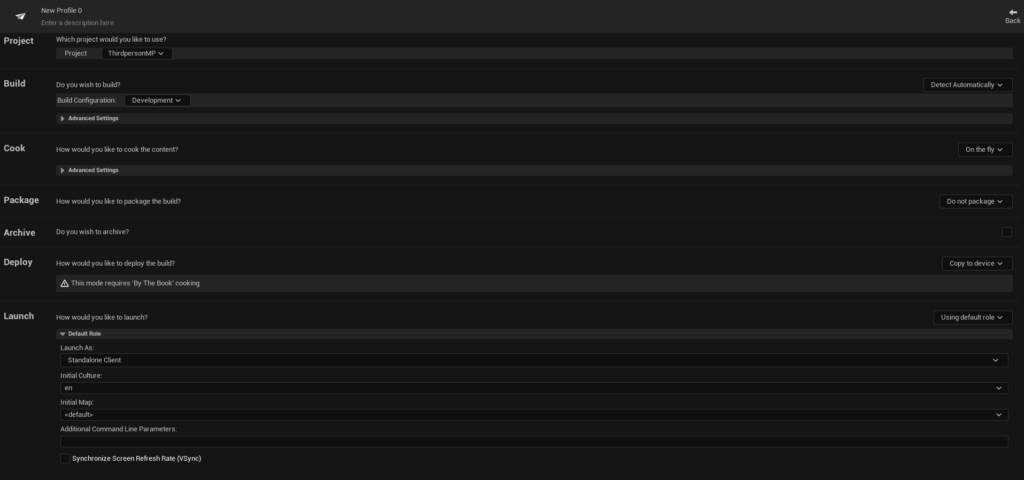
Within this menu, several key settings must be configured:
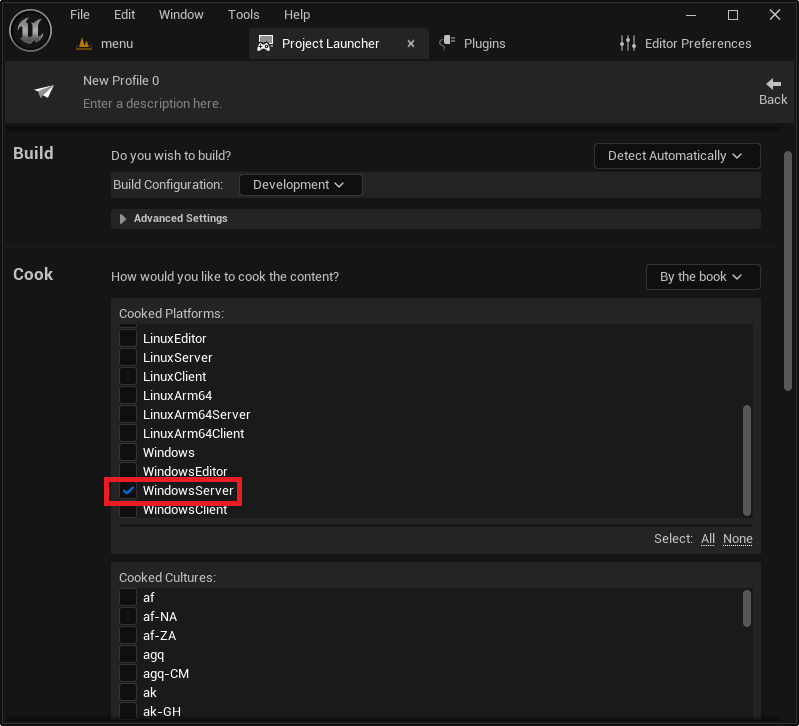
- Cook Section: The "Cook" option determines how game assets are prepared. Change the default "On the fly" setting to "By the book." "By the book" cooking ensures that all necessary assets are pre-cooked and packaged into the build, which is essential for a standalone dedicated server that won’t have the editor to cook assets on demand.
- Cooked Platforms: Scroll down to the "Cooked Platforms" list. Here, developers select the target operating system for their dedicated server. For Windows-based servers, "WindowsServer" should be checked. For Linux deployments, options include "LinuxServer" (for x86/64 architectures) or "LinuxArm64" (for ARM-based Linux systems), catering to different hosting environments. Choosing the correct platform is crucial for generating a compatible executable.
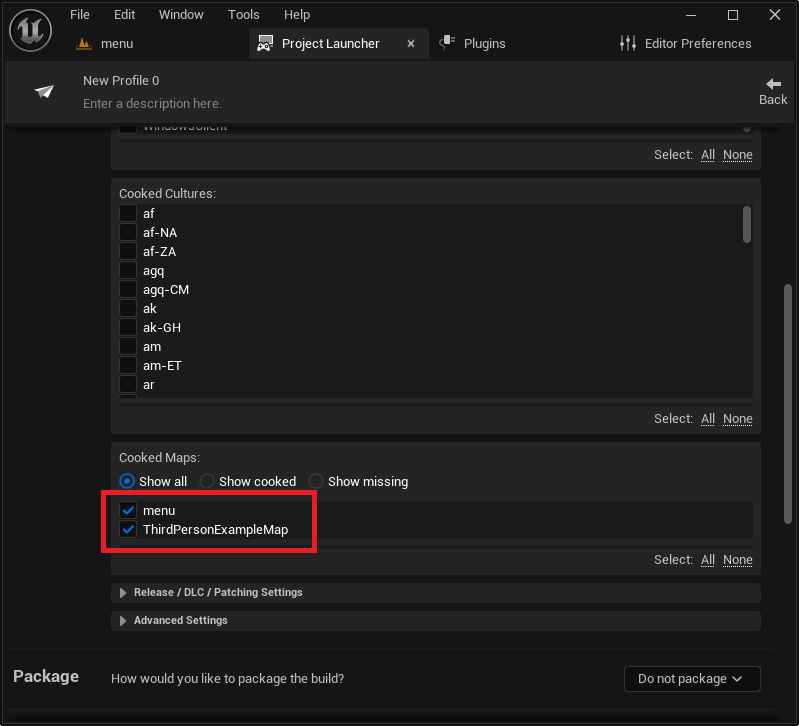
- Maps to Cook: Further down, in the "Maps to Cook" section, developers must explicitly add all game maps that the server will need to load. This typically includes the default server map configured earlier, as well as any other gameplay maps that players might transition to during a session. Failure to include a map here will result in the server being unable to load it at runtime.
- Package Section: The "Package" setting dictates how the cooked assets are bundled. Change "Do not package" to "Package & store locally." This instructs the Project Launcher to create a complete, self-contained package of the server build. The system will generate a default output path, typically within the project’s
Saved/StagedBuildsdirectory. This path can be customized using the "Browse" button if a different build location is desired. - Deploy Section: For local development and testing, the "Deploy" option should be set to "Do not deploy," changing from the default "Copy to device." This prevents the Project Launcher from attempting to deploy the build to a specific device, which is unnecessary for a local server build.
- Profile Name: Finally, provide a descriptive name for the custom profile (e.g., "Windows Dedicated Server Build") to easily identify its purpose within the Project Launcher. This concludes the profile setup.
Generating and Deploying the Dedicated Server
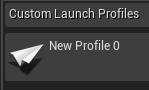
With the custom profile meticulously configured, the process of building the dedicated server can commence. Return to the main Project Launcher menu by clicking the "back" button. The newly created profile will now appear in the list of custom launch profiles.
Building the Files: To initiate the build, simply click the "Launch" button (represented by a controller and display icon) next to the newly created profile. The Project Launcher will then display a log window, showing the real-time progress of the dedicated server’s compilation. This process involves cooking assets, packaging the build, and generating the server executable. The initial build, especially for larger projects or the first time a profile is run, can take a significant amount of time, ranging from minutes to several hours depending on project complexity and hardware specifications. It is crucial to allow this process to complete fully without interruption, as any premature termination could result in a corrupted or incomplete build. A successful build will show a "Success" message for each task within the log.
Testing the Dedicated Server: Once the build process has completed successfully, the dedicated server executable will be located in the output folder specified in the custom profile. By default, this is typically found within the project’s root directory under Saved/StagedBuilds/[PlatformName], for example, MyProject/Saved/StagedBuilds/WindowsServer. Inside this folder, navigate to the subdirectory named after your game project (e.g., MyProjectServer.exe).
Running the MyProjectServer.exe directly will typically launch the server as a background process, making it difficult to monitor its status or debug issues. To facilitate testing and monitoring, it is highly recommended to create a shortcut to the server executable. Right-click the MyProjectServer.exe, select "Create shortcut," and then right-click the newly created shortcut and select "Properties." In the "Target" field, at the very end of the existing path, add the launch argument "-log" (e.g., ".../MyProjectServer.exe" -log). Applying this change ensures that when the shortcut is opened, the dedicated server launches with a console window, displaying all internal logging messages. This provides invaluable feedback on server initialization, session creation, map loading, and any errors that might occur, making debugging significantly easier.
Upon launching the server shortcut with the -log argument, a console window will appear, rapidly filling with text. This output details the server’s initialization sequence, including the creation of the Advanced Session and the loading of the default server map. Once the server is fully initialized and the session is active, client instances of the game (launched from the Unreal Editor or as separate packaged clients) should be able to discover and connect to this dedicated server session. The client’s session browser should display the newly created server, allowing players to join and interact within the shared game world. A successful connection will demonstrate players moving and interacting seamlessly, validating the dedicated server’s operational integrity.
Real-World Impact and Future Implications

The successful deployment of a dedicated server has profound implications for a game’s success and its long-term viability. From a player perspective, it translates directly into a superior gaming experience: reduced latency, fair play environments free from host advantage, and stable connections that minimize disconnections or frustrating lag. This enhances player satisfaction, encourages competitive play, and fosters a positive community around the game.
For developers, dedicated servers offer unparalleled control and security. By authoritative server logic, developers can implement robust anti-cheat measures, prevent client-side manipulation, and ensure a consistent game state across all players. This protects the game’s integrity and reputation. Furthermore, dedicated servers enable greater scalability, allowing games to support larger player counts, more complex game worlds, and a higher number of concurrent sessions than would ever be possible with P2P hosting. This scalability is critical for handling player surges during launch periods, updates, or special events.
The ability to maintain and update server-side code independently of client patches also streamlines development and maintenance workflows. Server-side only hotfixes can be deployed without requiring players to download a new client, leading to a more agile development cycle. In the competitive esports landscape, dedicated servers are non-negotiable, providing the controlled and fair environment essential for professional tournaments.
The trend towards persistent online worlds, live service games, and cross-platform play further solidifies the critical role of dedicated server infrastructure. Unreal Engine 5, with its advanced capabilities and robust networking tools, positions itself as a leading choice for developers aiming to build high-quality, scalable multiplayer experiences that meet and exceed the evolving demands of the global gaming audience. Mastering dedicated server deployment is not just a technical task; it’s an investment in a game’s longevity, player satisfaction, and competitive edge in the bustling digital entertainment market.
Conclusion
The journey from a single-player concept to a thriving multiplayer game is complex, with dedicated server deployment standing as a pivotal milestone. This guide has detailed the essential steps for building and configuring a dedicated server for Unreal Engine 5 projects, from preparing the project and understanding core server logic to leveraging the Project Launcher for compilation and verifying functionality. By embracing dedicated server technology, developers are not just setting up a piece of software; they are laying the groundwork for a reliable, secure, and performant multiplayer experience that can captivate players at scale. With this knowledge, developers are one step closer to launching a fully featured multiplayer game that not only performs well but also delivers a consistent and engaging experience, solidifying their project’s place in the competitive world of online gaming. The ability to manage and deploy these servers effectively is a critical skill, underpinning the future success of any ambitious multiplayer title built with Unreal Engine 5.
About the Author