Unreal Engine 5 (UE5) offers a robust suite of tools for game development, and among its most valuable features for managing dynamic game content are Data Tables. These powerful assets empower developers, designers, and programmers alike to define, store, and access structured lists of information with remarkable efficiency, thereby streamlining content iteration and enhancing collaborative workflows. This guide delves into the essence of Data Tables, providing a detailed walkthrough of their creation, population, and implementation within an Unreal Engine 5 project.
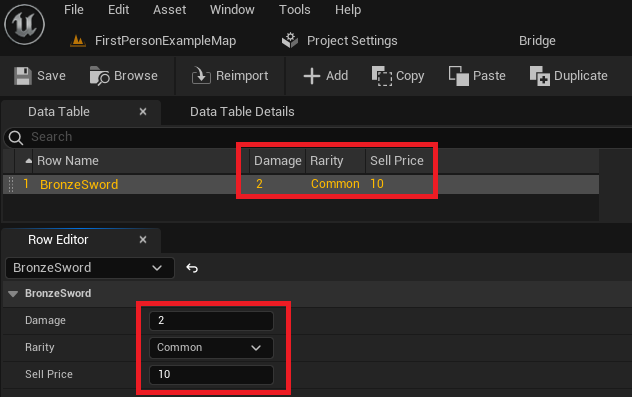
The foundational concept behind Data Tables is their ability to act as a centralized repository for game-related data. Instead of hardcoding values into Blueprints or C++ classes, which can lead to maintenance nightmares and hinder design flexibility, Data Tables allow for externalized, editor-friendly data management. This approach is particularly beneficial for managing large quantities of similar data, such as item statistics, enemy attributes, quest parameters, or even localization strings. When a Data Table is created, developers are prompted to select a struct upon which the table will be based. This struct serves as a schema, defining the exact types and names of the columns (data fields) that each row in the Data Table will contain, ensuring data consistency and integrity across the project.
The Foundational Role of Data Management in Game Development
In the increasingly complex landscape of modern game development, effective data management is paramount. Contemporary titles often feature intricate economies, expansive item inventories, diverse character abilities, and sprawling narrative structures, all of which rely on vast amounts of interconnected data. Without a structured approach, this data can quickly become unwieldy, leading to several critical challenges:
- Maintainability Issues: Hardcoded values are difficult to track, modify, and debug. A change to a single item’s property might require recompiling code or updating multiple Blueprints, introducing potential errors.
- Scalability Concerns: As a game grows, the sheer volume of data can overwhelm ad-hoc management systems. Adding new items or enemies becomes a cumbersome process.
- Collaboration Bottlenecks: Designers often need to tweak game balance or introduce new content without direct programmer intervention. Disparate data sources create dependencies and slow down development cycles.
- Version Control Difficulties: When data is scattered across numerous assets or embedded within code, tracking changes and resolving conflicts in a team environment becomes problematic.
Unreal Engine’s Data Tables directly address these challenges by providing a robust, editor-integrated solution. They consolidate related data into single, easy-to-manage assets, which are then accessible at runtime. This asset-based approach means Data Tables integrate seamlessly with source control systems, allowing teams to track changes and collaborate effectively. Furthermore, the visual interface for editing Data Tables empowers designers to iterate on content rapidly, adjusting values like item damage, rarity, or sell price directly within the editor without needing to touch a single line of code or blueprint logic. This shift fosters a more agile development environment, where content creators can quickly experiment and refine game mechanics.
Setting the Stage: Prerequisites and Core Concepts
Before diving into the practical steps of creating and utilizing Data Tables, it’s essential to understand the underlying components. A Data Table in Unreal Engine 5 is fundamentally a structured list of data, analogous to a spreadsheet, where each row represents a unique entry and each column corresponds to a specific data field. The power of this system lies in its ability to store varying values for a predefined list based on a unique "key" – typically the row name.
This data is stored as a distinct asset within your project, offering several significant advantages:
- Centralized Storage: All related data resides in one place, simplifying management and updates.
- Editor Accessibility: Data can be created and modified directly within the Unreal Editor, providing a user-friendly interface for content creators.
- Runtime Retrieval: The data is readily available during gameplay, allowing game logic to dynamically access and utilize it.
- Persistence: Changes made in the editor are saved and persist across sessions, ensuring consistency.
A prime example of Data Table utility is managing data for items or enemies in a role-playing game. Instead of individual Blueprint classes for every sword or goblin, a single Data Table can hold all the statistical variations (damage, rarity, health, gold drop, etc.) for dozens of items or enemy types. This not only reduces asset duplication but also ensures that any system designed to interact with items or enemies only needs to know how to read from this central table. The process of making and using Data Tables is straightforward, requiring minimal setup for maximum benefit.
Building Blocks: Creating Enums and Structs
The journey to creating an effective Data Table begins with defining its structure. This involves two critical components: Enumerations (Enums) and Structures (Structs). These define the data types and organization for each entry within your Data Table.
Creating an Enum
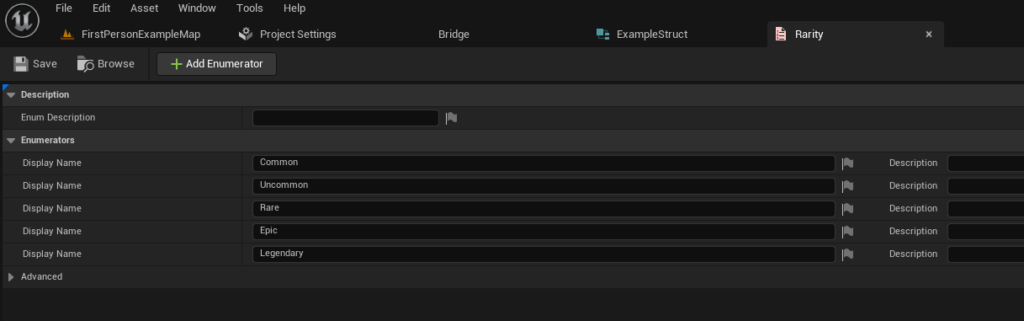
An Enum, short for Enumeration, is a distinct type that consists of a set of named integer constants. In game development, enums are invaluable for categorizing data with a finite set of discrete values. For instance, instead of using arbitrary numbers or strings to represent item quality, an enum provides a clear, type-safe list of options like "Common," "Uncommon," "Rare," "Epic," and "Legendary." This not only improves code readability but also prevents errors that can arise from typos or invalid entries.
To create an enum in Unreal Engine 5:
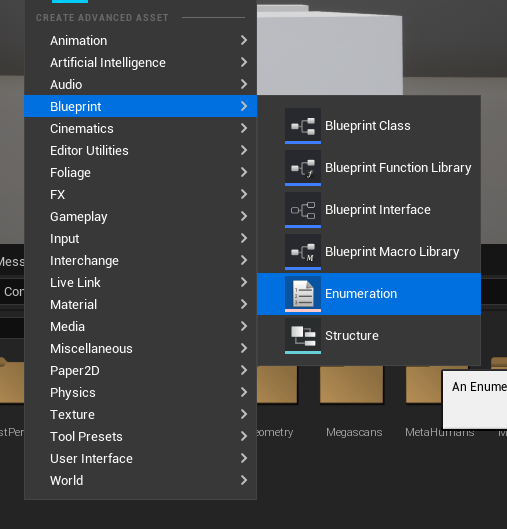
- Right-click anywhere in the Content Browser.
- Navigate to the Blueprints category.
- Select Enumeration.
- Give your enum a descriptive name (e.g.,
E_ItemRarity). - Open the newly created enum asset.
- Add the desired values. For an item rarity enum, these might be:
CommonUncommonRareEpicLegendary
Each value will be assigned an integer index automatically, starting from 0. Using enums ensures that item rarity, for example, is always selected from a predefined list, making game logic more robust and preventing invalid states.
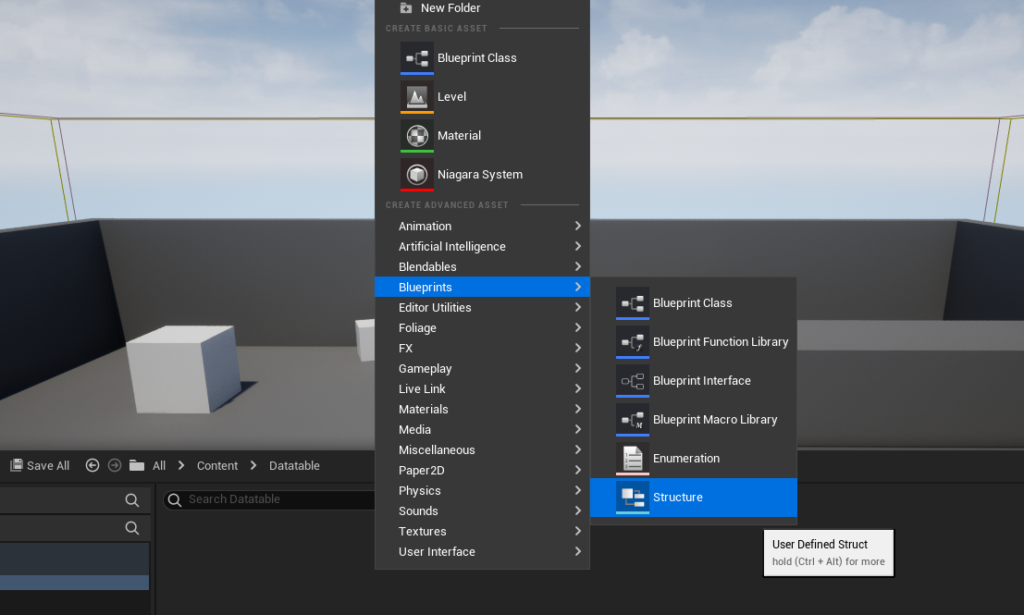
Creating Our Struct
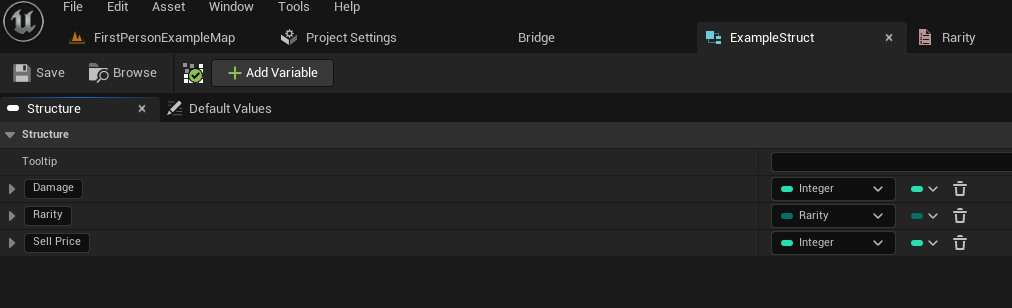
The next crucial step is to create a Structure, or Struct. A struct in Unreal Engine acts as a custom data type that bundles together several variables of different types under a single name. For Data Tables, a struct defines the schema for each row. It specifies what information each entry in your table will hold. For example, an item struct might contain variables for its damage value, its rarity, and its sell price.
To create your struct:
- Right-click anywhere in the Content Browser.
- Navigate to the Blueprints category.
- Select Structure.
- Name your struct appropriately (e.g.,
F_ItemData). It’s a common convention to prefix struct names withF(forFixed-size structure). - Open the struct asset.
- Add the variables (members) that represent the data points for each item:
- Damage: Type
IntegerorFloat(depending on precision needed). - Rarity: Type
E_ItemRarity(the enum you just created). This demonstrates how enums are integrated. - SellPrice: Type
Integer.
- Damage: Type
- Ensure you save the struct after adding all variables.
This struct, F_ItemData, now serves as the template for every row in your Data Table. Each row will automatically have fields for Damage, Rarity, and Sell Price, ensuring uniformity across all your item entries. This adherence to a predefined structure is fundamental to the consistency and reliability of data-driven systems.
Constructing the Data Table
With our enum and struct defined, we can now proceed to create the Data Table itself. This asset will house all our structured game data.
To create the Data Table:
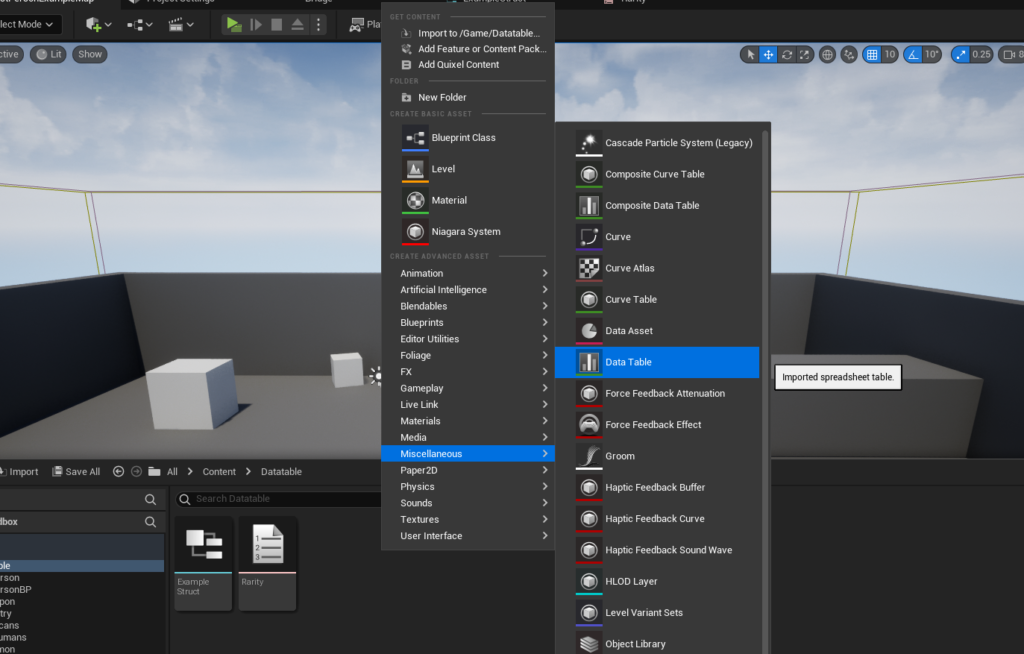
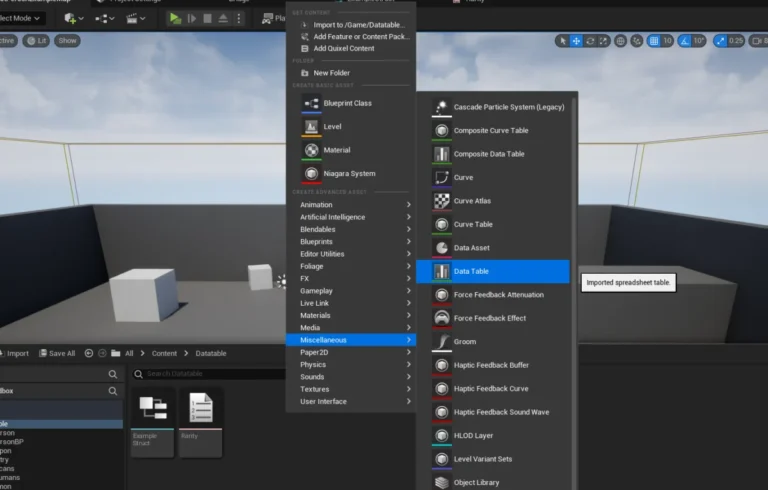
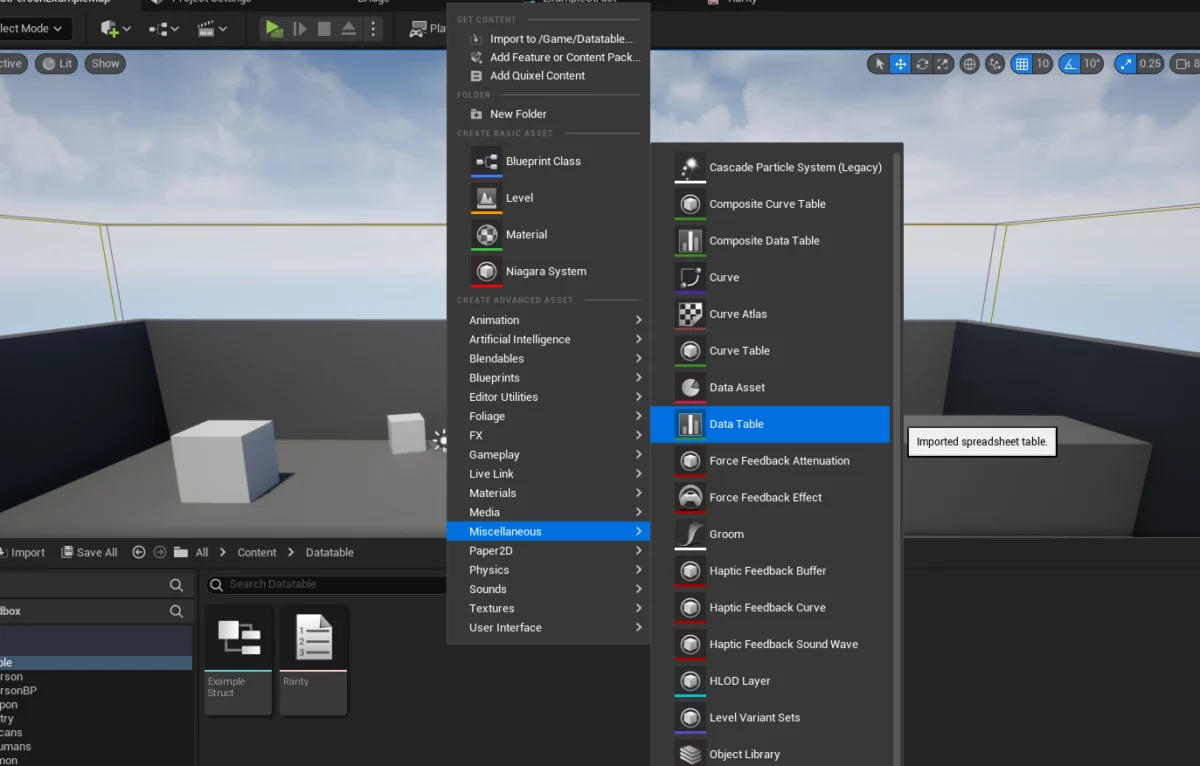
- Right-click anywhere in the Content Browser.
- Navigate to the Miscellaneous category.
- Select Data Table.
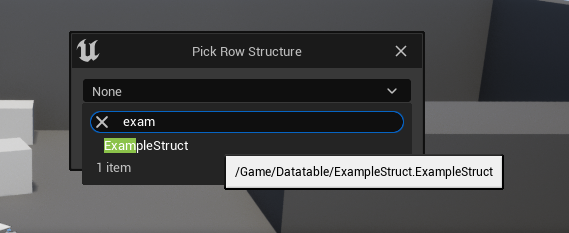
- A pop-up window will appear, asking you to "Pick Struct." This is a critical step, as it links your Data Table to the schema you just created. From the dropdown list, select your custom struct (e.g.,
F_ItemData). This choice dictates the columns that will be available in your Data Table. - Click OK.
- Name your Data Table (e.g.,
DT_ItemStats). It’s good practice to prefix Data Table assets withDT_.
Upon creation, your Data Table asset will appear in the Content Browser. Double-clicking it will open the Data Table editor, where you can begin populating it with data. At this point, the table will be empty, awaiting your entries.
Populating the Data Table: Content Iteration and Management
Once your Data Table is created and configured with the correct struct, the next step is to fill it with actual game data. The Unreal Engine editor provides an intuitive interface for this, empowering designers to manage game content directly.
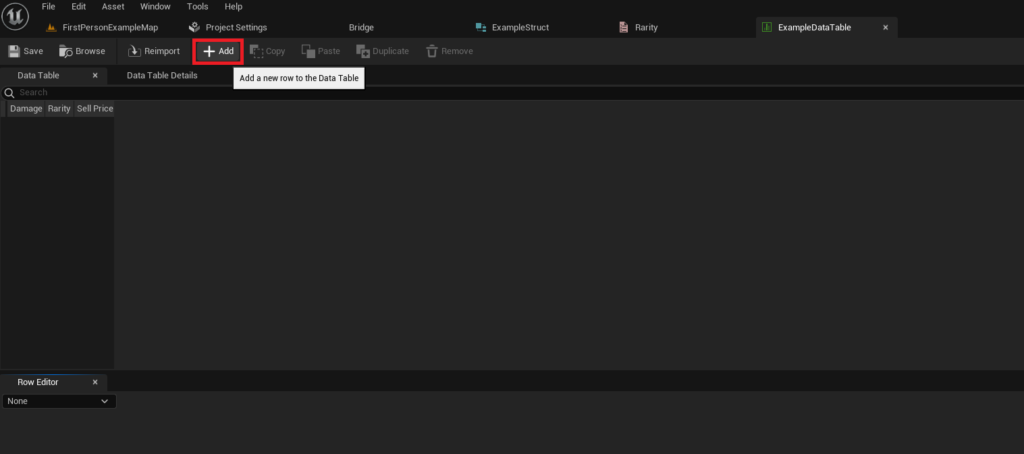
- Adding New Rows: In the Data Table editor, locate the Add button. Clicking this will create a new row in your table. Each new row will initially display default values based on the variable types defined in your struct.
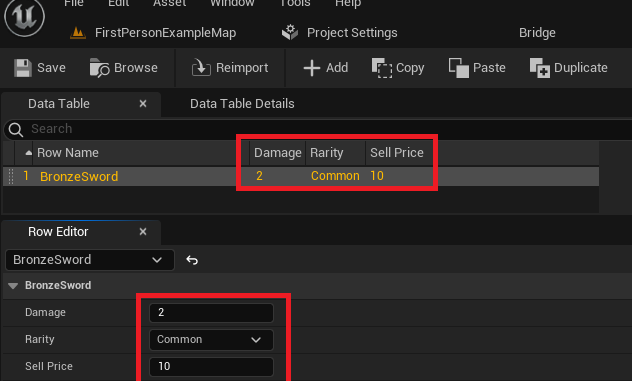
- The Row Editor: Below the main table view, you’ll find the "Row Editor" panel. When you select a row in the table, its details are displayed here. This panel provides an easy way to modify the individual values for each data field (e.g., Damage, Rarity, Sell Price). The interface dynamically adjusts to the types defined in your struct, presenting dropdowns for enums and input fields for numerical values.
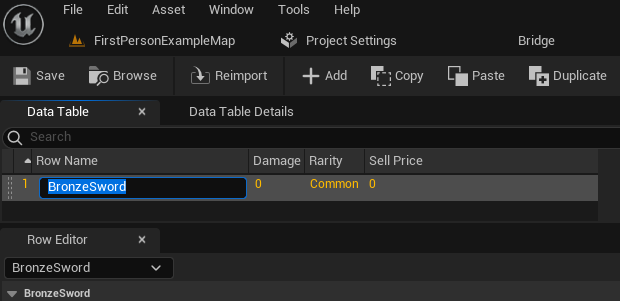
- Naming Rows: Crucially, each row in a Data Table requires a unique "Row Name." This name acts as the primary key for retrieving data at runtime. You can change the default row name by clicking on the name field within the row. For instance, if you’re defining a sword, you might name the row "BronzeSword" or "SteelAxe." Descriptive and unique names are vital for efficient data lookup.
- Iterative Content Creation: The ability to add, modify, and delete rows quickly makes Data Tables ideal for iterative content development. Designers can adjust weapon damage, change item rarities, or rebalance prices on the fly, seeing immediate results during testing without requiring programmer intervention or code changes. This significantly speeds up the balancing and content creation process.
- Saving Your Work: As with any asset in Unreal Engine, it is imperative to Save your Data Table frequently to prevent losing your changes. The Data Table editor provides clear indicators when the asset has unsaved modifications.
By populating your Data Table with numerous entries, each representing a unique item or entity defined by your struct, you create a powerful, centralized database for your game’s content. This structured approach not only organizes data but also lays the groundwork for efficient runtime access.
Accessing Data: Single Row Retrieval
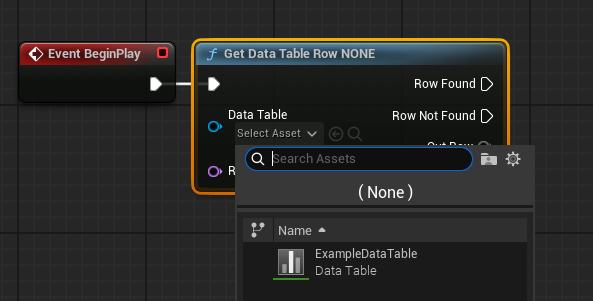
With your Data Table populated, the next crucial step is to learn how to access this data from your game’s logic, typically within Blueprints or C++. The primary method for retrieving a specific entry is using the Get Data Table Row node.
-
Introducing
Get Data Table Row: This node is the cornerstone of Data Table interaction. It requires two main inputs:- Data Table: A direct reference to the Data Table asset you want to query (e.g.,
DT_ItemStats). - Row Name: A
Namevariable specifying the unique name of the row you wish to retrieve (e.g., "BronzeSword").
- Data Table: A direct reference to the Data Table asset you want to query (e.g.,
-
Output Pins: The
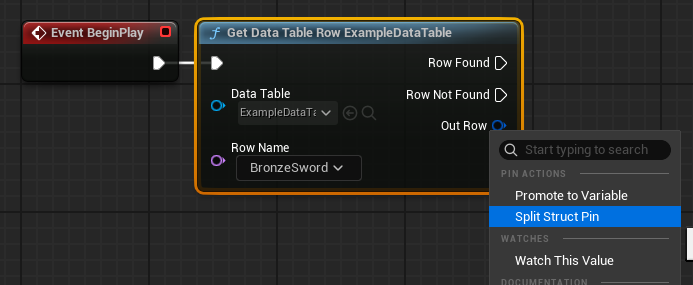
Get Data Table Rownode provides several outputs:- Row Found (Exec Pin): This execution pin fires if a row matching the provided
Row Nameis successfully found. - Row Not Found (Exec Pin): This execution pin fires if no row with the given
Row Nameexists in the Data Table. This is crucial for robust error handling. - Out Row (Struct Pin): If the row is found, this pin outputs a copy of the entire struct containing all the data for that row. If the row is not found, the data in this struct will be invalid.
- Row Found (Exec Pin): This execution pin fires if a row matching the provided
-
Setting the Data Table Reference: To configure the node, click on the dropdown next to the
Data Tableinput pin and select your Data Table asset from the list. For theRow Name, you can either type in a specific name directly into the node’s properties or connect aNamevariable from elsewhere in your Blueprint. Notably, if theRow Namepin is not connected, the node will present a dropdown list of all available row names within the selected Data Table, aiding in design and debugging.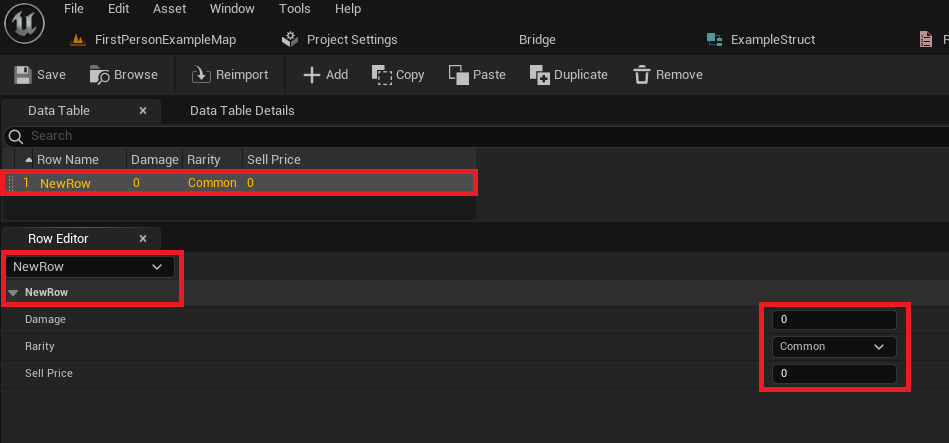
-
Splitting the Struct Pin: The
Out Rowpin outputs the entire struct. To access individual data members (like Damage, Rarity, or Sell Price), you need to "split" the struct pin. Right-click on theOut Rowpin and select Split Struct Pin from the context menu. This action will expand the pin into individual output pins for each variable defined in your struct, allowing you to easily retrieve and use the specific values.
For example, on Event BeginPlay in a Level Blueprint, you could use Get Data Table Row with "BronzeSword" as the Row Name. If Row Found executes, you can then split the Out Row pin and connect the Damage output to a Print String node to display the sword’s damage value on screen. This immediate access to structured data is fundamental for populating UI, calculating game statistics, and driving gameplay logic.
Advanced Data Retrieval: Looping Through Rows
While accessing a single row by name is powerful, many game mechanics require iterating through multiple or even all entries in a Data Table. For instance, you might need to display all available items in a shop, filter items by rarity for an inventory screen, or perform calculations based on a subset of data. Unreal Engine provides efficient ways to loop through Data Table rows.
-
Get Data Table Row NamesNode: The first step in looping is to obtain a list of all row names within your Data Table. TheGet Data Table Row Namesnode serves this purpose.- It requires a
Data Tableasset reference as input, similar toGet Data Table Row. - Its primary output is Out Row Names, which is an
Arraycontaining all the uniqueNamekeys from your Data Table.
- It requires a
-
For Each LoopNode: Once you have the array of row names, you can process each one using aFor Each Loopnode.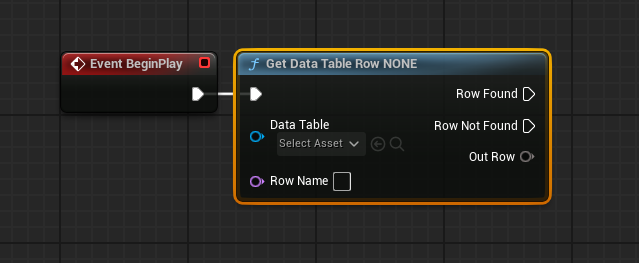
- Connect the Out Row Names array from
Get Data Table Row Namesto theArrayinput of theFor Each Loop. - The
For Each Loopwill then execute its Loop Body for every element in the array. - The Array Element output pin of the
For Each Loopwill provide the currentName(row name) being processed in each iteration.
- Connect the Out Row Names array from
-
Combining for Full Iteration: To retrieve the actual data for each row during the loop:
- Connect the Array Element output pin of the
For Each Loopto theRow Nameinput pin of aGet Data Table Rownode. - Ensure the
Data Tableinput of thisGet Data Table Rownode is also connected to your target Data Table asset. - The
Loop Bodyexecution pin of theFor Each Loopshould then flow into the execution pin ofGet Data Table Row. - Within the
Row Foundpath of theGet Data Table Rownode, you can split theOut Rowstruct pin and access all the individual data values for the current row.
- Connect the Array Element output pin of the
This setup allows you to systematically process every entry in your Data Table. For example, you could iterate through DT_ItemStats, check each item’s Rarity, and if it’s "Epic," add it to a specific list or spawn it in the world. This powerful combination of nodes enables highly dynamic and data-driven gameplay systems, making your game content easily scalable and adaptable.
Implications and Best Practices for Development Teams
The adoption of Data Tables in an Unreal Engine 5 project carries significant implications for development workflows and team collaboration, extending far beyond simple data storage.
- Enhanced Collaboration: Data Tables serve as a "single source of truth" for shared game data. Designers can populate and balance content (e.g., item stats, enemy health, quest rewards) without needing direct programming assistance. Programmers, in turn, can focus on implementing robust systems that read from these tables, knowing the data is consistently structured. This clear separation of concerns minimizes bottlenecks and fosters parallel development.
- Rapid Iteration and Prototyping: The editor-based editing of Data Tables allows for extremely fast iteration cycles. Game designers can tweak numerical values, experiment with different rarities, or add new items within minutes, observing changes in real-time during playtesting. This agility is crucial for finding the "fun factor" and fine-tuning game balance.
- Scalability for Large Projects: As games grow in scope and complexity, the number of distinct assets and data points can become overwhelming. Data Tables provide a scalable solution for managing hundreds or thousands of items, abilities, or characters efficiently, preventing the sprawl of individual, repetitive assets.
- Localization Efficiency: Data Tables are an excellent tool for managing localized text. A single Data Table can store all game strings, with columns for different languages, simplifying the process of adapting a game for global audiences.
- Version Control Integration: As standard Unreal Engine assets, Data Tables seamlessly integrate with source control systems like Git or Perforce. This allows development teams to track changes, review history, and merge contributions effectively, ensuring data integrity across the project lifecycle.
- Performance Considerations: While Data Tables are highly efficient for lookup, it’s important to use them judiciously. For very small, static pieces of data that are only accessed once, a simple variable might suffice. However, for collections of related, editable data, Data Tables offer superior performance compared to iterating through numerous individual Blueprint assets at runtime.
- Designer Empowerment: Perhaps one of the most significant impacts of Data Tables is the empowerment of game designers. They gain direct control over significant portions of game content and balance, reducing their dependency on programmers and fostering a more creative and responsive design process. This aligns with modern game development philosophies that emphasize data-driven design.
- Data Integrity: By enforcing a strict struct-based schema, Data Tables inherently promote data integrity. Every entry conforms to the defined types and fields, reducing the likelihood of invalid or malformed data entering the system.
Conclusion
Unreal Engine 5 Data Tables are an indispensable feature for any serious game development project. They offer a powerful, flexible, and efficient solution for managing structured game data, addressing many of the common challenges associated with content iteration, team collaboration, and scalability. By mastering the creation of enums and structs, configuring Data Tables, populating them with content, and implementing robust retrieval mechanisms, developers can unlock a more streamlined and agile workflow.
The ability to centralize data, provide intuitive editor access for designers, and facilitate rapid iteration makes Data Tables a cornerstone of modern game development in UE5. Whether for item statistics, enemy behaviors, quest parameters, or localization, almost every Unreal Engine project stands to benefit from their efficient and neatly organized data storage capabilities. Furthermore, their seamless integration with existing engine features and lack of C++ prerequisites for basic usage make them accessible to a broad range of developers, significantly simplifying the process of creating dynamic and engaging game worlds. Embracing Data Tables is not just about storing information; it’s about building more robust, maintainable, and collaboratively developed games.
About the Author