The pursuit of bringing highly stylized 2D concept art, particularly exaggerated caricatures, into the dynamic world of 3D character creation has long presented a significant hurdle for artists. Standard photogrammetry and image-to-3D tools often falter when faced with non-realistic proportions, relying heavily on the silhouette and form that are the very essence of such art. However, a groundbreaking pipeline integrating Reallusion’s Headshot 3 and Character Creator 5, augmented by the power of Blender and Krita, is now offering a robust solution. This advanced workflow meticulously transforms a single piece of front-facing bodybuilder caricature art into a fully rigged, sculpt-ready Character Creator 5 (CC5) asset, demonstrating a powerful new avenue for digital artists.
At its core, the challenge lies in capturing the exaggerated silhouette that defines stylized artwork. Traditional 3D conversion tools, optimized for photographic realism, struggle to interpret and replicate these deliberate deviations from anatomical norms. The innovative approach detailed in this tutorial leverages the strengths of specialized software to streamline the often-tedious aspects of base-mesh generation and texture alignment, allowing artists to dedicate their creative energy to the defining elements: anatomy, exaggeration, and stylistic texturing. The workflow, exemplified by an extreme bodybuilder caricature, proves to be remarkably adaptable to a wide spectrum of stylized 2D concepts.
The Power of AI-Assisted Reference Generation
The initial step in this sophisticated pipeline hinges on overcoming the inherent limitation of a single, front-facing reference image. Stylized art, by its nature, relies on a strong silhouette, but a frontal view alone provides insufficient depth information for accurate 3D reconstruction of the profile. Headshot 3 addresses this directly through its integrated AI Image Generator. By analyzing the facial features present in the front-facing caricature, the AI can generate a complementary side-profile reference image. This crucial step feeds the subsequent image-to-3D reconstruction process, providing the necessary depth cues without the artist needing to manually draw a second angle. This AI-powered reference generation is a significant time-saver, especially in a workflow that demands meticulous attention to detail.

A key consideration for artists utilizing this feature is its credit-based consumption. The AI Image Generator, powered by Google Nano Banana technology, requires credits for each generation. Therefore, it is highly recommended that users generate their profile reference image once and then reuse it throughout their project rather than repeatedly generating new profiles for each iteration. This strategic approach optimizes resource usage and maintains consistency in the reference material.
Adapting to Exaggerated Proportions: The Spline Fitting Stage
Once the AI-generated side profile is in place, the next critical phase involves adapting the character’s underlying mesh to match the exaggerated proportions of the original artwork. Headshot 3’s automated fitting system is primarily trained on standard human anatomy. Consequently, when applied to caricature art, it tends to pull the mesh towards more conventional proportions, potentially clipping or distorting features that are intentionally exaggerated, such as a bodybuilder’s oversized jaw or chin.
To counteract this, artists must transition to the spline-based head shaping stage. This involves manually adjusting guide-curve nodes. By dragging these nodes outward to precisely encompass the true structural borders of the concept art, artists are effectively redefining the parameters of the fitting system. Instead of relying on anatomical averages, they are instructing the software on the actual edges and boundaries of their unique character. This meticulous adjustment ensures that the underlying mesh accurately reflects the intended stylistic exaggerations from the outset.
A crucial piece of advice during this stage is to push the splines all the way to the outer silhouette of the concept art, even if the result appears extreme on screen. Under-fitting an exaggerated feature at this early juncture can lead to significantly more challenging recovery efforts later in the sculpting process. The goal is to establish the most accurate representation of the stylized silhouette as possible.

Refining Forms within Character Creator’s Edit Mode
With the initial mesh adaptation complete, the workflow moves into Character Creator’s Edit Mode for further refinement. Here, artists utilize the robust sculpt morph tools, employing a wide, soft-selection falloff. This allows for the precise pulling and molding of primary facial forms directly over the background image plates. Maintaining symmetry is paramount; therefore, adjustments are mirrored across the appropriate axis to ensure consistency between both sides of the character’s face. The built-in sculpt morph sliders are then used to blend these adjustments, cementing the underlying depth and form before the character is exported for more intensive sculpting.
A cardinal rule to observe during this stage is to strictly avoid altering or scaling the character’s overall head size using standard viewport transform tools. Headshot 3 locks the generated mesh to the photographic layer based on an analyzed camera lens projection. Scaling the head outside of this controlled environment will break this projection alignment, leading to significant texture matching issues. If a change in head size is genuinely required, it must be handled within the Headshot 3 dialog itself to ensure the integrity of the projection remains intact.
Advanced Sculpting in Blender: Non-Destructive Morphing
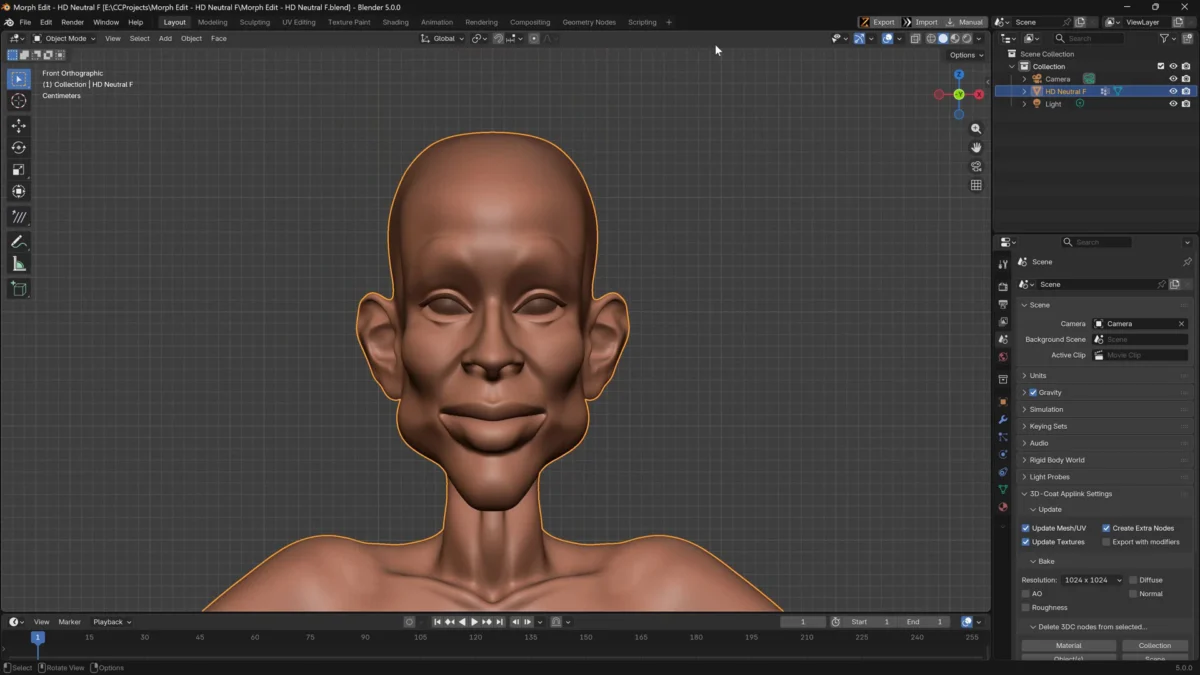
The pipeline then transitions to Blender, a powerful open-source 3D creation suite, for detailed anatomical sculpting. The character is exported through the Blender Auto Setup pipeline, crucially as a morph rather than a full avatar replacement. This non-destructive approach is key to maintaining the integrity of the character’s rigging and bone weights. By exporting as a morph, artists can alter the physical shapes of the character without affecting the underlying skeletal structure. The sculpted results are then imported back into Character Creator 5 as an editable Character Morph.
During the sculpting phase in Blender, artists are advised to focus their efforts at Subdivision Level 2 (SubD2). This resolution provides sufficient geometric density to carve out the significant muscle groups characteristic of a bodybuilder while maintaining good viewport performance and avoiding the creation of overly complex or messy topology. At this stage, the focus is on blocking out the primary anatomy, not on intricate surface details like pores.

Texture Realignment: Restoring Detail in Krita
The significant mesh distortions introduced during the fitting and sculpting phases inevitably cause the originally projected textures to become misaligned. To address this, the workflow moves to Krita, a free and open-source painting program. The diffuse map is exported from Character Creator at a 2K resolution. Concurrently, the model’s 3D UV layout is exported. This UV layout is then inverted and placed on an overhead layer within Krita, set to a "Multiply" blend mode. This effectively transforms the UV layout into a positional roadmap, guiding the texture realignment process.
Using Krita’s warp and push tools, artists meticulously slide the texture details—such as lips, eyes, and nostrils—back onto their correct 3D coordinates, guided by the UV roadmap. Following this, soft airbrushes are employed to expertly erase any seams or visible artifacts left behind by the warping process, ensuring a smooth and seamless texture application.
Addressing Normal Map Artifacts with Neutral Blue
A common challenge encountered during texture baking and manipulation is the appearance of messy artifacts or unwanted structural wrinkles on the normal map. It is crucial to understand that normal maps encode surface direction, not visual appearance. Therefore, these artifacts cannot be simply painted over with skin-tone colors. The correct approach involves identifying the exact neutral value of the normal map, which is typically RGB 128, 128, 255. This specific hue is then used to paint over the problematic areas. This action effectively flattens the surface vectors in those spots, resetting them to a clean, smooth baseline without disturbing the rest of the carefully crafted normal map.
The Comprehensive Pipeline and Its Implications
The complete Headshot 3 stylized image-to-3D pipeline encompasses a series of integrated steps: front art to AI side profile generation, meticulous spline fitting, in-mode refinement within Character Creator, non-destructive morph sculpting in Blender, and finally, precise texture realignment in Krita. The refined textures and sculpted morphs are then brought back into Character Creator. Here, further enhancements can be made, such as adding hair using the Smart Hair system, constructing a high-contrast studio lighting rig, and posing the character dramatically to rigorously test deformation and overall quality.

By offloading the most labor-intensive aspects of base-mesh modeling and profile setup to Headshot 3, this pipeline significantly accelerates the character creation process. Artists can bypass the traditionally tedious initial phases and dedicate their valuable time and creative energy to the more impactful stages of anatomy refinement, stylistic detailing, and performance optimization.
Broader Impact and Future Potential
The successful implementation of this advanced pipeline signifies a pivotal moment in stylized 3D character creation. It democratizes the ability to translate complex 2D artistic visions into fully realized 3D assets, opening doors for independent artists, small studios, and even large production houses looking to maintain unique artistic styles across different media. The implications extend beyond mere asset generation; they touch upon the future of character design in video games, animated films, and virtual reality experiences, where distinct and memorable characters are paramount to audience engagement.
The adaptability of this workflow means that it is not confined to the extreme example of a bodybuilder caricature. It can be applied to a vast array of stylized concept art, from cartoonish characters to more subtly exaggerated designs. The more pronounced the stylistic deviations in the original artwork, the more critical the manual spline adjustment and sculpt morph stages become, highlighting the indispensable role of artistic input even within an automated pipeline.
Frequently Asked Questions
Can this stylized image-to-3D workflow be used for all types of concept art, not just caricatures?
Yes. The bodybuilder caricature serves as an extreme test case to demonstrate the pipeline’s capabilities. The core workflow—AI profile generation, spline reshaping, Blender morph sculpting, and texture realignment—is equally effective for any stylized 2D concept. In fact, the more pronounced the artistic exaggerations, the more crucial the manual spline and sculpt steps become in accurately capturing the artist’s intent.

Does the AI Image Generator in Headshot 3 incur costs?
The primary 3D head generation functionality within Headshot 3 is free to use. However, the AI Image Generator, which is responsible for producing the side-profile and other reference images, operates on a credit-based system, powered by Google Nano Banana. Users are advised to generate their essential profile reference image once and reuse it throughout their project to manage credit consumption efficiently.
Are Blender and Krita essential, or can the entire process be completed within Character Creator?
While a stylized character can be significantly advanced using only Headshot 3 and Character Creator’s built-in sculpt morph tools, Blender and Krita offer specialized capabilities that enhance the final output. Blender is particularly valuable for intensive anatomical muscle sculpting at a manageable subdivision level (SubD2), and Krita excels in the precise realignment of textures after substantial mesh distortion. Both tools represent optional but highly beneficial refinements layered upon the core Reallusion workflow, allowing artists to achieve a higher degree of polish and detail.
What is the distinction between Headshot 3’s Image and Mesh workflows?
Headshot 3 offers two primary workflows. The Image workflow is designed to generate a fully rigged 3D head directly from a 2D photograph or concept art, which is the method employed in this tutorial. The Mesh workflow, on the other hand, is used to convert an existing static 3D model into a complete, rigged Character Creator asset. For artists working with 2D caricature art, the Image workflow represents the most direct and appropriate entry point into the 3D conversion process.
About the Author