Setting up a dedicated server for an Unreal Engine 5 (UE5) game represents a pivotal strategic decision for developers aiming to deliver high-quality, scalable multiplayer experiences. In an era where multiplayer gaming dominates significant market segments, offering a stable, secure, and performant online environment is not merely a feature but a fundamental expectation from players. This guide meticulously details the process of building and configuring a dedicated server for UE5 projects, covering essential project preparations, server compilation, and local execution, thus laying the groundwork for sophisticated multiplayer infrastructures.
The global multiplayer gaming market has seen exponential growth, projected to reach billions of dollars annually, driven by competitive esports, cooperative adventures, and expansive social simulations. Within this landscape, the distinction between peer-to-peer (P2P) hosting and dedicated server architecture is critical. While P2P might suffice for small-scale, casual games, it inherently introduces vulnerabilities and performance inconsistencies. Dedicated servers, by contrast, operate as independent, centralized instances of the game world, free from the influence of any single player’s device. This central authority guarantees superior performance by optimizing network traffic, bolsters security against client-side exploits, and enhances overall reliability, providing a consistent gameplay experience for all participants regardless of their individual network conditions.
The shift towards dedicated servers addresses several inherent limitations of P2P models, which often suffer from "host advantage," where the player hosting the game experiences lower latency and potentially unfair advantages. P2P also makes games susceptible to cheating, as the game state can be more easily manipulated on a local machine. Furthermore, the performance of a P2P hosted game is directly tied to the host’s hardware and internet connection, leading to variable experiences for other players. Dedicated servers mitigate these issues by running on robust, professionally managed hardware, ensuring that the game’s authoritative state is maintained server-side, thereby fostering a more equitable and stable environment for competitive play and large-scale interactions.
Prerequisites for Dedicated Server Development
Before embarking on the server build process, developers must ensure their Unreal Engine 5 project meets specific technical prerequisites. Foremost among these is a fully functional multiplayer UE5 project, meaning the core gameplay logic already supports network replication for player movement, actions, and game state. This foundational work is typically covered in guides focusing on multiplayer sessions. Crucially, a source build of Unreal Engine is indispensable. Unlike the binary versions downloaded from the Epic Games Launcher, a source build provides access to the engine’s underlying code, allowing for the compilation of server-specific modules and the inclusion of necessary server-only components. This access is vital for creating a lean, optimized server executable that doesn’t include client-side rendering or input functionalities. Developers without a source build can refer to Epic Games’ documentation for detailed instructions on downloading and compiling the engine from source, a process that ensures full control over the build environment.
Additionally, the AdvancedSessions plugin is a highly recommended, if not essential, component for effective session management. This plugin extends Unreal Engine’s native session interface, offering robust functionalities for creating, finding, and joining multiplayer sessions. Without it, particularly for servers needing to be discoverable in a session browser, the server may fail to properly advertise its presence to clients. Integrating AdvancedSessions into the project ensures that the dedicated server can seamlessly establish and manage game sessions, enabling players to connect and participate without friction.
Understanding the Dedicated Server Architecture
At its core, a dedicated server in game development is a specialized computer program designed solely to manage the game world and execute server-side logic. It functions as a "headless" instance, meaning it lacks a graphical user interface, does not render the game world visually, and does not simulate a player character. Its sole purpose is to process game rules, handle player connections, replicate game state across clients, and enforce authoritative game logic. This contrasts sharply with a listen server, where one player’s game client also acts as the host.
Listen servers, while convenient for small groups (typically 2 to 16 players) and beneficial for reducing development costs and simplifying testing, present several drawbacks for larger or more competitive titles. The host’s machine bears the burden of both rendering the game for themselves and processing server logic for all connected players, often leading to performance bottlenecks, particularly with higher player counts or complex game states. More critically, listen servers are inherently less secure, as the host client has direct control over the game state, opening avenues for cheating and desynchronization issues. For instance, in a fast-paced fighting game, minor latency inconsistencies on a listen server could lead to significant and game-breaking desyncs.
Dedicated servers are the definitive solution to these challenges. By isolating the server logic on a separate, often high-performance machine, they provide a stable, consistent, and secure environment. The server continuously runs the game world, processing network packets, and maintaining the single source of truth for all game events. This architecture allows for 24/7 game availability (with proper infrastructure), robust anti-cheat measures, and consistent performance that scales with demand, making them ideal for competitive shooters, massive multiplayer online games (MMOs), and any title prioritizing fairness and reliability.
Configuring Automatic Session Creation and Map Loading
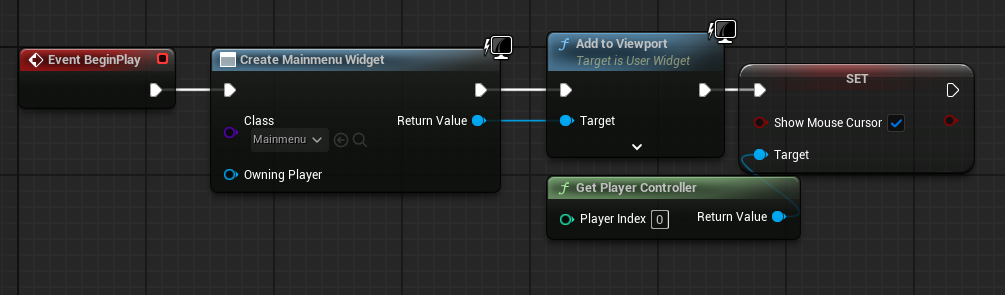
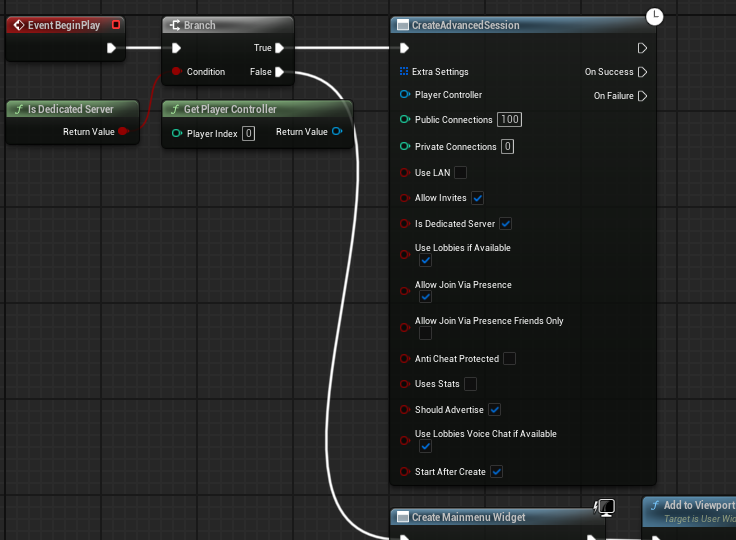
A crucial step in preparing an Unreal Engine project for dedicated server deployment involves adapting its initial startup logic. Typically, a game client launches into a main menu, where players can choose to host or join a session. A dedicated server, being headless, has no need for a user interface. Therefore, the server must automatically create a game session and load the appropriate game map upon launch.
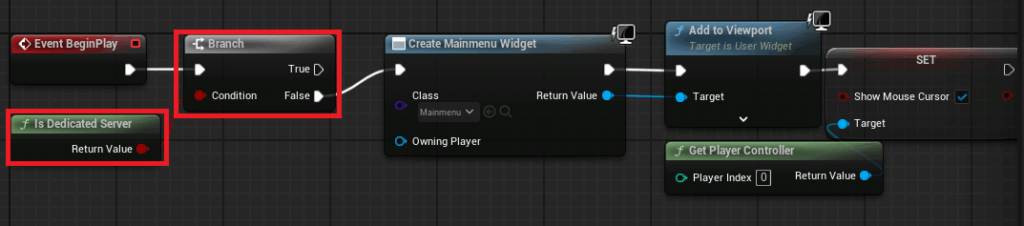
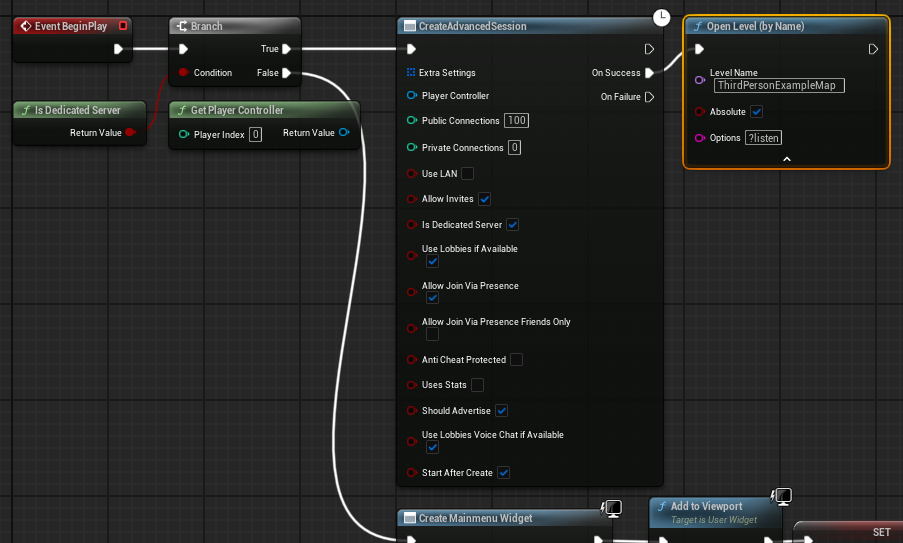
In the example project, the MainMenu widget is usually added to the screen within the main menu level blueprint. To accommodate the dedicated server, this flow needs modification. An "Is Dedicated Server" node, when evaluated, returns true if the current executable is a dedicated server build. This node is integrated into a branch condition before any widget creation logic. If "Is Dedicated Server" is true, the system bypasses the menu initialization entirely.
Instead, the "True" pin of the branch connects to a "Create Advanced Session" node. This node is configured with the desired session settings, such as max players, session name, and visibility. Upon successful session creation, the server proceeds to open the designated game level using the "Open Level" node with a critical option: ?listen. The ?listen parameter instructs the server to open the map and immediately begin listening for incoming client connections, effectively making itself available to players. This streamlined, automated startup sequence ensures that the dedicated server is operational and ready to accept players immediately upon execution, without requiring any manual intervention or UI rendering.
Establishing the Default Server Map
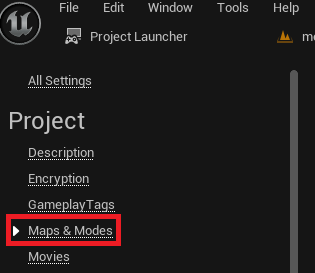
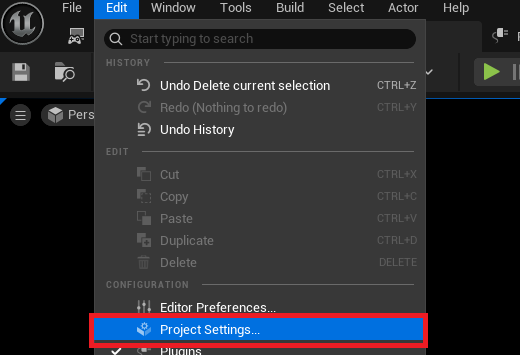
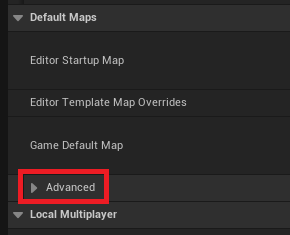
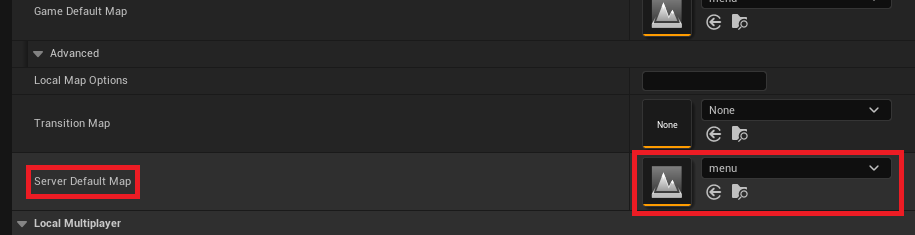
By default, an Unreal Engine server might attempt to load an internal engine map called "Entry," which is unsuitable for game sessions. It is imperative to configure the dedicated server to load a specific game map upon startup. This is achieved through the Project Settings:
- Navigate to
Editin the top-left menu, then selectProject Settings. - Within Project Settings, locate and click on the
Maps & Modessection. - Expand the
Advanceddropdown option underDefault Maps. - Here, the
Server Default Mapoption must be set to the desired map for the server to load. This map typically serves as the lobby or the initial game instance where players connect. For instance, if the game’s main lobby is named "Menu," this map would be selected. This setting overrides the engine’s default behavior, ensuring the server initializes into a playable state.
Optimizing Levels: No Default Character for Servers
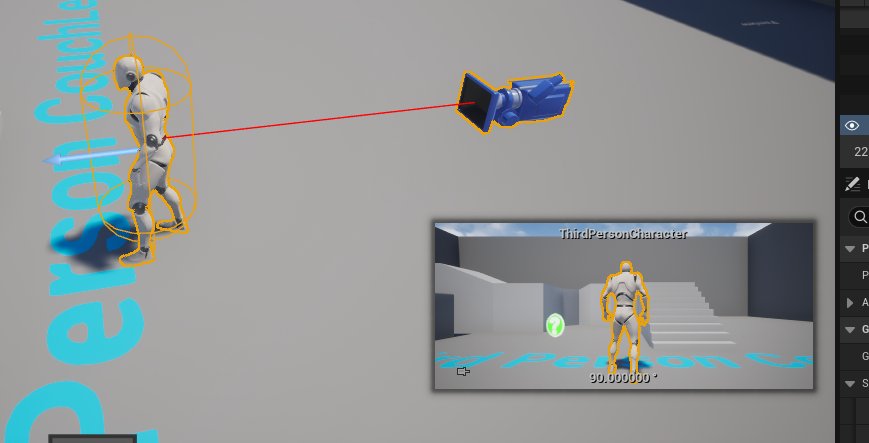
Given that a dedicated server does not simulate a player character or render a visual game, the presence of a default character blueprint within the server’s loaded level is unnecessary and can be inefficient. Many game templates or starting levels might automatically spawn a default player character or pawn. For a dedicated server, this character would exist in the game world without any associated player input, consuming resources needlessly. Therefore, it is a best practice to remove any default character spawns or adjust the Game Mode to prevent character instantiation on dedicated server builds. This ensures the server remains a lean, efficient processing unit focused solely on game logic.
Leveraging the Project Launcher for Server Builds
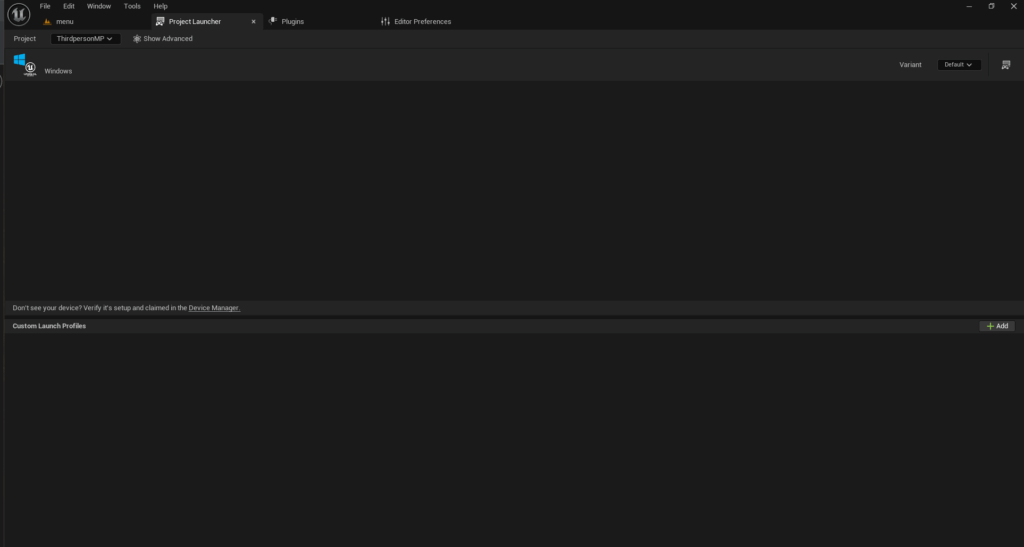
The Unreal Engine’s Project Launcher is a powerful built-in tool that streamlines the process of building and deploying various versions of a game, including dedicated servers. It allows developers to define custom profiles for different build configurations, ensuring consistency and repeatability in the packaging process.
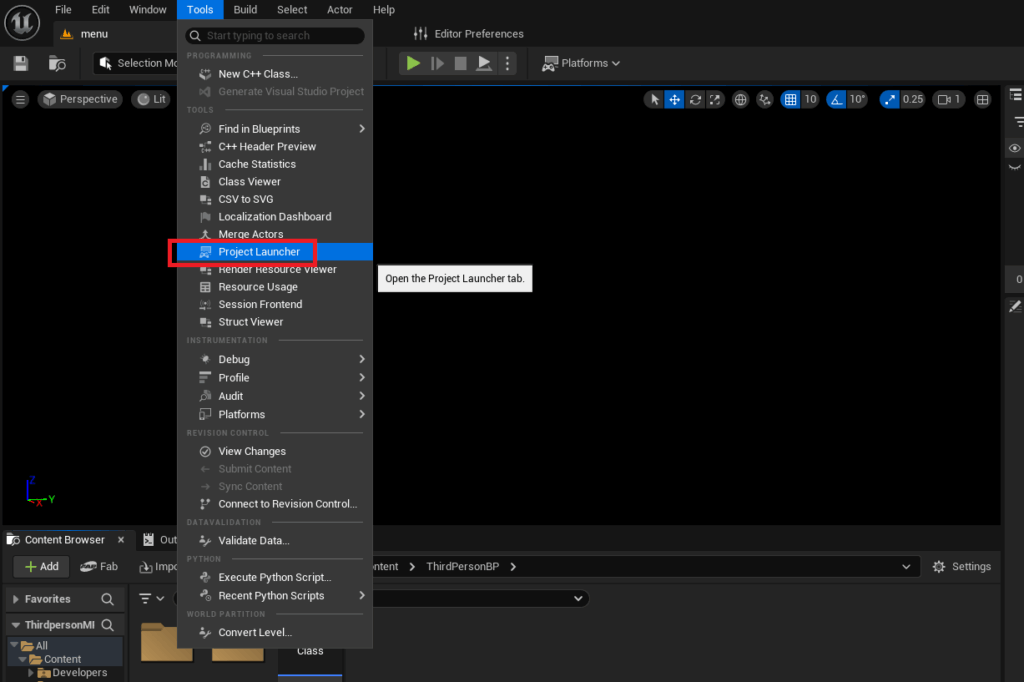
To access the Project Launcher:
- From the Unreal Editor, navigate to
Toolsin the top menu bar. - Select
Project Launcherfrom theToolssection.
Upon opening, the Project Launcher typically presents an empty interface, awaiting the creation of custom build profiles.
Creating a Custom Profile for Dedicated Server Builds
The heart of building a dedicated server through the Project Launcher lies in configuring a custom profile:
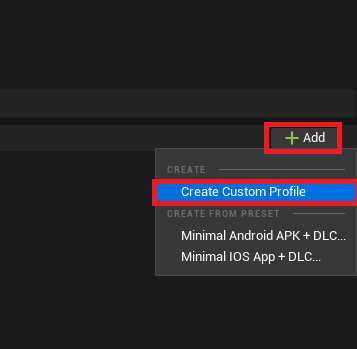
- Click the
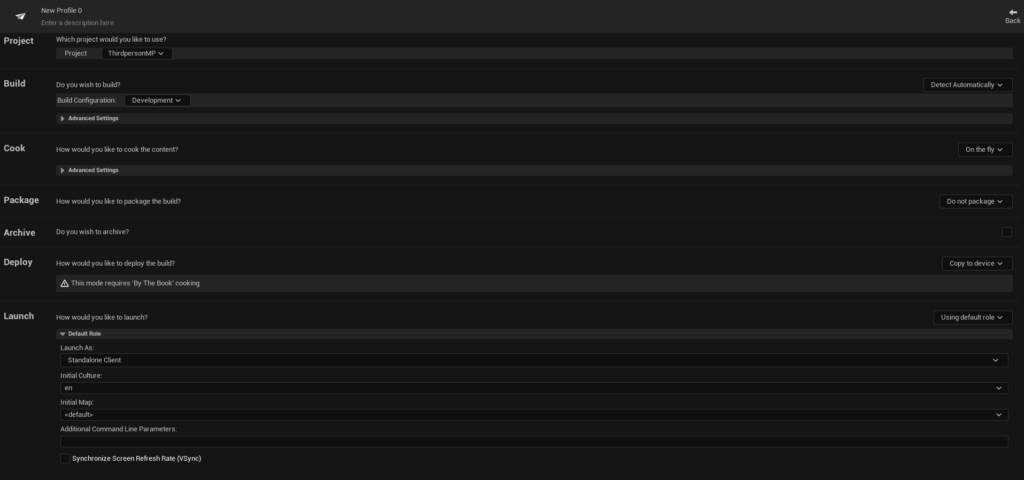
Addbutton in the bottom right corner, then selectCreate Custom Profile. This opens a comprehensive menu of options for tailoring the build process. - Cook Section:
- Change the
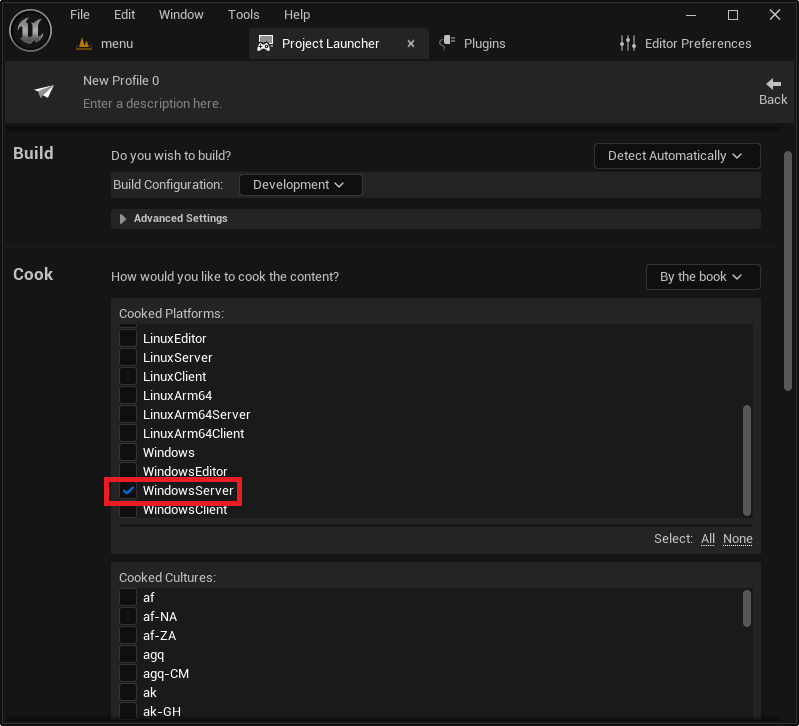
Cookoption fromOn the flytoBy the book. "By the book" cooking pre-processes all content, optimizing it for the target platform and ensuring that all necessary assets are included in the final package. "On the fly" cooking is more suited for rapid iteration within the editor.
- Change the
- Cooked Platforms:
- Scroll down and select the desired server platform. For Windows-based servers,
WindowsServeris the appropriate choice. For Linux deployments,LinuxServer(for x86/64 architectures) orLinuxArm64(for ARM-based Linux systems, potentially for edge computing or specific server hardware) can be chosen. This selection dictates which platform-specific server binaries and libraries will be included.
- Scroll down and select the desired server platform. For Windows-based servers,
- Maps to Cook:
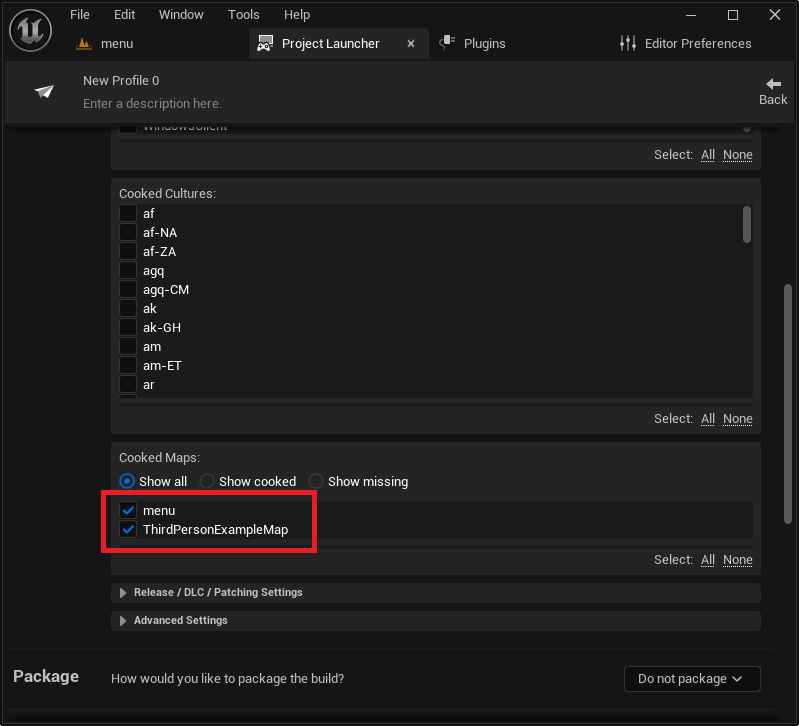
- Crucially, select all maps that the server will need to access and load during gameplay. This includes the
Server Default Mapand any other game levels players might transition to.
- Crucially, select all maps that the server will need to access and load during gameplay. This includes the
- Package Section:
- Change the
Packageoption fromDo not packagetoPackage & store locally. This instructs the Project Launcher to compile and package all cooked content and binaries into a self-contained, deployable folder structure on the local machine. - A default output path will be generated within the project’s
Saved/StagedBuildsdirectory, but this can be customized using theBrowsebutton to any desired location.
- Change the
- Deploy Section:
- Change the
Deployoption fromCopy to devicetoDo not deploy. For dedicated servers, manual deployment to cloud providers or specific server hardware is typical, so automated deployment from the Project Launcher is usually unnecessary.
- Change the
- Profile Naming:
- Finally, assign a descriptive name to the custom profile, such as "MyGame Dedicated Server," for easy identification and management.
Executing the Dedicated Server Build
With the custom profile meticulously configured, the dedicated server can now be built:
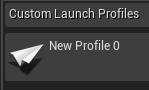
- Return to the main Project Launcher menu. The newly created profile will be visible in the list of custom launch profiles.
- Click the
Launchbutton (represented by a controller and display icon) next to the dedicated server profile.
The Project Launcher will initiate the build process, displaying real-time progress and debug logs. This stage involves compiling C++ code, cooking game assets for the target server platform, and packaging them into the specified output directory. The initial build, particularly for larger projects or the first time a profile is run, can take a significant amount of time, ranging from minutes to hours depending on project complexity and hardware specifications. It is essential to allow this process to complete entirely without interruption. A successful build will show "Success" for all tasks in the log.
Testing and Monitoring the Dedicated Server
Once the build process concludes successfully, the dedicated server executable will be located in the previously configured output folder. By default, this is typically [YourProjectFolder]/Saved/StagedBuilds/[PlatformName], e.g., WindowsServer. Inside this directory, developers will find the server executable, usually named [YourGameName]Server.exe.
Running this executable directly will launch the server in the background, which can be challenging to monitor or terminate. To facilitate testing and debugging, a simple but effective method involves creating a Windows shortcut for the server executable:
- Right-click the
[YourGameName]Server.exeand selectCreate shortcut. - Right-click the newly created shortcut and select
Properties. - In the
Targetfield, append the launch option-logto the end of the existing path. For example:"C:PathToYourGameSavedStagedBuildsWindowsServerYourGameBinariesWin64YourGameServer.exe" -log.
The -log argument forces the server to open a console window, displaying all logging messages and server output in real-time. This provides invaluable feedback on the server’s initialization, session creation, and any errors or warnings, making it significantly easier to diagnose issues.
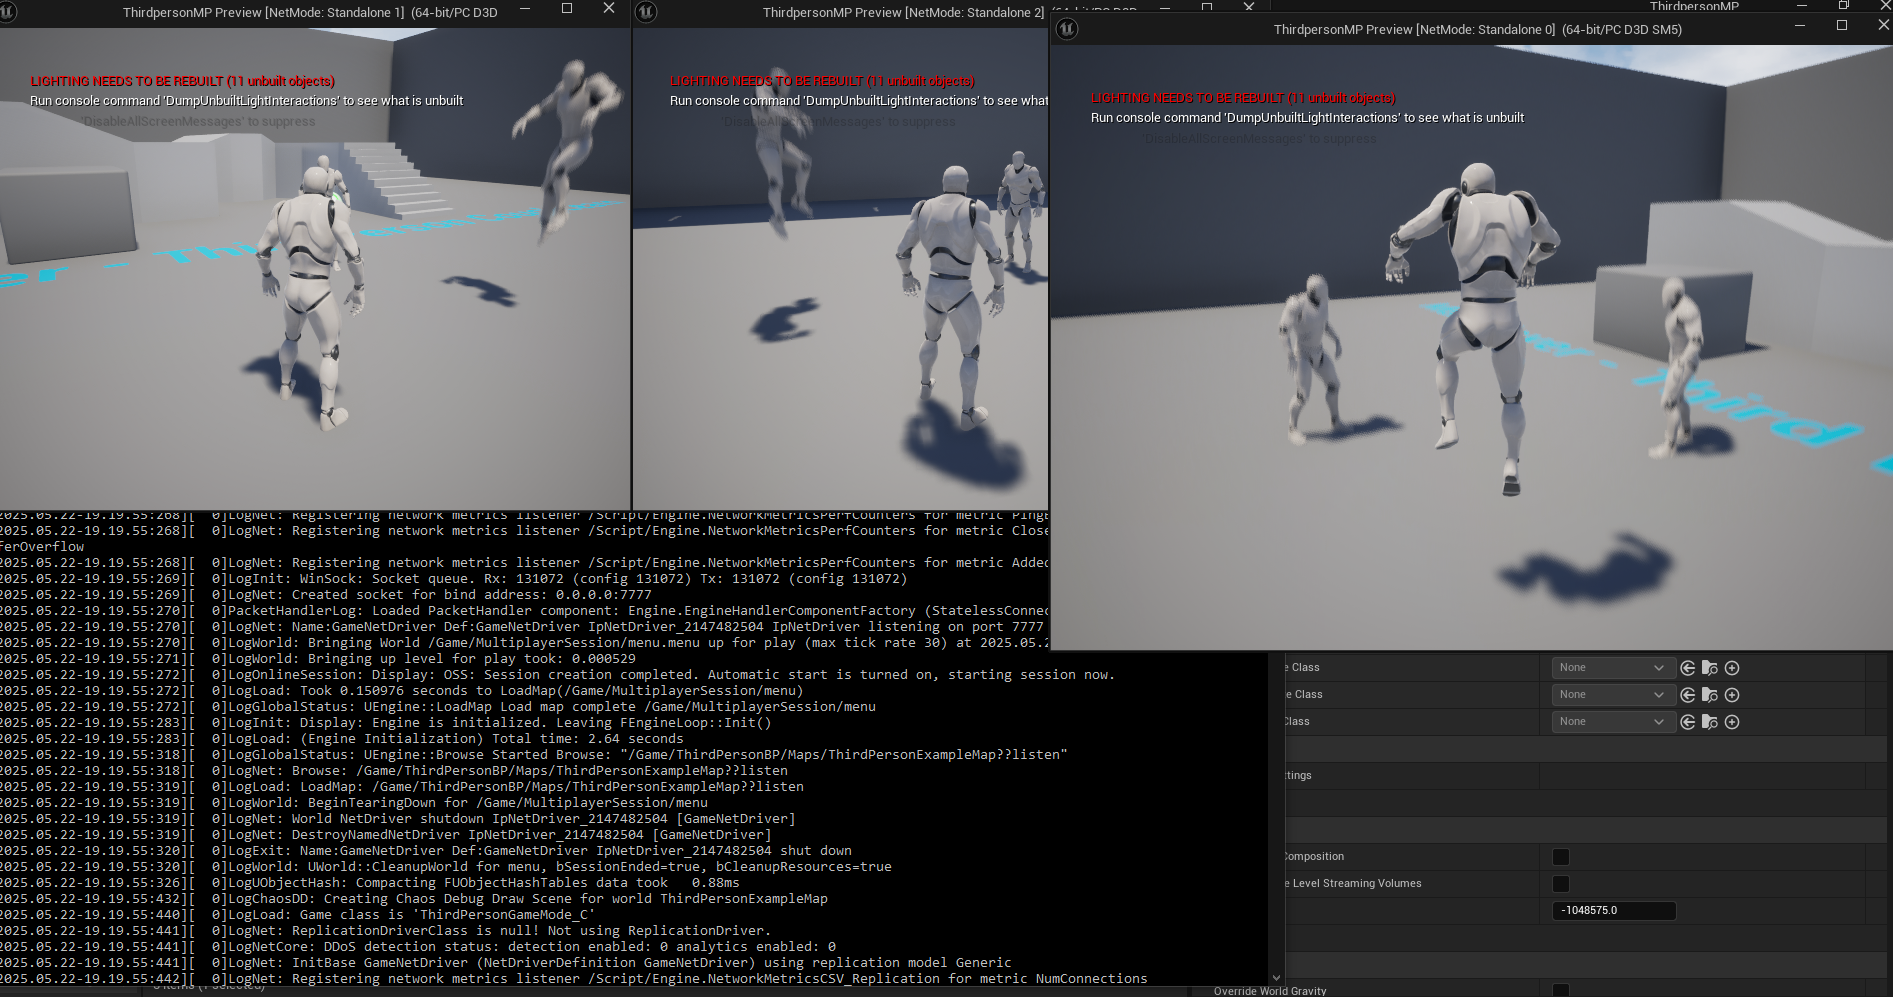
Upon launching the shortcut, the console window will fill with text as the server initializes, creates a session, and prepares to accept connections. Clients, running the regular game executable, can then search for and connect to this dedicated server session. The demonstration phase typically involves launching multiple client instances (e.g., within the Unreal Editor with "Number of Players" set to 3 or more, and "Play as Listen Server" unchecked) and observing them successfully connect and interact within the game world hosted by the dedicated server. This verifies that the server is correctly broadcasting its session and handling client connections and replication.
Broader Implications and Future Considerations

The successful deployment of a dedicated server fundamentally transforms a multiplayer game’s potential. It enables true scalability, allowing developers to host thousands of concurrent players across a fleet of servers, often managed via cloud infrastructure providers like AWS, Azure, or Google Cloud. These cloud platforms offer dynamic scaling capabilities, automatically provisioning or de-provisioning server instances based on player demand, thereby optimizing operational costs. Advanced server orchestration tools like Agones (built on Kubernetes) further streamline the management of game server fleets, handling matchmaking, instance lifecycle, and resource allocation.
From a security standpoint, dedicated servers are the cornerstone of robust anti-cheat systems. Since the server holds the authoritative game state, client-side modifications are less effective. Any discrepancies between a client’s reported state and the server’s validated state can be detected and addressed, significantly reducing the prevalence of hacking and exploitation. This directly contributes to competitive integrity, ensuring that player skill, rather than technical exploits, determines outcomes.
For game developers, transitioning to a dedicated server model requires a more sophisticated approach to networking code, focusing on server-side authoritative logic, robust network prediction, and efficient data replication. This paradigm ensures that the game remains fair and stable even under varying network conditions.
Looking ahead, advancements in serverless computing and edge computing present exciting possibilities for game server infrastructure. Serverless functions could manage ephemeral game logic, while edge servers, positioned closer to players, could further reduce latency for real-time multiplayer experiences. However, dedicated server technology remains the robust, proven foundation for scalable and secure multiplayer gaming.
Conclusion
This comprehensive guide demonstrates the end-to-end process of building and configuring a dedicated server for Unreal Engine 5 projects. By systematically addressing prerequisites, adapting game logic for server-only execution, leveraging the Project Launcher for robust builds, and implementing effective testing methodologies, developers gain the ability to deploy powerful, independent game servers. This knowledge is not merely a technical skill but a strategic advantage, empowering creators to launch fully featured multiplayer games that deliver exceptional performance, unwavering security, and a consistent, high-quality experience to a global player base. The investment in dedicated server infrastructure is an investment in player satisfaction, competitive fairness, and the long-term success of any ambitious multiplayer title.
About the Author