The landscape of modern multiplayer gaming increasingly demands robust and reliable server infrastructure to deliver seamless, secure, and scalable experiences. For developers leveraging Unreal Engine 5, establishing a dedicated server is not merely an option but a critical strategic decision for any game aiming to support multiplayer functionality at scale. This guide provides a comprehensive overview of the process, from initial project configuration to the final server build and testing, ensuring developers can effectively transition from peer-to-peer setups to a professional, dedicated server environment.
The Evolution and Necessity of Dedicated Servers in Gaming
For decades, multiplayer gaming relied on various networking models, with early iterations often utilizing peer-to-peer (P2P) connections or "listen servers." In a P2P model, one player’s machine acts as the host, simultaneously running the game client and server logic. This approach is cost-effective for developers as it eliminates the need for dedicated hardware and complex server management. Listen servers, a variation where one player’s client also hosts the game, are similarly easy to implement for smaller-scale games (typically 2-16 players). However, both P2P and listen servers are inherently vulnerable to a range of issues, including host advantage (where the host experiences minimal latency), "host migration" problems if the host disconnects, and susceptibility to cheating due to client-side authority.
As competitive gaming grew and player expectations for stable, lag-free experiences intensified, the industry largely shifted towards dedicated server architecture. A dedicated server is a specialized computer running only the game’s server-side logic, independent of any player’s client. This centralized control offers significant advantages: enhanced performance by offloading processing from player machines, superior security against cheating, improved reliability, and true scalability to accommodate hundreds or thousands of concurrent players. Major titles across genres, from competitive shooters like Valorant and Counter-Strike to expansive cooperative survival games and social sandbox experiences, rely exclusively on dedicated servers to maintain competitive integrity and deliver consistent gameplay. Industry analysts consistently highlight server stability and low latency as key drivers for player retention and satisfaction, underpinning the strategic importance of this architectural choice.
Understanding the Technical Foundation: Dedicated vs. Listen Servers
At its core, a dedicated server in game development is a "headless" instance of the game. It processes the game world, handles physics, replicates data, and manages player connections without rendering graphics or spawning a player character. This allows it to operate with minimal overhead, focusing solely on the authoritative simulation of the game state. Unlike a listen server, which is constrained by the host player’s internet connection and hardware, a dedicated server can be hosted on high-performance machines in data centers with robust network infrastructure, guaranteeing optimal latency and bandwidth for all connected clients.
The key benefits of a dedicated server include:
- Reduced Latency and Jitter: Centralized hosting on high-speed networks minimizes round-trip time for data packets, leading to smoother gameplay.
- Enhanced Security: Server-side authority makes it significantly harder for players to cheat or manipulate game mechanics, as the server validates all critical actions.
- Improved Reliability: The server runs independently, unaffected by individual player disconnections or client-side crashes.
- Scalability: Dedicated servers can be deployed en masse to handle fluctuating player counts, enabling developers to scale their infrastructure dynamically.
- Fair Play: All players connect to a neutral host, eliminating host advantage and ensuring an even playing field.
- Persistence: Game worlds can remain active 24/7, even without players, facilitating persistent environments and asynchronous gameplay.
While dedicated servers entail higher operational costs (for hardware, hosting, and maintenance) and a more complex initial setup, the long-term benefits in terms of player experience, community trust, and game longevity often outweigh these challenges for serious multiplayer titles.
Essential Prerequisites for Unreal Engine 5 Dedicated Server Development
Before embarking on the dedicated server build process for an Unreal Engine 5 project, several foundational requirements must be met to ensure a smooth workflow and successful compilation. These prerequisites are not merely suggestions but technical necessities mandated by Unreal Engine’s architecture for server-side deployments.
-
A Working Multiplayer Unreal Engine 5 Project: The absolute first step is to have an existing Unreal Engine 5 project that already supports basic multiplayer functionality. This typically involves player replication, movement, and interaction across multiple clients within a listen server environment. Developers without such a project are advised to first complete a guide on implementing multiplayer sessions in Unreal Engine 5, as the dedicated server build will rely on these established networking components. For instance, the linked "Multiplayer Sessions in Unreal Engine 5" guide on Couchlearn.com provides the necessary groundwork for session management and player connectivity.
-
A Source Build of Unreal Engine 5: This is a crucial distinction. Unlike the version downloaded directly from the Epic Games Launcher, a dedicated server cannot be built using a pre-compiled binary engine. Developers must compile Unreal Engine 5 from its source code, obtained from Epic Games’ GitHub repository. The reason for this requirement lies in the specific build targets and configurations necessary for server binaries. The Epic Games Launcher version is optimized for client-side development and gameplay, lacking the server-specific modules and dependencies. Building from source grants developers access to these server targets, allowing for the generation of a stripped-down, server-only executable. Epic Games provides detailed documentation on how to download and build the engine from source, a process that involves using Visual Studio (for Windows) and potentially other toolchains depending on the target server platform (e.g., Linux). This step can be time-consuming, involving significant download and compilation times, but it is non-negotiable for dedicated server development.
-
The AdvancedSessions Plugin (Crucial for Session Browsing): For a dedicated server to correctly advertise itself and appear in a session browser for players to join, the AdvancedSessions plugin is often indispensable. While Unreal Engine provides native session interfaces, the AdvancedSessions plugin, developed by Satheesh "VREUE4" Kumar, extends and enhances these functionalities, offering more robust and user-friendly Blueprint nodes for creating, finding, and joining multiplayer sessions. Without this plugin (or a custom implementation that replicates its features), players may struggle to discover and connect to the dedicated server, rendering the server largely inaccessible. Integrating this plugin into the project ensures that the server’s session data is correctly broadcast and queryable by client applications.
Meeting these prerequisites establishes a solid foundation, allowing developers to proceed with the server-specific configurations and build processes within Unreal Engine 5.
Configuring Your Unreal Engine 5 Project for Dedicated Servers
Once the foundational prerequisites are in place, the Unreal Engine 5 project itself requires specific modifications to behave correctly when launched as a dedicated server. These adjustments ensure the server operates as a backend process, manages game sessions automatically, and loads the appropriate game levels without player-specific elements.
1. Implementing Automatic Session Creation:
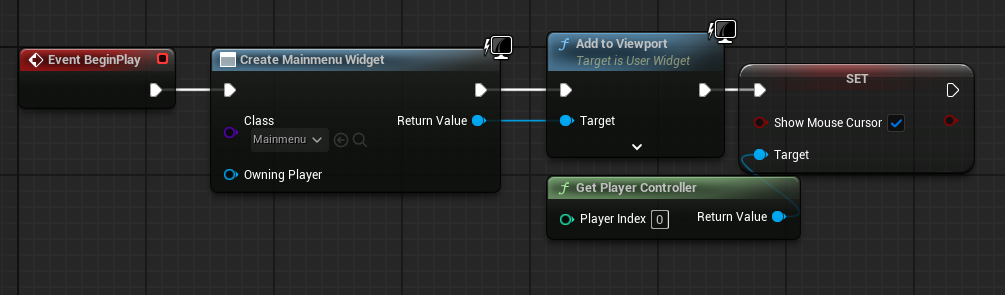
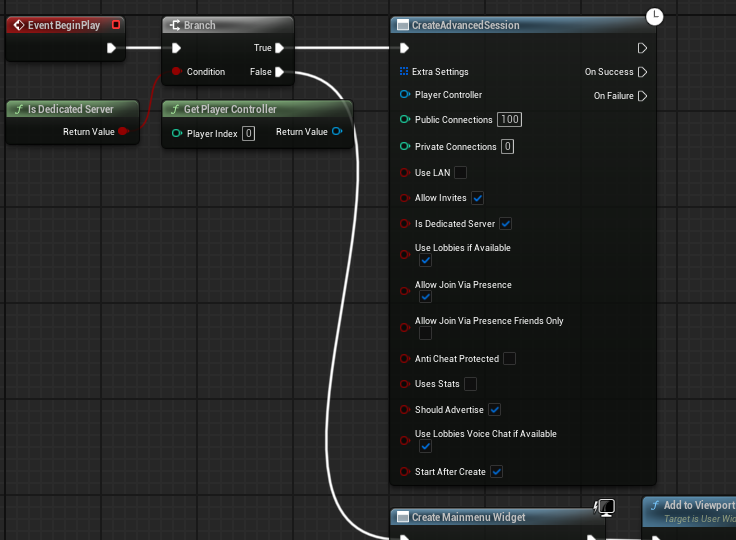
A key difference for a dedicated server is its lack of a player-driven interface. Unlike a client, it doesn’t navigate menus or click "Host Game." Therefore, the server must automatically create a game session and load the primary gameplay map upon launch. This is typically achieved within the main menu level blueprint or a similar initial startup logic.
The process involves:
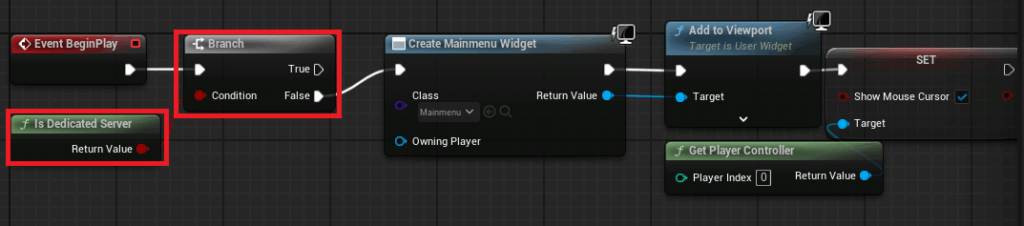
- Checking for Dedicated Server Status: Utilize the "Is Dedicated Server" Blueprint node. This node returns
Trueif the current executable is running as a dedicated server andFalseotherwise. - Branching Logic: If the "Is Dedicated Server" node returns
False(meaning it’s a client), the existing logic for creating and adding the main menu widget to the screen should execute. - Dedicated Server Path: If "Is Dedicated Server" returns
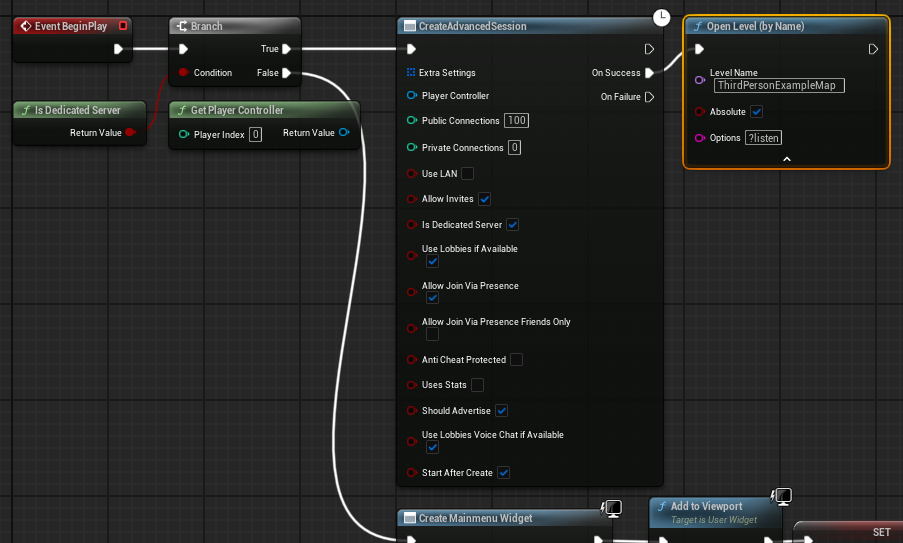
True, bypass all UI-related code. Instead, directly execute a "Create Advanced Session" node (from the AdvancedSessions plugin). This node allows the server to establish a new multiplayer session with predefined settings such as maximum players, public/private status, and other session-specific metadata. - Loading the Game Map: Upon successful session creation, the server must then open the intended gameplay level. This is done using an "Open Level" node, critically appending the
?listenoption to the map name (e.g.,GameplayMap?listen). The?listenparameter instructs the engine to open the level as a listen server, but in the context of a dedicated server, it means the server will accept incoming client connections to that specific map. This ensures players can connect to the actively running game world.
This sequence guarantees that a dedicated server instance, when launched, autonomously sets up the game environment, ready for players to connect, without requiring any manual intervention or displaying a graphical user interface.
2. Choosing the Default Server Map:
By default, an Unreal Engine build attempts to load an internal engine map called "Entry" upon startup. For a dedicated server, this is undesirable. The server needs to load a specific project map to initialize the game world correctly. This is configured within the Project Settings:
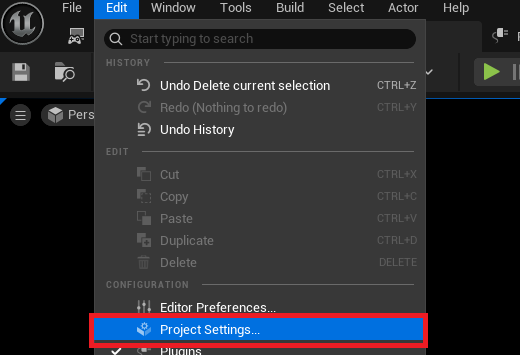
- Navigate to Edit > Project Settings.
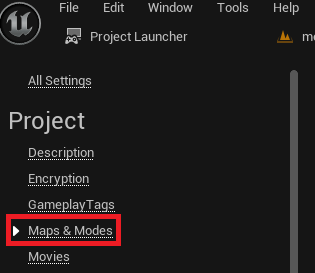
- In the Project Settings window, select the Maps & Modes section.
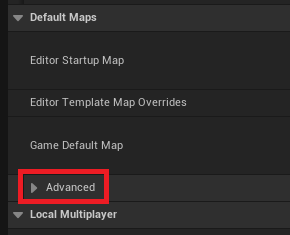
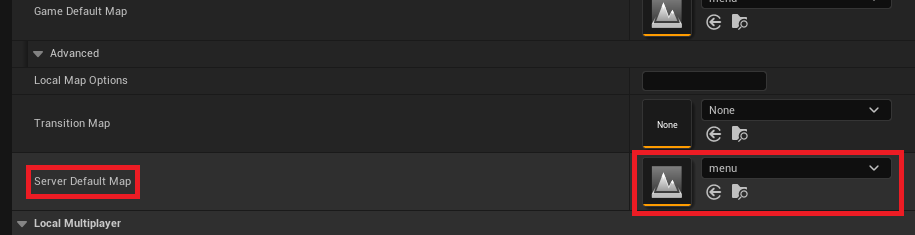
- Under the "Default Maps" category, expand the Advanced options.
- Locate the Server Default Map setting. Here, specify the path to the main menu map or the initial map where the dedicated server’s session creation logic resides. For instance, if the automatic session creation is handled in a map named "MainMenu," that map should be set as the "Server Default Map." This ensures the server starts in the correct environment to execute its automated session setup.
3. No Default Character in the Level:
A dedicated server’s purpose is to manage the game world, not to participate in it as a player. Therefore, any player character blueprints or default pawn spawns present in the level should be removed or conditionally spawned.
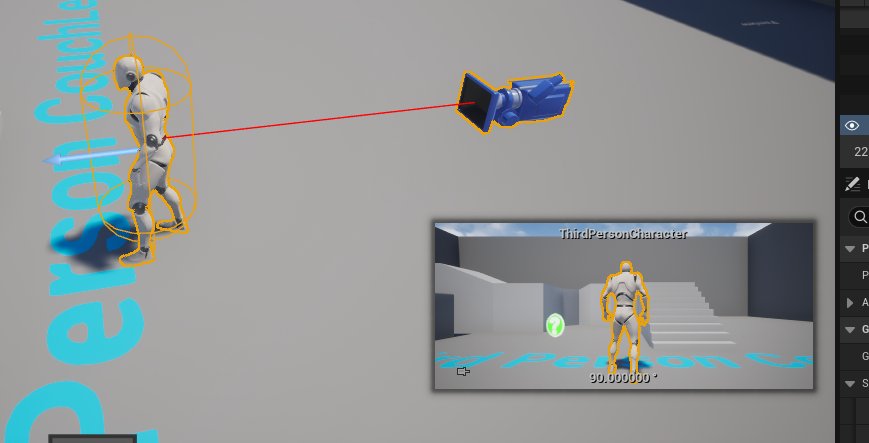
- If a level contains a default player character blueprint that automatically spawns and is controlled by the first connected player, this character will needlessly exist in the dedicated server’s instance. This consumes resources, can cause unexpected behaviors, and serves no functional purpose.
- Developers should ensure that the initial maps loaded by the dedicated server do not contain any default player characters. Character spawning should instead be handled by the game mode or player controller logic only when a client successfully connects and requests a pawn. This ensures the server remains a lean, authoritative backend without unnecessary visual or interactive components.
By meticulously implementing these project configurations, developers prepare their Unreal Engine 5 game to operate efficiently and correctly in a dedicated server environment, laying the groundwork for a robust multiplayer experience.
Leveraging the Unreal Engine Project Launcher for Server Builds
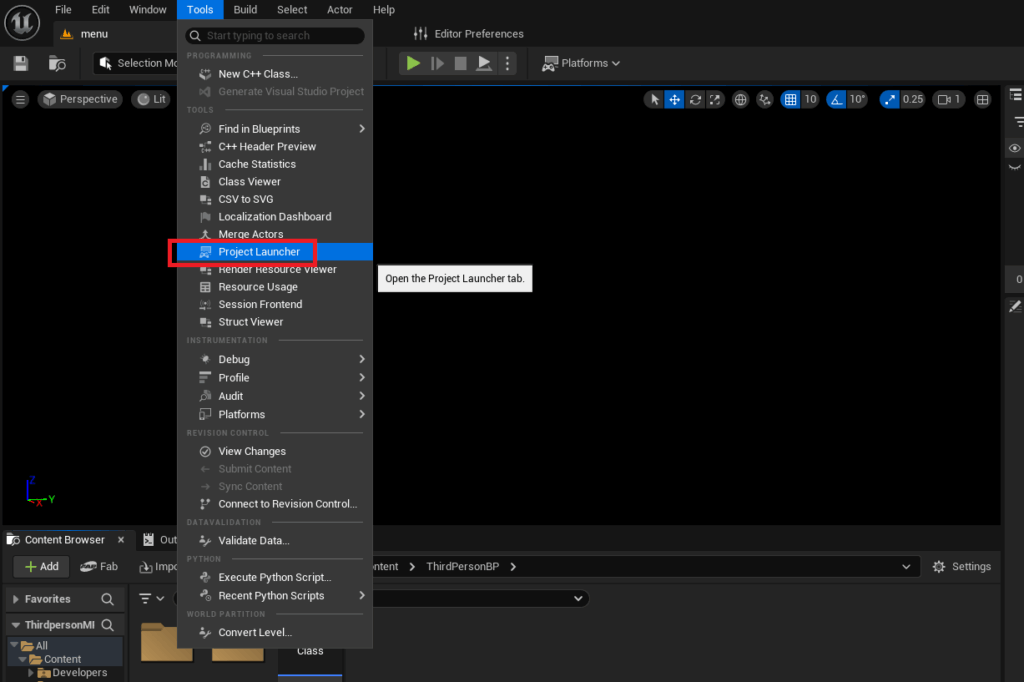
The Unreal Engine Project Launcher is an invaluable, built-in tool designed to streamline the packaging, cooking, and deployment of Unreal Engine projects across various platforms. For dedicated server development, it provides a powerful and flexible interface to define custom build profiles, ensuring that the server executable is compiled with the exact specifications required. This tool simplifies what could otherwise be a complex, command-line driven build process.
To access the Project Launcher:
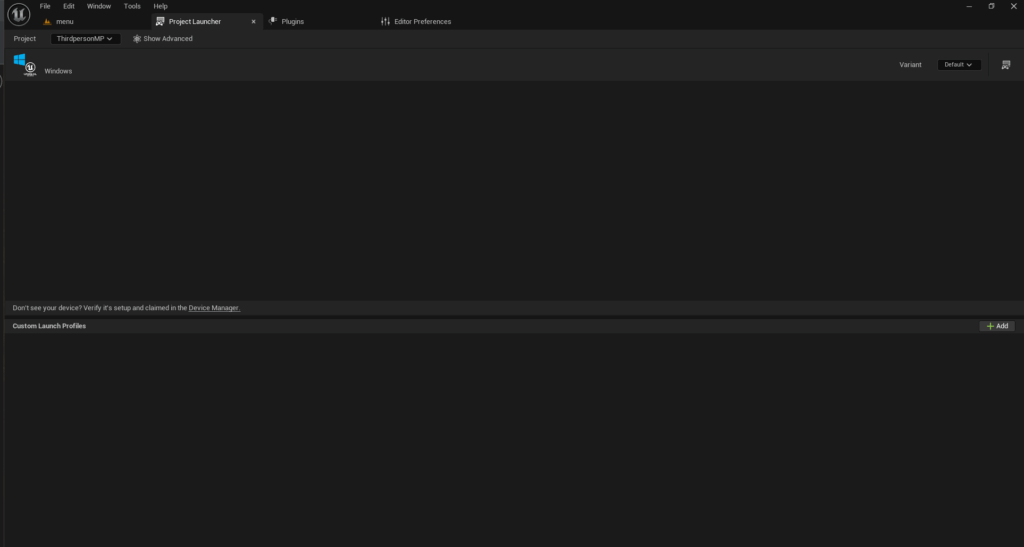
- From the Unreal Engine editor, navigate to Tools > Project Launcher.
Upon opening, the Project Launcher typically presents an empty interface, awaiting the creation of custom launch profiles.
Creating a Custom Profile for Your Dedicated Server:
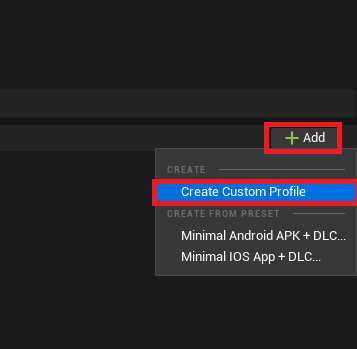
The core of using the Project Launcher for dedicated servers lies in configuring a custom profile that dictates how the engine should compile the project.
-
Initiate Profile Creation: Click the "Add" button (usually a plus icon) in the bottom right corner, then select "Create Custom Profile." This will open a detailed configuration menu.
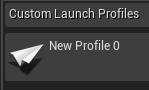
-
Cook Settings – "By the Book":
- Locate the "Cook" section. The default setting "On the fly" is suitable for rapid iteration during development but is not appropriate for a final server build.
- Change the cook option from "On the fly" to "By the book." This instructs the engine to pre-cook all necessary content (assets, shaders, etc.) into platform-specific archives before packaging, ensuring optimal performance and consistency for the server. This process is more thorough and ensures that all assets are correctly prepared for the target platform.
-
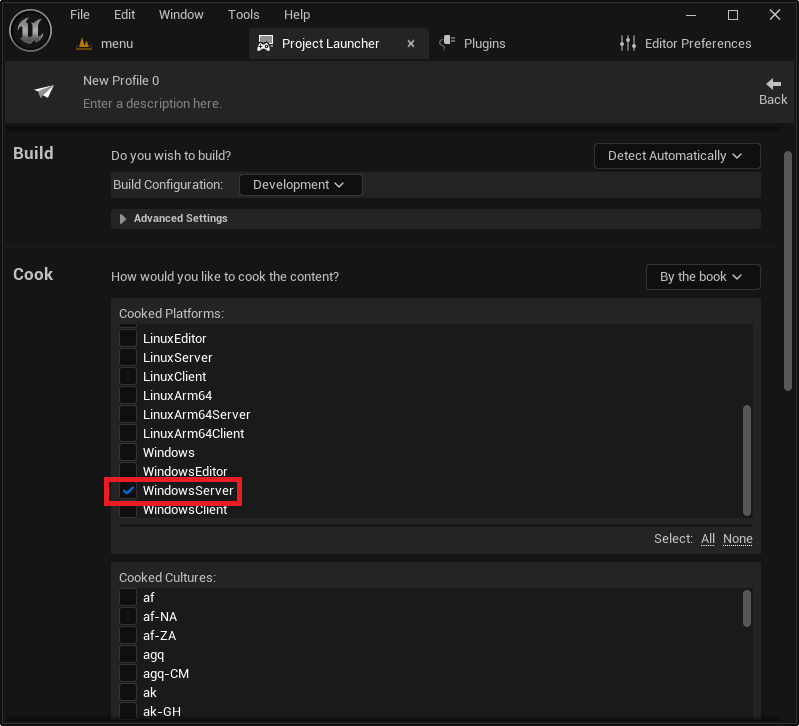
Cooked Platforms – Selecting the Server Target:
- Scroll down within the "Cook" section to find the "Cooked Platforms" list.
- Enable the checkbox for the desired server platform. For Windows-based servers, select "WindowsServer."
- For Linux deployments, choose "LinuxServer" (for x86/64 architectures) or "LinuxArm64" (for ARM-based servers). The choice depends entirely on the operating system and architecture of the machine intended to host the dedicated server. "WindowsServer" is the most common choice for many developers.
-
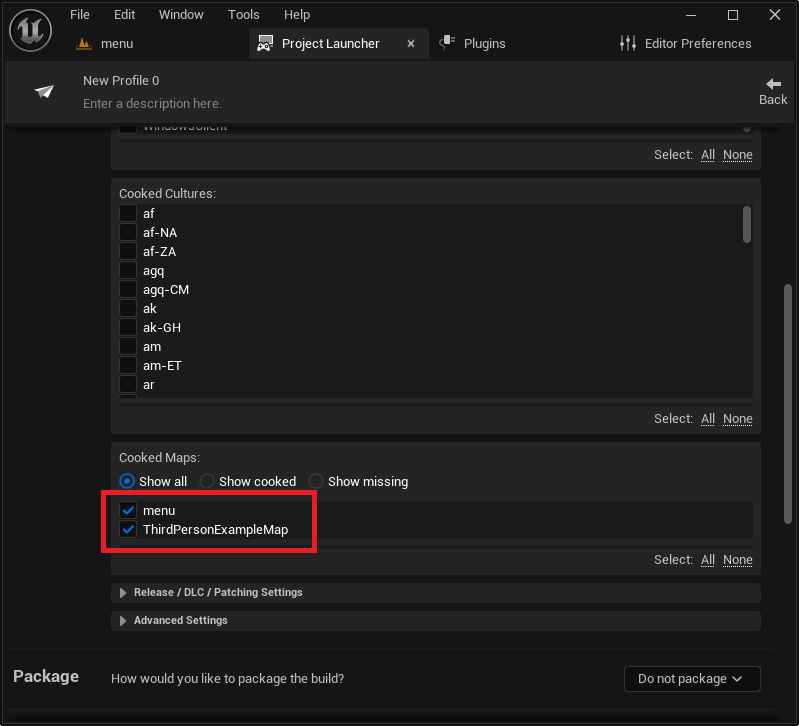
Maps to Cook – Including All Relevant Levels:
- Further down in the "Cook" section, specify all the maps that the dedicated server will need access to. This typically includes the main menu map (where the session is created) and all gameplay maps that players will transition between.
- Carefully select each relevant map using the provided interface. Failing to include a map will result in the server being unable to load it, leading to runtime errors.
-
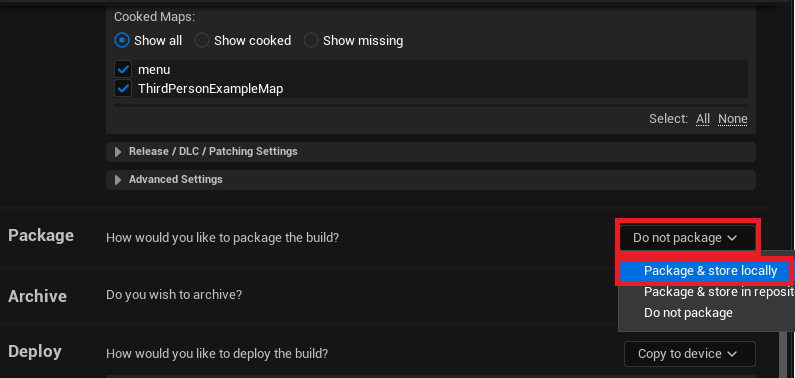
Package Settings – "Package & Store Locally":
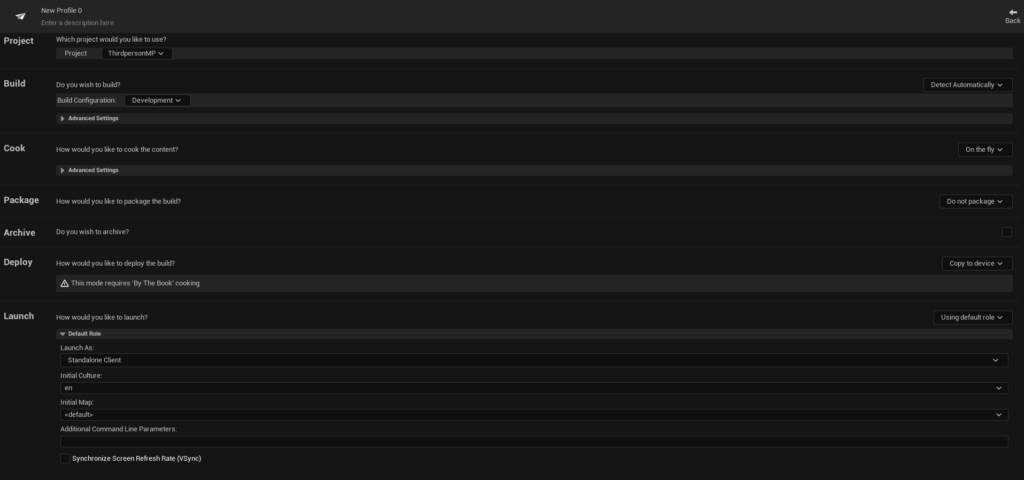
- Navigate to the "Package" section.
- Change the package option from "Do not package" to "Package & store locally." This tells the Project Launcher to compile and package the cooked content and server executable into a deployable folder structure on the local machine.
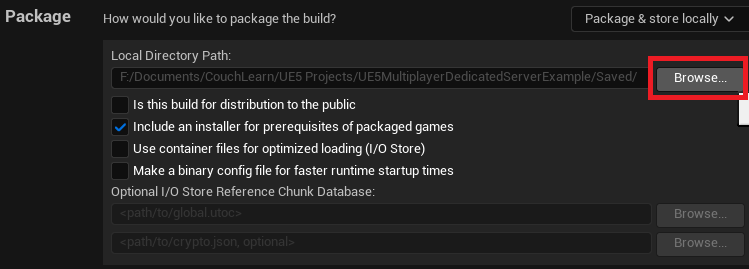
- A default output path within the project’s
Saved/StagedBuildsdirectory will be generated. Developers can customize this path using the "Browse" button to choose a more convenient location for the packaged server files.
-
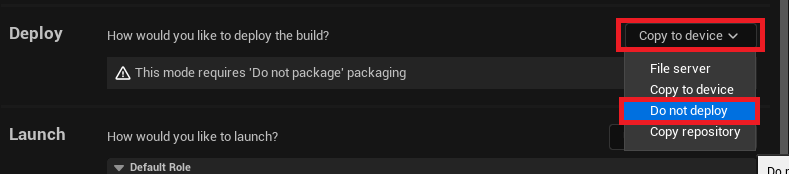
Deploy Settings – "Do Not Deploy":
- In the "Deploy" section, change the option from "Copy to device" to "Do not deploy." While the Project Launcher can directly deploy builds to connected devices, for a dedicated server, the goal is typically to create a standalone package that can then be manually transferred to a remote hosting environment or server machine. "Do not deploy" simply ensures the package is generated locally without attempting an immediate transfer.
-
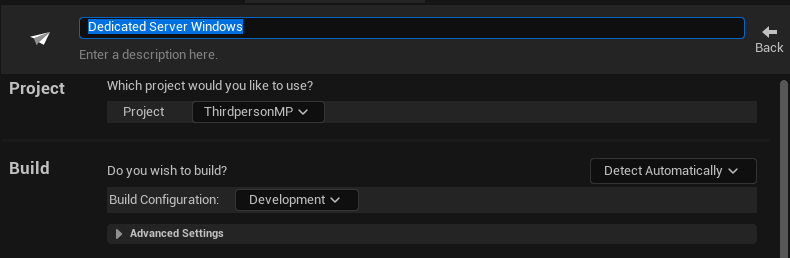
Profile Naming:

- Finally, provide a descriptive name for your custom profile (e.g., "MyGame_DedicatedServer_Windows"). A clear name helps in identifying the profile later, especially when managing multiple build configurations.
After configuring all these settings, save the profile. This meticulously prepared profile serves as a blueprint for generating the dedicated server executable, encapsulating all the necessary build instructions for Unreal Engine.
Building and Testing Your Dedicated Server
With the custom profile configured within the Project Launcher, the next phase involves initiating the build process and subsequently testing the generated dedicated server. This step transforms your project code into a functional, standalone server application.
Initiating the Build Process:
- Return to Main Project Launcher Menu: After saving your custom profile, click the "Back" button to return to the main Project Launcher interface. Your newly created profile will now appear in the list of custom launch profiles.
- Launch the Build: To start building the dedicated server, simply click the "Launch" button (often represented by a controller or play icon) associated with your custom profile.
Upon launching, the Project Launcher will display a console-like window showing the progress and debug logs of the build process. This involves several stages:
- Cooking Content: All specified assets and maps are processed and optimized for the target server platform. This can be the most time-consuming part, especially for the first build or large projects.
- Compiling Server Binaries: The engine compiles the necessary C++ code into the server executable.
- Packaging: The cooked content and compiled binaries are assembled into the final deployable folder structure.
The build process can take a considerable amount of time, ranging from minutes to several hours, depending on the project’s size, the number of maps, and the developer’s hardware specifications. It is crucial to allow this process to complete fully without interruption. A "Success" message for each task within the log indicates a successful build.
Locating and Running the Dedicated Server:
Once the build is complete, navigate to the output folder specified in your custom profile’s "Package" settings. If the default path was used, the server files will typically be located within your project directory under Saved/StagedBuilds/[PlatformName], e.g., Saved/StagedBuilds/WindowsServer.
Inside this folder, you will find the server executable (e.g., MyGameServer.exe).
Testing the Dedicated Server:
- Creating a Shortcut: For ease of use and to add launch arguments, create a shortcut to the server executable (right-click the
.exe> Send to > Desktop (create shortcut) or right-click > Create shortcut). - Adding the
-logArgument: Right-click the newly created shortcut, select "Properties," and in the "Target" field, append-logto the end of the executable path (e.g.,".../MyGameServer.exe" -log).- The
-logargument is invaluable for debugging. It forces the server to open a console window that displays real-time logging messages, including session creation status, network activity, and any errors. Without this, the server often runs silently in the background, making it difficult to monitor or troubleshoot.
- The
- Launching the Server: Double-click the shortcut. A console window will appear, displaying initialization messages as the server boots up, creates its session, and loads the default map. Once the log indicates that a session has been created and the map loaded, the server is ready for client connections.
Client Connection and Demonstration:
With the dedicated server running, launch your Unreal Engine 5 game client (either from the editor or a client build). The client’s session browser should now display the dedicated server’s active session. Players can then select and join this session.
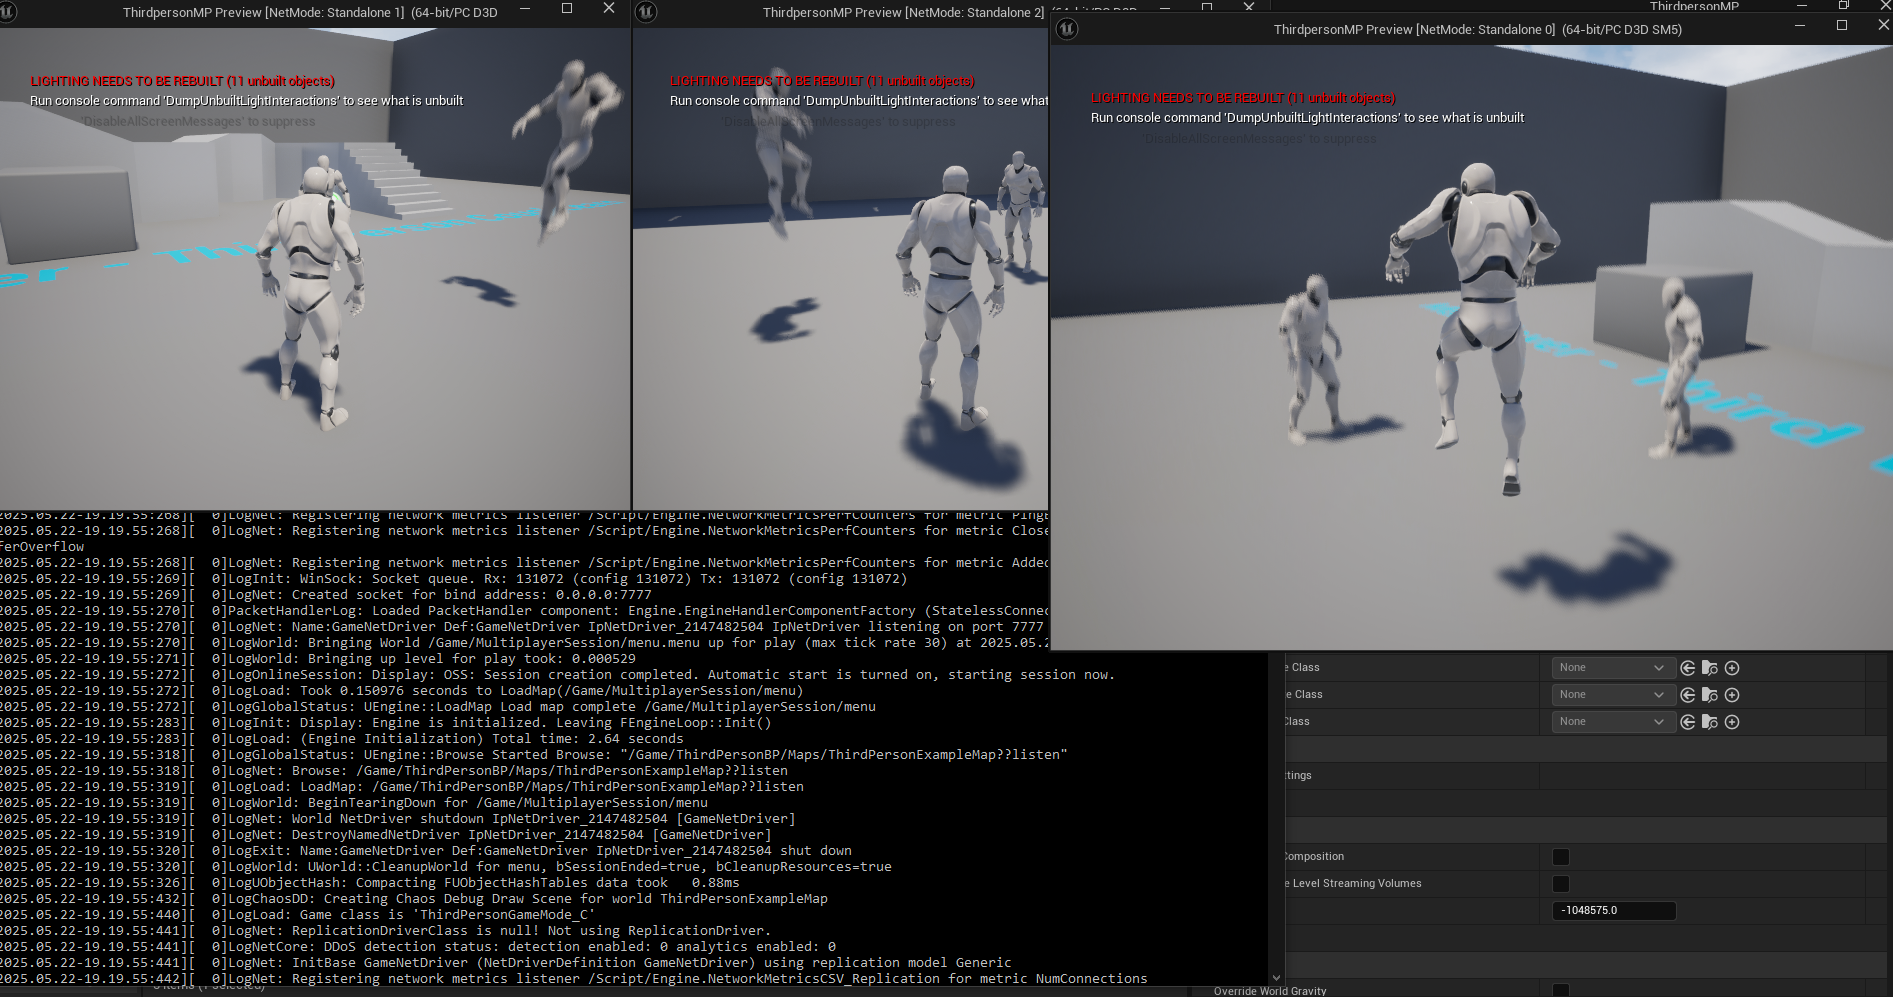
- Verification: To truly test the dedicated server, launch multiple client instances (e.g., three clients within the editor, each set to "Play as Listen Server" or "Play as Client" if testing local client builds). Connect all these clients to the running dedicated server.
- Observation: Players connected to the dedicated server should be able to move, interact, and see each other seamlessly, demonstrating that the server is independently managing the game state without relying on any single player’s machine to host. This independent operation is the hallmark of a successful dedicated server deployment, providing superior performance, security, and a consistent multiplayer experience for all participants.
Broader Implications for Game Development and Operations
The successful deployment of a dedicated server for an Unreal Engine 5 game carries significant implications beyond mere technical functionality. It represents a strategic commitment to quality, scalability, and the long-term viability of a multiplayer title.
- Enhanced Player Experience and Retention: By eliminating host advantage, reducing latency, and mitigating cheating, dedicated servers directly contribute to a more enjoyable and fair gameplay experience. This is crucial for player retention, as a frustrating or laggy experience is a primary reason for players to abandon a game. A smooth, responsive multiplayer environment fosters a loyal community.
- Competitive Integrity and Esports Potential: For games with competitive aspirations, dedicated servers are non-negotiable. They ensure that every player competes on an even playing field, with the server acting as the ultimate authority. This integrity is fundamental for professional esports, where even minor inconsistencies can impact competitive outcomes and viewership.
- Scalability and Global Reach: Dedicated servers can be deployed across various geographical regions, allowing developers to minimize latency for players worldwide. Cloud hosting providers (like AWS, Azure, Google Cloud, or specialized game server hosting services) offer scalable infrastructure, enabling studios to dynamically spin up or shut down server instances based on player demand. This elasticity is vital for handling peak player counts during new content releases or events, and for efficient resource management during off-peak hours.
- Robust Security and Anti-Cheat Measures: With the game logic residing on a secure, controlled server, developers gain a powerful tool against cheating. Server-side validation of player actions and continuous monitoring make it significantly harder for malicious actors to exploit vulnerabilities. This protects the game’s economy, competitive balance, and overall player trust.
- Simplified Game Updates and Maintenance: Deploying updates to dedicated servers can be more streamlined than coordinating updates across numerous peer-to-peer hosts. Developers can push patches to centralized server instances, ensuring all players are connecting to the latest version of the game. This simplifies maintenance and allows for faster iteration on gameplay features.
- Monetization and Business Models: For games relying on in-game purchases, battle passes, or subscription models, a stable and fair multiplayer experience fostered by dedicated servers is paramount. Players are more likely to invest in a game that consistently delivers high quality and protects their competitive investments.
In conclusion, the journey from a local multiplayer project to a fully functional dedicated server in Unreal Engine 5 is a significant step that underpins the success of any ambitious multiplayer game. By understanding the core concepts, meticulously configuring project settings, and utilizing Unreal Engine’s powerful Project Launcher, developers can build and deploy servers that offer unparalleled performance, security, and scalability. This knowledge empowers studios to deliver the consistent, high-quality multiplayer experiences that modern gamers expect, paving the way for engaging, long-lasting game communities and competitive ecosystems.
About the Author