The rapid evolution of game development, characterized by increasingly complex virtual worlds and intricate gameplay mechanics, necessitates robust and efficient development tools. Among these, Unreal Engine 5 (UE5) stands as a leading platform, and its visual scripting language, Blueprints, plays a pivotal role in empowering developers. At the heart of effective Blueprint scripting lies the concept of the function – a self-contained unit of code designed to enhance modularity, reusability, and overall project manageability. This guide delves into the fundamentals of Blueprint Functions, illustrating their creation, application, and the profound impact they have on streamlining game development workflows within UE5.
The Imperative of Modularity in Modern Game Development
In the contemporary landscape of interactive entertainment, game projects scale to unprecedented levels, involving vast teams and millions of lines of code or nodes. Without a structured approach to logic organization, development can quickly descend into chaos, leading to unmanageable code, increased debugging times, and hindered collaboration. This challenge is precisely what functions, both in traditional text-based programming languages like C++ and visual scripting environments like Unreal Engine’s Blueprints, are designed to address. By encapsulating specific tasks within discrete units, functions enable developers to adhere to the "Don’t Repeat Yourself" (DRY) principle, fostering cleaner, more efficient, and scalable projects.
Unreal Engine 5, launched with significant anticipation, has further solidified its position as a powerhouse for game creation. Its Blueprint visual scripting system is a cornerstone feature, allowing designers and programmers alike to build complex systems without writing a single line of C++ code. As projects grow in scope and complexity, mastering Blueprint Functions becomes not merely an advantage but a fundamental necessity for maintaining project health and accelerating development cycles. Data from developer surveys consistently highlight code organization and reusability as top priorities, directly aligning with the core benefits offered by functions.
Defining the Blueprint Function: Self-Contained Logic for Enhanced Efficiency
A Blueprint Function is essentially a self-contained sequence of nodes that executes a specific task. Think of it as a mini-program within your larger Blueprint graph. Once created, this logic block can be invoked, or "called," from multiple locations within the same Blueprint actor, eliminating the need to duplicate complex node networks. This reusability is augmented by the ability to define input parameters, allowing data to be passed into the function, and output parameters, enabling the function to return calculated results. This flexibility makes functions incredibly versatile, capable of handling everything from simple mathematical operations to intricate gameplay calculations.
Consider a common scenario in game development: calculating damage. Without functions, every instance where damage needs to be calculated (e.g., a player taking damage from an enemy, an environmental hazard, or a fall) would require duplicating the same complex damage calculation logic. This not only clutters the Blueprint graphs but also creates a maintenance nightmare. If the damage formula changes, every duplicated instance would need to be manually updated, a process prone to errors and significant time expenditure. By contrast, creating a single CalculateDamage function centralizes this logic. Any modifications to the damage formula are made once, within the function, and automatically propagate to all calling instances. This significantly reduces debugging effort and enhances project agility, crucial for iterative development.
It is important to note a key characteristic: a function defined within a specific Blueprint actor is inherently tied to that actor and can only be directly utilized within its own Blueprint graph. For logic intended for broader use across multiple different Blueprint actors, developers typically leverage Blueprint Function Libraries, which offer a similar modularity but at a project-wide scope.
Chronology of Implementation: Creating a Basic Blueprint Function
To illustrate the practical application of these concepts, we begin with a step-by-step guide to creating a simple "Print String" function, a fundamental operation often used for debugging and displaying information. This foundational example will then be expanded to demonstrate more advanced capabilities, such as handling input and output parameters for complex calculations.
Step 1: Accessing the Blueprint Editor and Function Panel
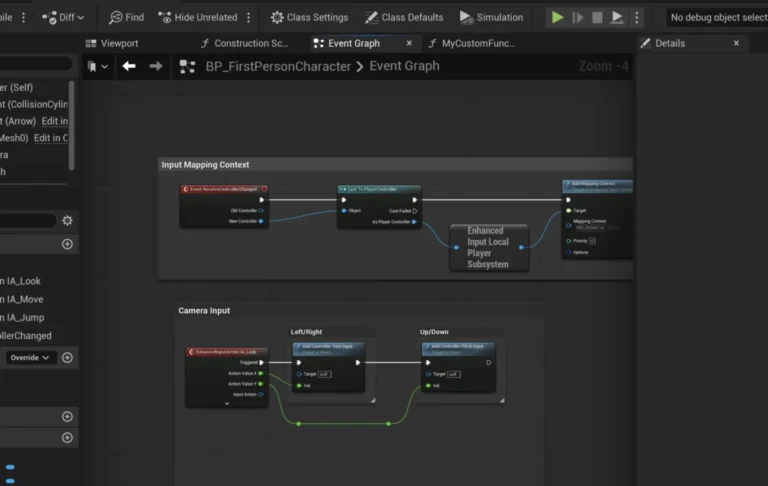
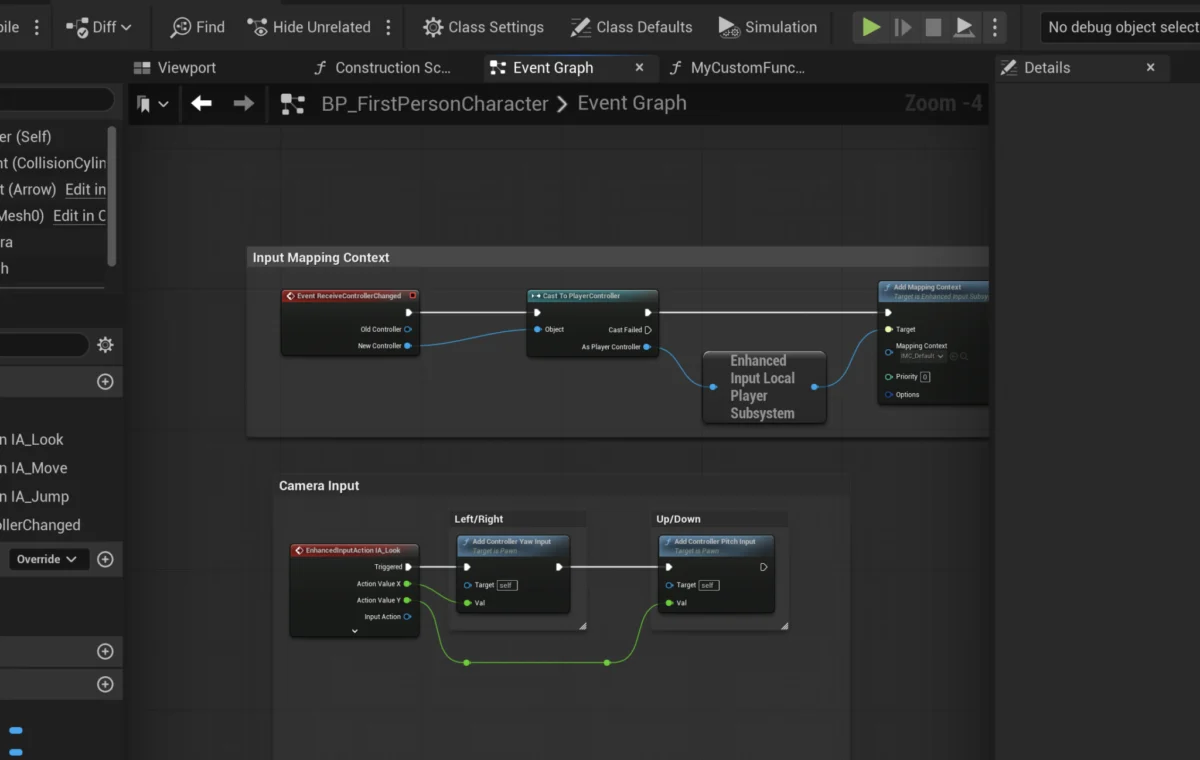
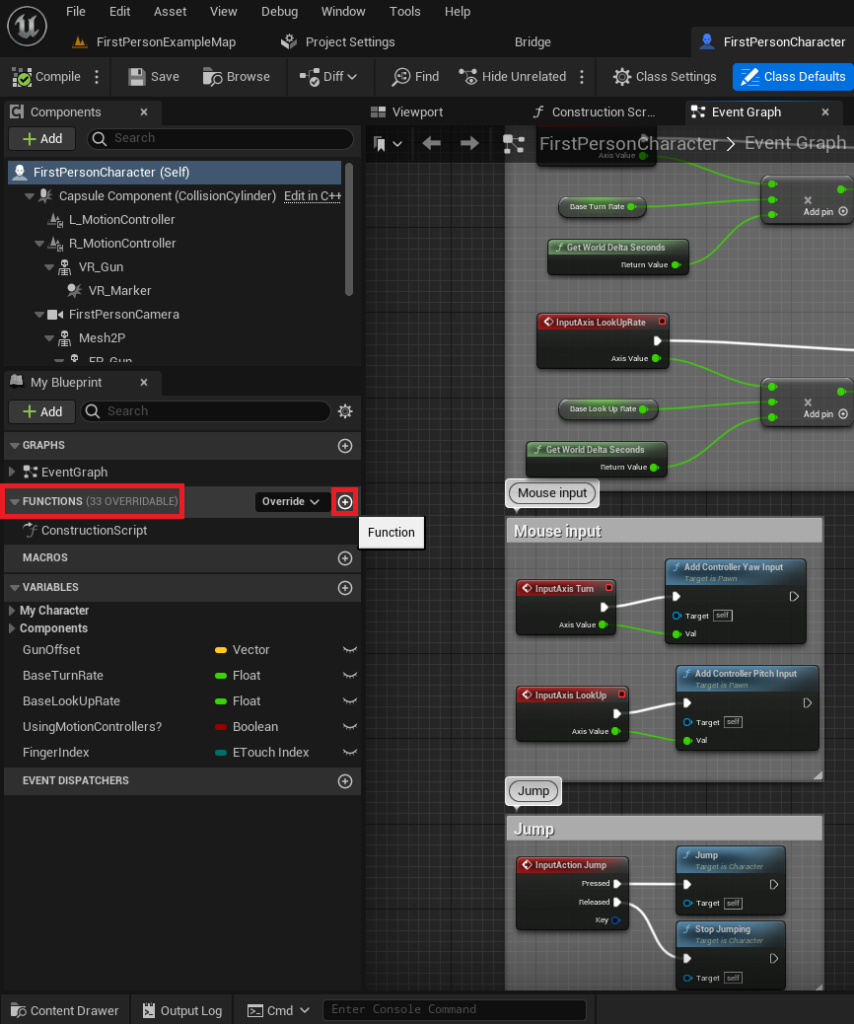
The journey begins within the Blueprint editor of an existing actor. For this demonstration, we utilize the FirstPersonCharacter Blueprint, a common starting point provided by Unreal Engine’s First Person Shooter template. Upon opening the Blueprint, developers will observe a dedicated "Functions" section in the left-hand "My Blueprint" panel. This area serves as the central repository for all functions specific to this particular Blueprint actor. The organized display of functions within this panel underscores Unreal Engine’s commitment to promoting structured development practices.
Step 2: Initiating Function Creation
To create a new function, locate the circle with a plus symbol positioned to the right of the "Functions" dropdown section. Clicking this icon prompts the system to generate a new function entry, ready for configuration. This intuitive user interface design ensures that developers can quickly and easily add new functional blocks to their Blueprints.
Step 3: Naming the Function with Clarity
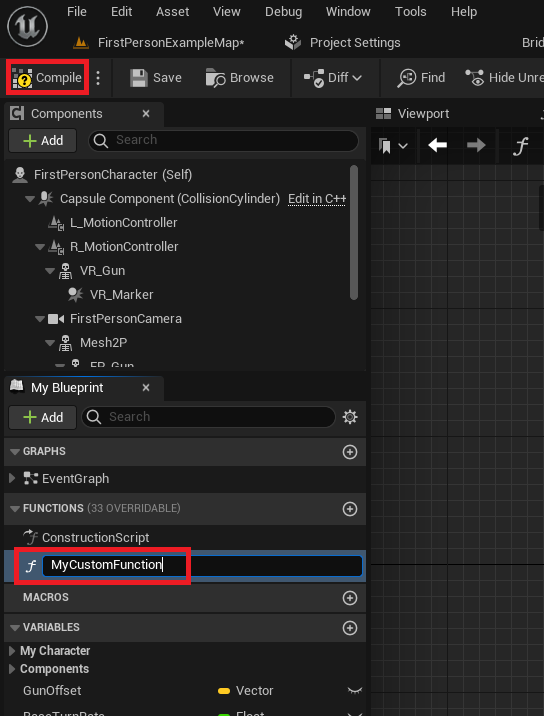
Immediately following creation, the new function requires a name. Adopting clear, descriptive naming conventions is paramount for project maintainability, especially as projects grow in size and complexity. Names like MyCustomFunction are useful for initial learning but should evolve into more functional descriptions, such as PrintDebugMessage or InitializePlayerState. Consistent naming practices, often following conventions like PascalCase (e.g., CalculateDamage, ApplyEffect), make Blueprints significantly more readable and easier for team members to understand and navigate. After inputting the desired name, pressing Enter or clicking elsewhere in the Blueprint window finalizes the naming process.
Step 4: Compiling the Blueprint
The final action in the initial creation phase is to compile the Blueprint. The "Compile" button, typically located at the top of the editor window, processes the changes, integrating the newly defined function into the Blueprint’s executable logic. This step is crucial for ensuring that the engine recognizes and can utilize the function within the project.
Adding Basic Functionality: The "Print String" Example
With the function framework established, the next phase involves embedding actual logic. For our initial example, the goal is to print a string to the screen, a simple yet effective way to confirm function execution.
Step 1: Connecting Execution Pins
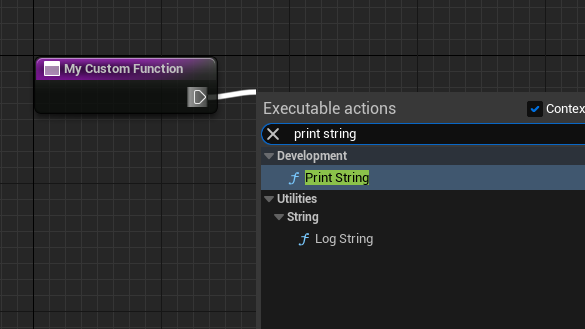
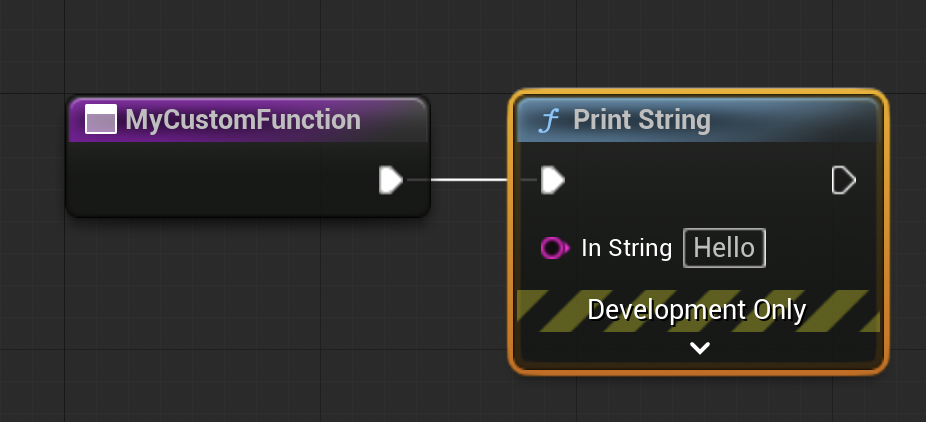
Within the newly created function graph, an entry node representing My Custom Function (or whatever it was named) will be present. This node features a white, sideways triangle known as an exec pin (execution pin). Exec pins are fundamental to Blueprint logic flow, dictating the sequential order in which nodes are executed. To add functionality, click and drag from this exec pin. Releasing the mouse button anywhere on the gray background grid will summon a contextual search menu.
Step 2: Selecting and Integrating the "Print String" Node
In the search menu, typing "Print String" will filter the available nodes. Selecting "Print String" from the results will place the corresponding node into the function graph. Crucially, because the connection was initiated from the My Custom Function‘s exec pin, the "Print String" node automatically connects to it, establishing a direct execution flow. When the My Custom Function is called, it will first execute any logic connected to its exec pin, in this case, the Print String node. The term "call" or "run" a function is used interchangeably to describe its execution.
Integrating Functions into Gameplay Logic: Testing the "Print String"
A function, once defined, must be explicitly "called" or "run" to execute its logic. For testing purposes, integrating it with the Event Begin Play is an ideal approach. This event fires automatically when an actor is spawned into the game world or when the game level starts if the actor is already placed in the world.
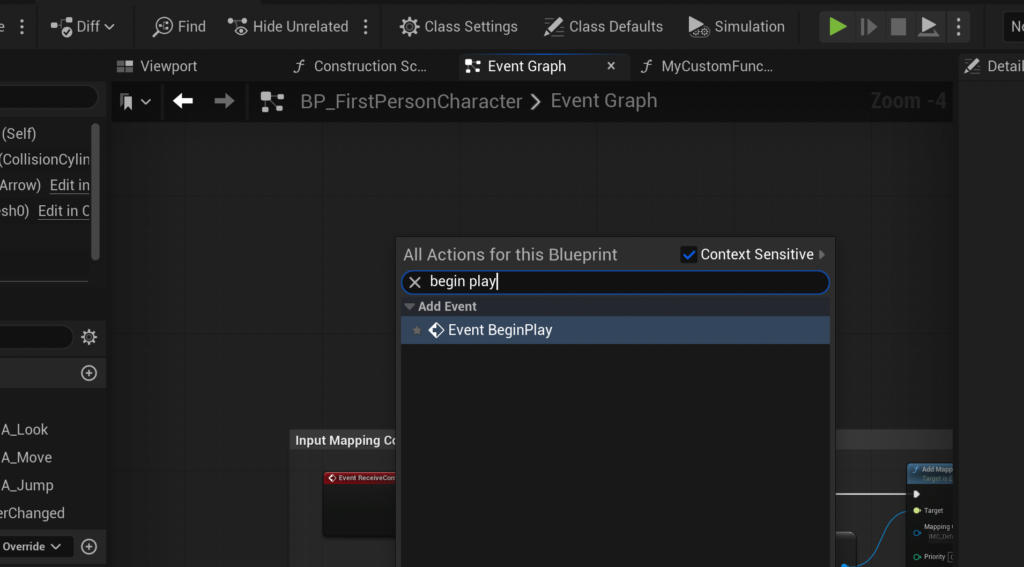
Step 1: Navigating to the Event Graph
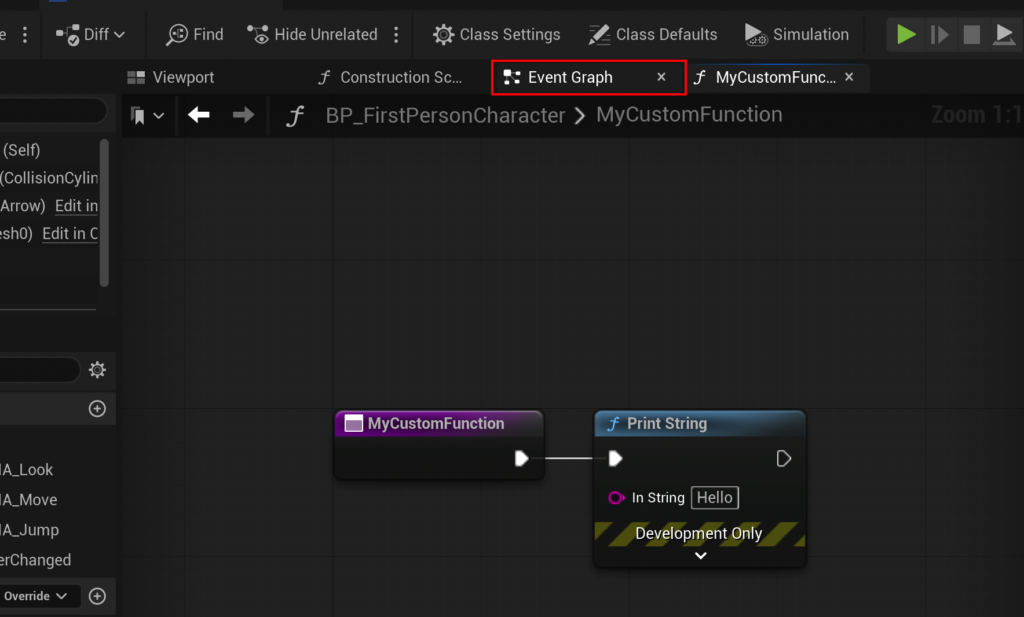
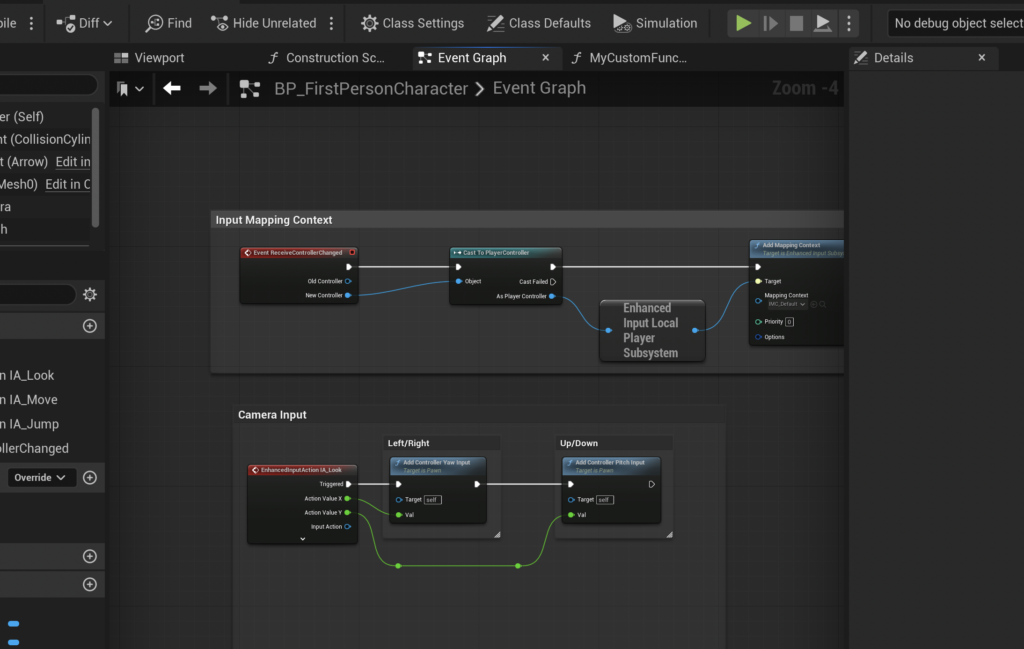
To connect our function to Event Begin Play, we must return to the Blueprint’s main Event Graph. This is achieved by clicking the "Event Graph" button located at the top of the Blueprint editor. The Event Graph serves as the primary canvas for handling events and orchestrating the overall logic flow of the Blueprint.
Step 2: Creating the Event Begin Play Node
Within the Event Graph, right-click on an empty area to open the contextual search menu. Search for "Event Begin Play" and select it to create the event node. This event requires no prior setup as Unreal Engine automatically triggers it at the start of gameplay for the relevant actor.
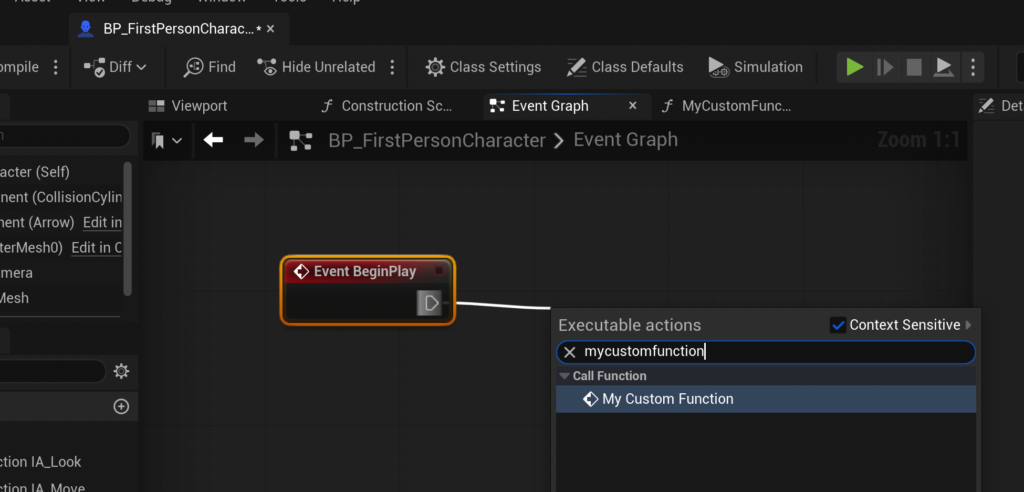
Step 3: Calling the Custom Function from Event Begin Play
Similar to adding nodes within the function itself, drag an exec pin from the Event Begin Play node. In the subsequent search menu, locate and select MyCustomFunction (or its designated name). This action places a callable instance of the function into the Event Graph and connects it to Event Begin Play.
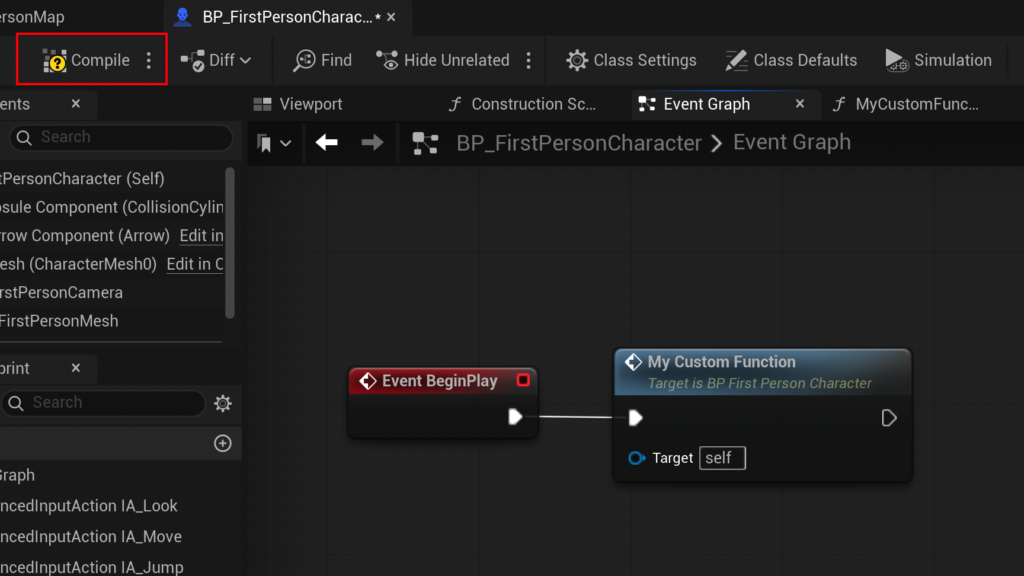
Step 4: Compiling and Saving Changes
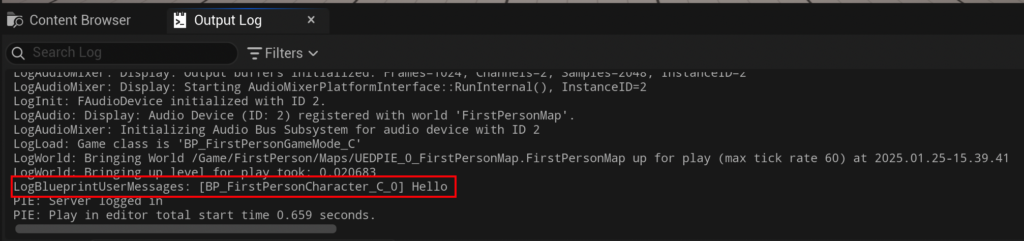
The final critical step is to compile and save the Blueprint. This ensures that all modifications, including the new function and its integration into the Event Graph, are processed and stored. Upon playing the game (e.g., in the FirstPersonMap), the Event Begin Play will trigger, which in turn calls MyCustomFunction, resulting in the "hello" string appearing in the output log. This successful output confirms the basic functionality and integration of the Blueprint function.
Advanced Functionality: Input and Output Parameters for Complex Logic
While printing a string demonstrates basic execution, the true power of functions lies in their ability to process and return data through input and output parameters. This enables the creation of reusable, dynamic logic blocks that can adapt to varying conditions. We will now expand our understanding by developing the CalculateDamage function, which accepts a damage value, subtracts armor, and returns the final damage dealt.
Understanding the Role of Input and Output Parameters
Input parameters allow external data to be fed into the function, acting as variables specific to that particular function call. Output parameters, conversely, enable the function to pass computed values back to the calling graph. This mechanism is crucial for creating functions that perform calculations or transformations and then provide the results for further processing.
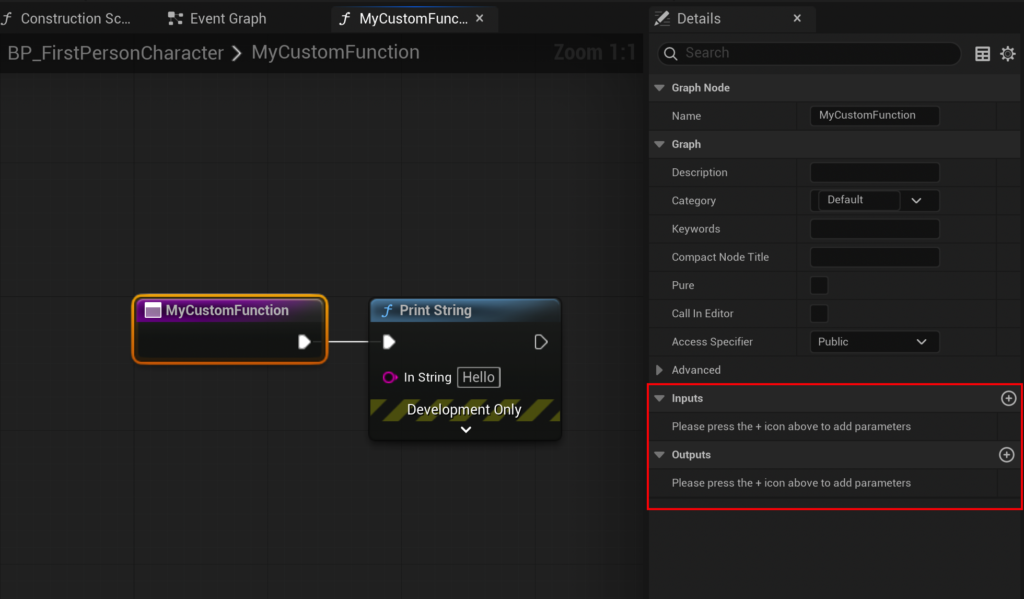
Step 1: Accessing Function Details and Adding Input Parameters
First, click on the My Custom Function (now conceptually renamed to CalculateDamage) node within its own function graph. The "Details" panel on the right side of the editor will display sections for "Inputs" and "Outputs." To add an input parameter, click the small "Add" button within the "Inputs" section.
Step 2: Configuring the Input Parameter
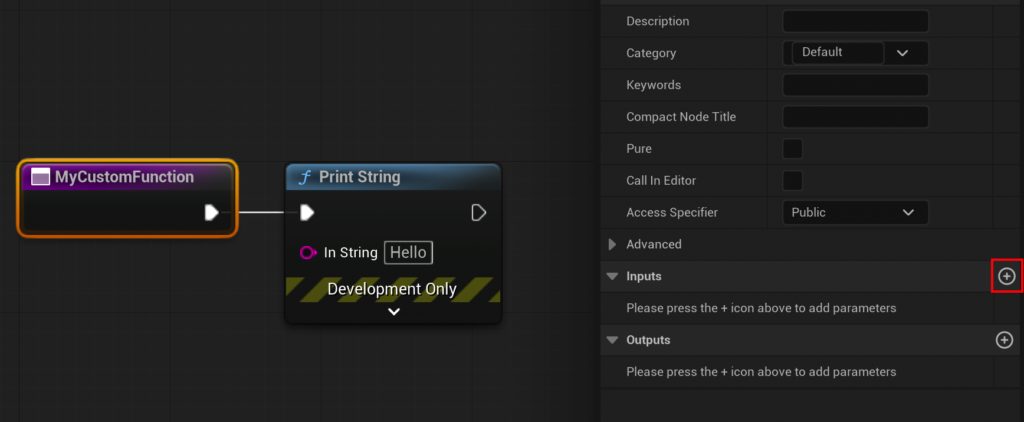
A new input parameter will appear. By default, it might be a Boolean type. For our CalculateDamage function, we need a numerical value for damage. Therefore, change the variable type from "Boolean" to "Float." Floats are essential for representing decimal numbers, which are common in damage calculations. Next, rename the parameter from its default to "Damage," clearly indicating its purpose.
Step 3: Implementing the Calculation Logic
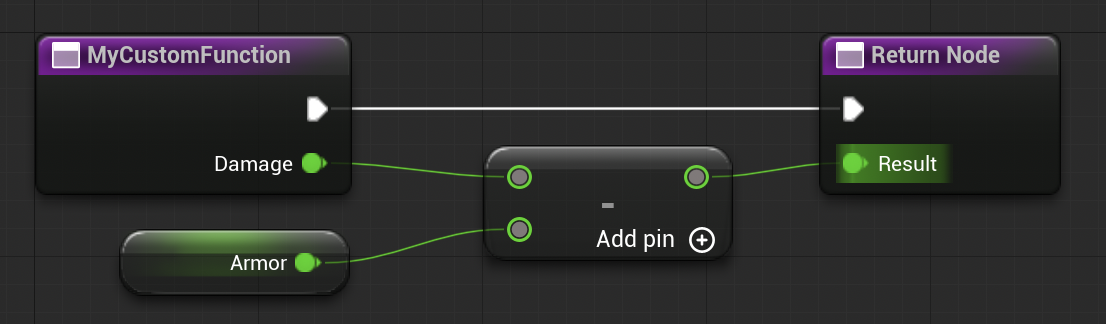
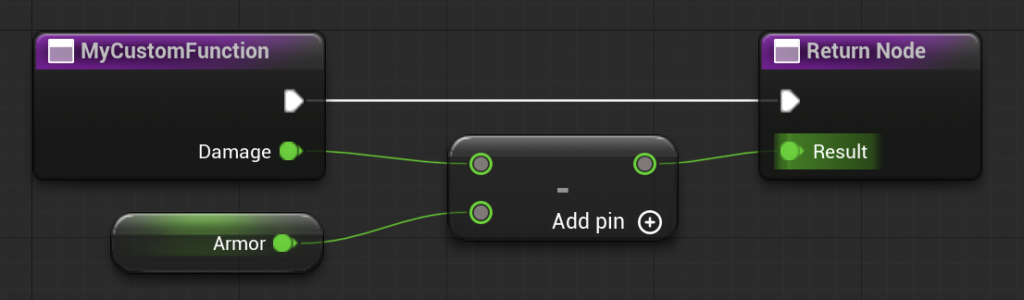
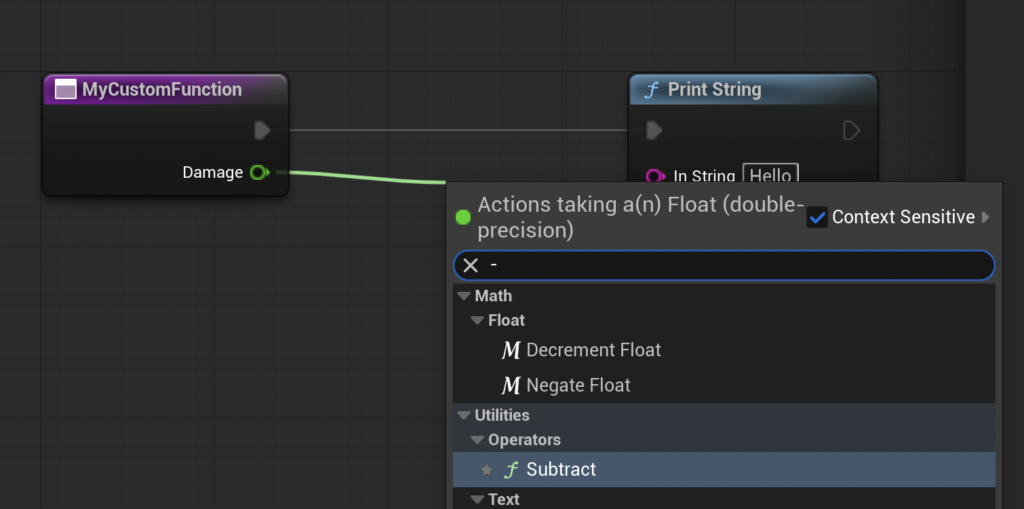
Now, within the function graph, we connect the "Damage" input pin to a subtraction operation. Dragging from the green "Damage" pin into the grid and searching for "-" or "Subtract" will bring up the "Float – Float" node. This node performs a subtraction operation.

Step 4: Introducing a Variable for Armor
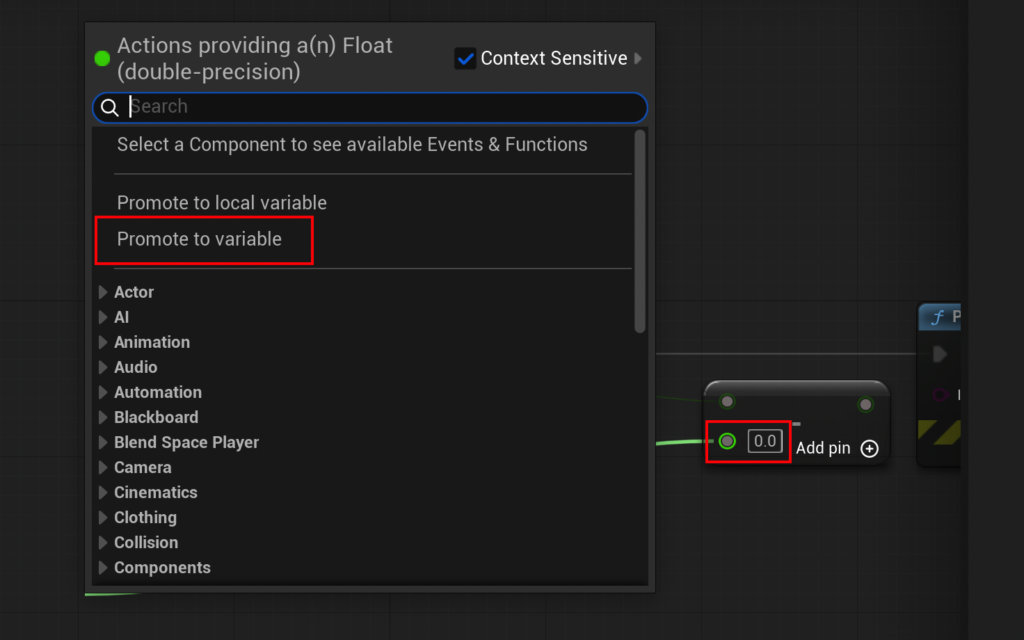
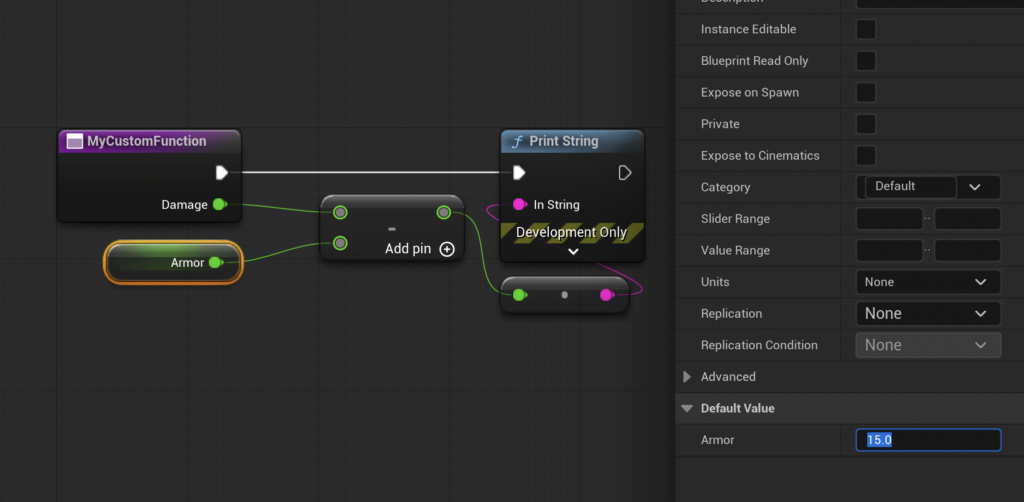
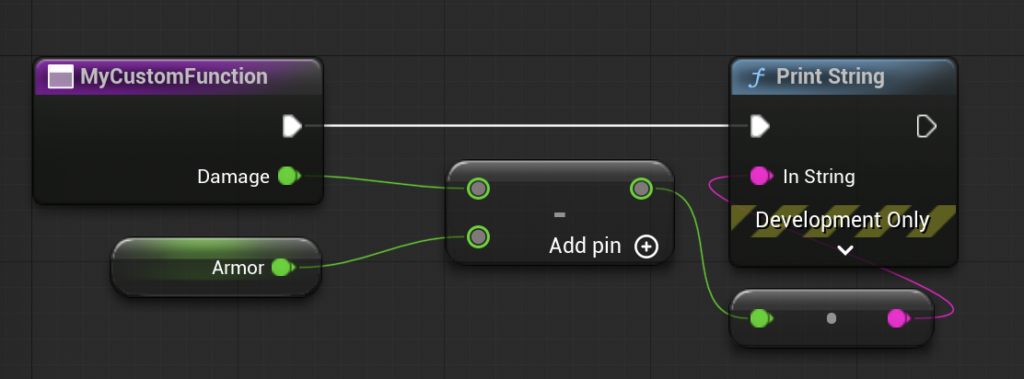
The damage calculation also requires an "Armor" value. To make this value easily configurable, we will create a variable. Drag from the bottom input pin of the "Float – Float" node and select "Promote to variable" from the context menu. Name this new variable "Armor." This creates a local variable within the function that can be set in the "Details" panel when the variable node is selected in the graph. For this example, set the default value of "Armor" to 15.0. The calculation now takes the input "Damage" and subtracts the "Armor" value from it.
Returning the Calculated Value
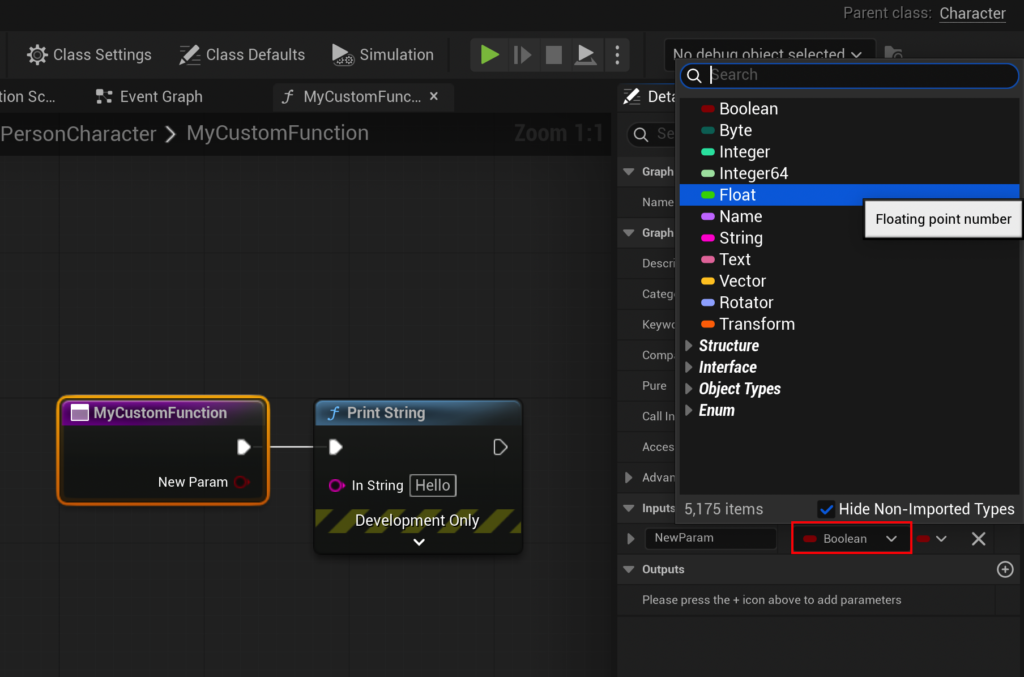
The CalculateDamage function now performs its calculation, but the result remains internal to the function. To make this result available to the calling Blueprint graph, we must "return" it as an output parameter.
Step 1: Adding an Output Parameter
Re-select the My Custom Function node in the function graph. In the "Details" panel, navigate to the "Outputs" section and click the "Add" button. A new output parameter will be created.
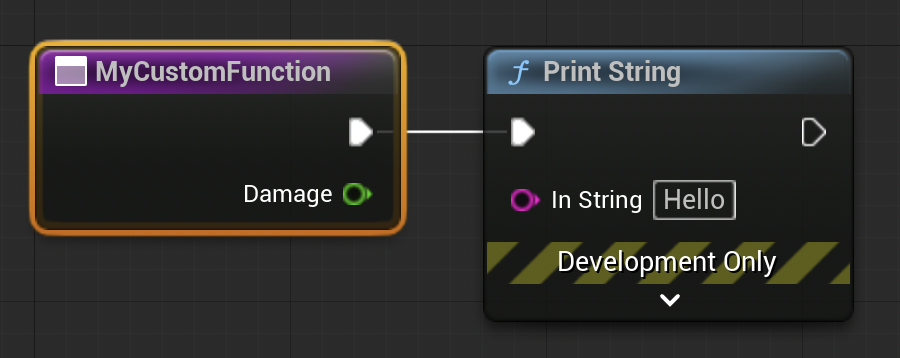
Step 2: Configuring the Output Parameter
Similar to input parameters, configure the output parameter. Change its type to "Float" (as the result of a damage calculation is a number) and name it "Result."
Step 3: Connecting the Return Node
Upon creating an output parameter, Unreal Engine automatically generates a "Return Node" within the function graph. This node has an exec pin and a data pin corresponding to each output parameter. Connect the output of the "Float – Float" subtraction node to the "Result" pin on the "Return Node." This establishes the flow: the calculation is performed, and its numerical outcome is passed to the "Result" output. The original "Print String" node, if still present, can now be safely deleted from within the function, as the function’s primary purpose is to return the value, not print it.
Finalizing the Function and Testing its Return Value
With the CalculateDamage function now fully configured with input and output, its representation in the Event Graph changes. When "called," it will now display an input pin for "Damage" and an output pin for "Result."
To test this sophisticated function, return to the Event Graph. Connect the CalculateDamage function to Event Begin Play. Set an arbitrary "Damage" input value, for instance, 20.0. To visualize the returned "Result," drag from the "Result" output pin of CalculateDamage and connect it to a "Print String" node. Compile and save the Blueprint.
Demonstration and Validation
Upon executing the game, Event Begin Play triggers, calling our CalculateDamage function with an input of 20.0. Inside the function, 15.0 (our armor value) is subtracted from 20.0, yielding 5.0. This 5.0 is then returned as the "Result" and subsequently printed to the output log by the "Print String" node in the Event Graph. The output log clearly displays "5.0," validating the successful calculation and return of the value.
Strategic Implications and Best Practices
Mastering Blueprint Functions in Unreal Engine 5 offers significant strategic advantages for game development projects:
- Enhanced Maintainability: Centralized logic means fewer points of failure and easier updates, reducing the long-term cost of development and bug fixing.
- Improved Scalability: As games grow, well-defined functions prevent Blueprints from becoming monolithic, unwieldy graphs. This modularity allows for easier expansion and the addition of new features.
- Facilitated Collaboration: Teams can work on different functions concurrently without stepping on each other’s toes, fostering a more efficient and less conflict-prone development environment. This is especially true when functions are organized into Blueprint Function Libraries, allowing common utilities to be shared across an entire project.
- Simplified Debugging: By isolating specific pieces of logic, functions make it easier to pinpoint the source of errors. When an issue arises, developers can focus their debugging efforts on a single function rather than sifting through a sprawling, interconnected graph.
- Distinction from Events: A crucial best practice involves understanding the fundamental difference between Functions and Events in Blueprints. Functions are synchronous and execute immediately, making them unsuitable for operations that require waiting, such as delays or network calls. For asynchronous operations, Custom Events are the appropriate tool, as they can incorporate "Delay" nodes and other asynchronous behaviors. Ignoring this distinction can lead to performance issues or unexpected behavior.
- Pure Functions: While not explicitly covered in the creation steps, developers should also be aware of "Pure Functions" – nodes that have no execution pins and are typically used for calculations that do not alter the state of the system (i.e., they have no side effects). These are often more performant as they can be evaluated multiple times without concern for state changes.
Conclusion: A Cornerstone of Efficient Unreal Engine 5 Development
The initial steps into Blueprint Functions in Unreal Engine 5 reveal an essential programming paradigm that underpins efficient and scalable game development. By embracing functions, developers can transform complex, sprawling Blueprint graphs into organized, readable, and highly maintainable systems. From the simplest debug message to intricate damage calculations, the ability to encapsulate logic into reusable nodes is a fundamental skill that empowers creators to manage project complexity effectively, accelerate development, and ultimately, bring their ambitious game ideas to fruition with greater ease and stability. As Unreal Engine 5 continues to push the boundaries of real-time rendering and interactive experiences, the mastery of foundational concepts like Blueprint Functions will remain a critical differentiator for successful game developers.
About the Author