Setting up a dedicated server for your Unreal Engine 5 (UE5) game is a pivotal step for any developer aiming to deliver a robust, scalable multiplayer experience. This process transitions game hosting from a peer-to-peer (P2P) model, often limited by host performance and network stability, to a centralized, independent infrastructure that prioritizes player experience, security, and reliability. Whether crafting a fast-paced competitive shooter, an expansive cooperative survival adventure, or an engaging social sandbox, dedicated servers are the backbone of modern multiplayer gaming, allowing players to connect seamlessly to a game instance that operates independently of any single player’s device. This guide provides an in-depth, step-by-step methodology for building and configuring a dedicated server for your UE5 project, covering everything from initial project settings and code adjustments to compiling the server and running it locally for testing.
The evolution of multiplayer gaming has seen a significant shift from client-hosted, peer-to-peer models to dedicated server architectures. In the early days of online gaming, P2P connections were common, largely due to technical limitations and the nascent stage of internet infrastructure. While P2P offered a straightforward, cost-effective way to enable multiplayer, it came with inherent drawbacks: the "host advantage" where the host player experienced minimal latency, susceptibility to cheating due to client-side authority, and performance degradation tied directly to the host’s internet connection and hardware capabilities. For instance, a host’s sudden disconnection would often end the game for all connected players, leading to frustrating and inconsistent experiences.
Today, the global multiplayer gaming market is a colossal industry, projected to exceed $300 billion by 2027, driven by titles demanding high performance, fair play, and persistent worlds. This growth necessitates robust backend infrastructure, making dedicated servers not just a luxury but a fundamental requirement for competitive and large-scale games. Unreal Engine 5, with its cutting-edge graphics and powerful networking capabilities, is at the forefront of this evolution, empowering developers to create sophisticated multiplayer titles. However, to fully leverage UE5’s potential and meet player expectations, a well-implemented dedicated server solution is indispensable. Epic Games, the creator of Unreal Engine, implicitly supports this through the comprehensive tools and documentation provided for server development, signaling a clear pathway for professional-grade game deployment.
The Indispensable Advantages of Dedicated Servers
Dedicated servers offer a multitude of benefits that profoundly impact both game development and the player experience:
- Superior Performance and Stability: By running on powerful, purpose-built server hardware, dedicated servers eliminate the performance bottlenecks associated with P2P hosting. They ensure consistent tick rates, reduce latency by centralizing network traffic, and provide a stable environment where game logic is processed efficiently, regardless of individual player hardware. This translates to smoother gameplay, more responsive controls, and a significant reduction in lag and desynchronization issues.
- Enhanced Security and Anti-Cheat: One of the most critical advantages is security. In a dedicated server model, the server holds ultimate authority over the game state, making it far more difficult for players to cheat or exploit vulnerabilities. Client-side hacks, common in P2P games where clients often have too much authority, are significantly mitigated. The server validates player actions, ensuring fairness and integrity across the game world.
- Uninterrupted Reliability and Uptime: Dedicated servers can be hosted in professional data centers with redundant power, cooling, and internet connections, ensuring near 24/7 uptime. Unlike P2P, where a host leaving or experiencing technical difficulties can abruptly end a session, a dedicated server provides a persistent game world that remains online, allowing players to join and leave without disrupting others. This reliability is crucial for persistent world games and competitive esports.
- Scalability for Large Player Counts: Dedicated servers are designed to handle a large number of concurrent players. They can be dynamically provisioned, scaled up or down based on demand, and deployed globally to minimize latency for players across different geographical regions. This flexibility is vital for games expecting a massive player base or requiring many players in a single instance.
- Consistent Player Experience: Ultimately, all these technical benefits converge to deliver a consistent and high-quality experience for every player. A fair, lag-free, and secure environment fosters player satisfaction, encourages community engagement, and builds loyalty, which are critical for the long-term success of any multiplayer game.
Essential Prerequisites for Dedicated Server Development
Before embarking on the dedicated server build process, several foundational elements must be in place to ensure a smooth and successful setup. Adhering to these prerequisites will prevent common pitfalls and streamline development:
- A Fully Functional Multiplayer Unreal Engine 5 Project: This guide assumes you have an existing UE5 project that is already configured for basic multiplayer functionality. This means your project should support multiple clients connecting, player characters spawning, and basic network replication of gameplay elements. If you are starting from scratch or need to solidify your multiplayer foundations, it is highly recommended to first follow a guide on implementing multiplayer sessions in Unreal Engine 5, such as the one provided by Couchlearn, which this guide complements. A stable multiplayer base is non-negotiable for dedicated server integration.
- An Unreal Engine Source Build (Not from Epic Games Launcher): This is perhaps the most critical prerequisite. To build a dedicated server executable for Unreal Engine, you must use a version of the engine compiled from source code, rather than the pre-compiled version downloaded via the Epic Games Launcher. The launcher version typically does not include the necessary server-specific build targets and configurations required for dedicated server packaging. Obtaining a source build involves downloading the engine source from Epic Games’ GitHub repository (which requires linking your Epic Games account to GitHub), then compiling the engine locally. This grants developers access to all engine modules, including those specifically for server builds, and allows for deeper customization if needed.
- The AdvancedSessions Plugin Installed: For your dedicated server to correctly create and advertise game sessions that players can find and join through a session browser, the AdvancedSessions plugin is essential. This third-party plugin simplifies interactions with Unreal Engine’s Online Subsystem, providing more robust and user-friendly Blueprint nodes for managing game sessions, searching for servers, and handling player connections. Without it, implementing reliable session management can be significantly more complex, potentially leading to issues with server discoverability. Ensure this plugin is correctly installed and enabled in your project before proceeding.
Configuring Your Project for Server-Side Operation: A Detailed Chronology
The journey to a dedicated server involves several specific modifications within your UE5 project to ensure it behaves correctly when run as a server.
1. Implementing Automatic Session Creation:
A dedicated server does not require a graphical user interface (GUI) or a player character to be controlled by a local user. Its sole purpose is to host the game world and manage connections. Therefore, upon launch, it must automatically create a game session and load the appropriate map without displaying menus.
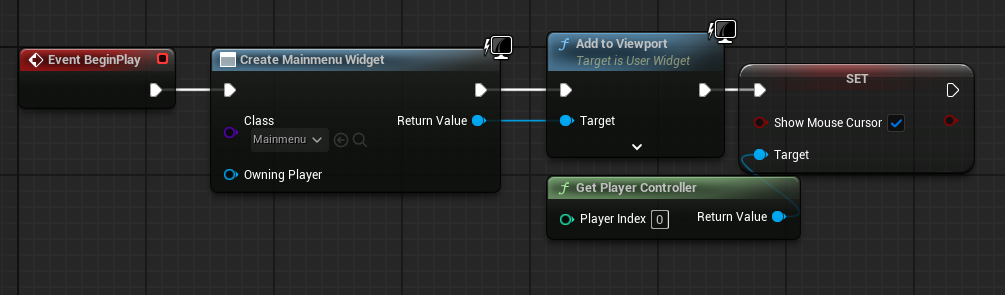
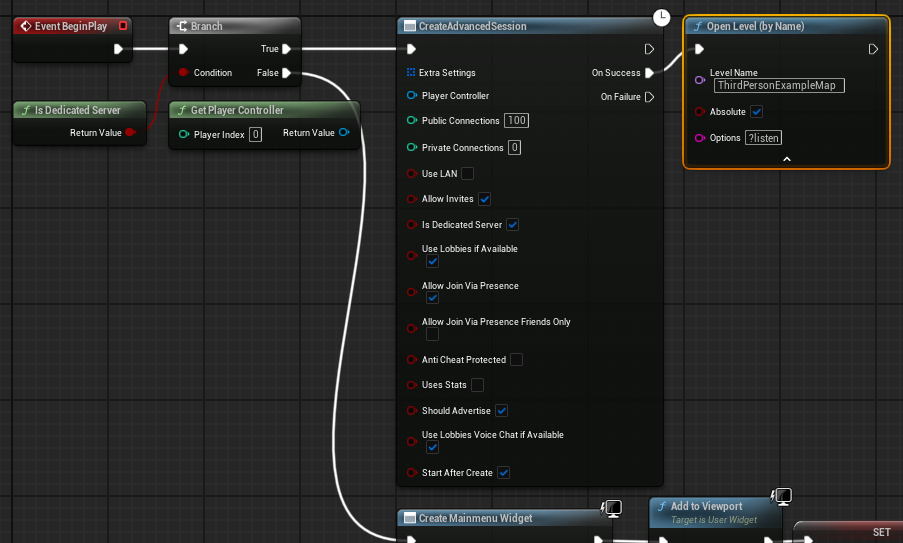
- Initial Setup: In your example project, the main menu level blueprint typically creates a MainMenu widget and adds it to the viewport. This behavior is suitable for client-side gameplay but redundant for a dedicated server.
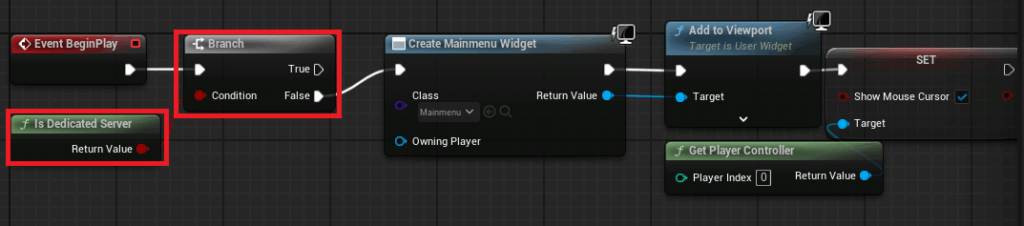
- Conditional Logic: To adapt this, integrate an "Is Dedicated Server" node into your main menu level blueprint. This node returns
Trueif the game instance is running as a dedicated server andFalseotherwise. - Branching Execution: Place a
Branchnode immediately before your existing widget creation logic. Connect theIs Dedicated Servernode’s output to theConditioninput of theBranch. - Client Path: Connect the
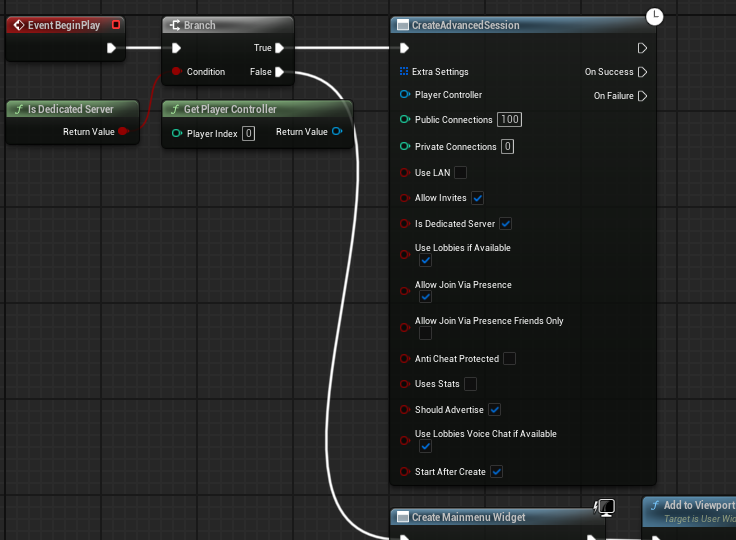
Falseoutput pin of theBranchto your existing MainMenu widget creation and display logic. This ensures that regular clients (non-dedicated servers) still see the menu. - Server Path: Connect the
Trueoutput pin of theBranchto aCreate Advanced Sessionnode. Configure this node with your desired session settings, such asMaxPlayers,bIsLANMatch,bShouldAdvertise, etc. TheAdvancedSessionsplugin provides these robust options. - Loading the Game Map: Upon successful session creation (from the
OnSuccesspin ofCreate Advanced Session), add anOpen Levelnode. Crucially, append the option?listento your map name (e.g., "YourGameMap?listen"). The?listencommand instructs the server to open the specified map and begin listening for incoming client connections. This ensures the server is ready for players to join as soon as it launches. - Finalization: Compile and save all changes within your blueprint. This ensures the server will automatically set up the game world without user interaction.
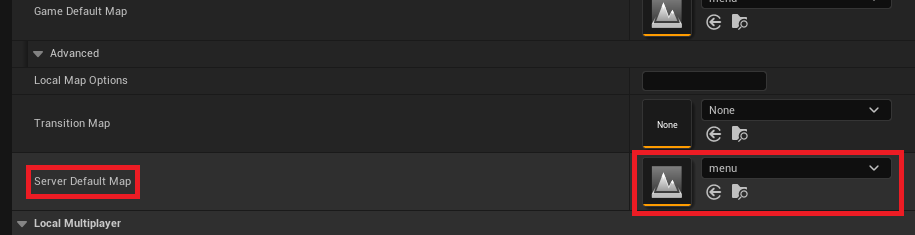
2. Specifying the Default Server Map:
By default, an Unreal Engine server might attempt to load a generic engine map named "Entry." This must be overridden to ensure your dedicated server starts on your desired game map.
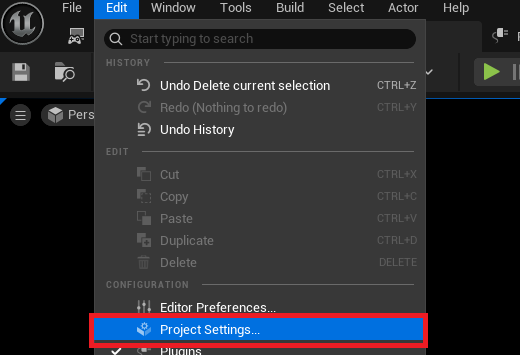
- Accessing Project Settings: Navigate to
Editin the top-left menu of the Unreal Engine editor, then selectProject Settings. - Maps & Modes Section: Within the Project Settings window, locate and click on the
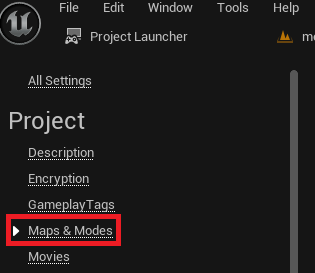
Maps & Modessection in the left-hand navigation pane. - Advanced Default Maps: Under the
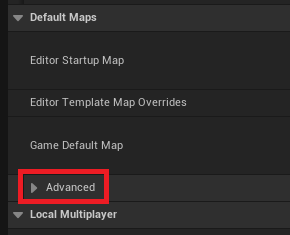
Default Mapscategory, expand theAdvanceddropdown options. - Setting Server Default Map: Locate the
Server Default Mapfield. Click the dropdown menu next to it and select the specific game map you want your dedicated server to load upon startup. For instance, if your main gameplay map is named "GameLevel," select "GameLevel" here. This ensures the server loads the correct environment for players.
3. Removing Default Character Spawning:
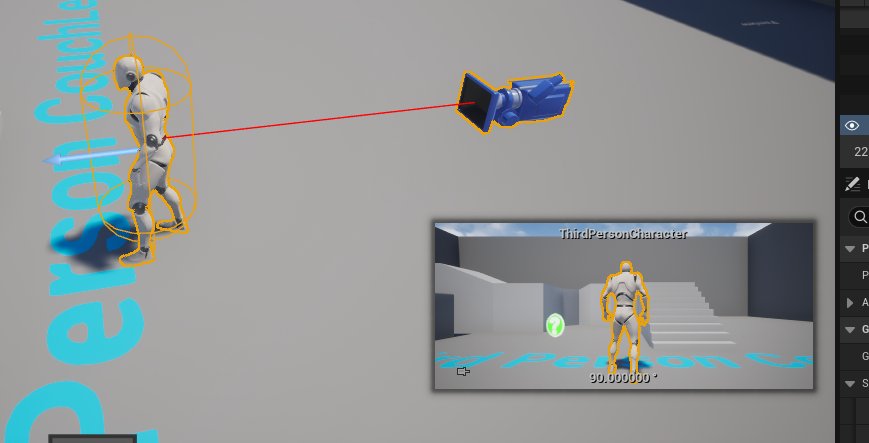
A dedicated server is an instance of the game world, not a player. Therefore, it does not need to spawn or control a player character. Leaving a default character in the level can lead to unnecessary resource consumption or even unintended gameplay consequences (e.g., an idle character taking up a player slot).
- Locate Default Character: Open your chosen
Server Default Map. Identify any default player character blueprints or pawn classes that are placed directly in the level or automatically spawned by a default Game Mode. - Deletion or Conditional Spawning: If a character is placed directly, simply delete it. If your game mode automatically spawns a default pawn, you might need to modify your Game Mode blueprint or C++ code to check
Is Dedicated Serverand skip spawning a player character if the condition is true. This prevents an uncontrolled character from existing in the server’s instance of the game world.
4. Building the Dedicated Server with the Project Launcher: A Chronology of Configuration
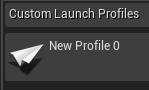
The Project Launcher is Unreal Engine’s powerful tool for packaging, deploying, and launching game builds based on customizable profiles. It’s the primary interface for generating your dedicated server executable.
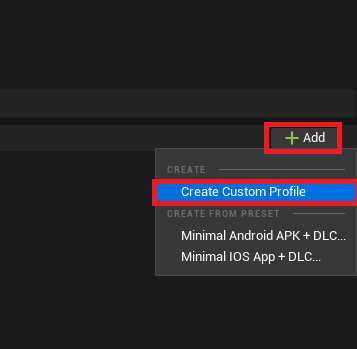
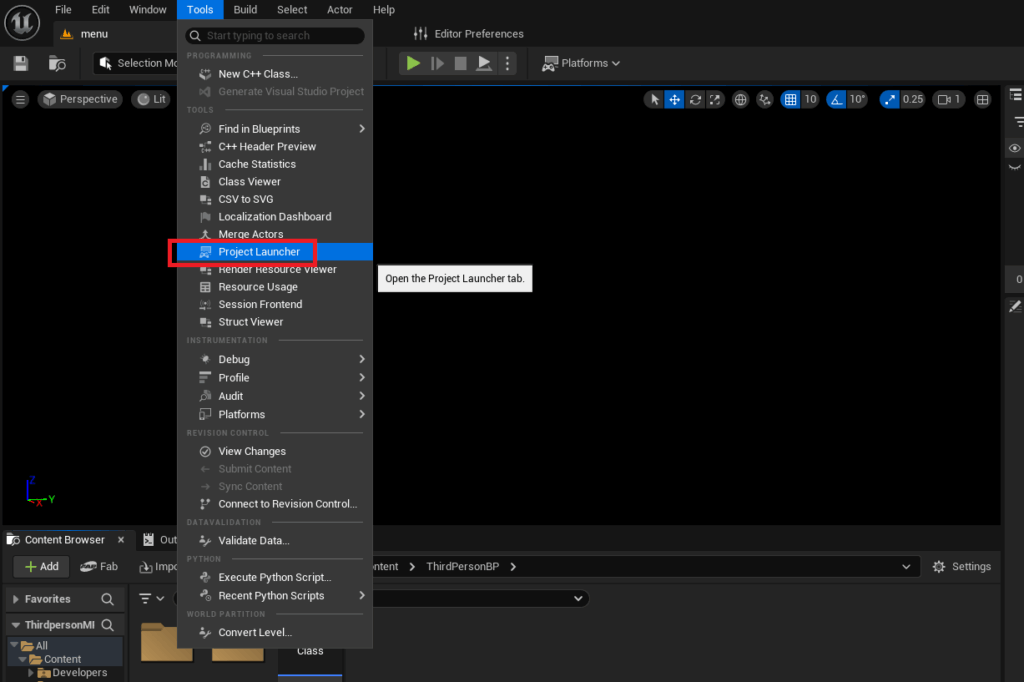
- Accessing the Project Launcher: From the Unreal Engine editor, go to
Toolsin the top menu bar, then selectProject Launcherfrom theToolssection. -
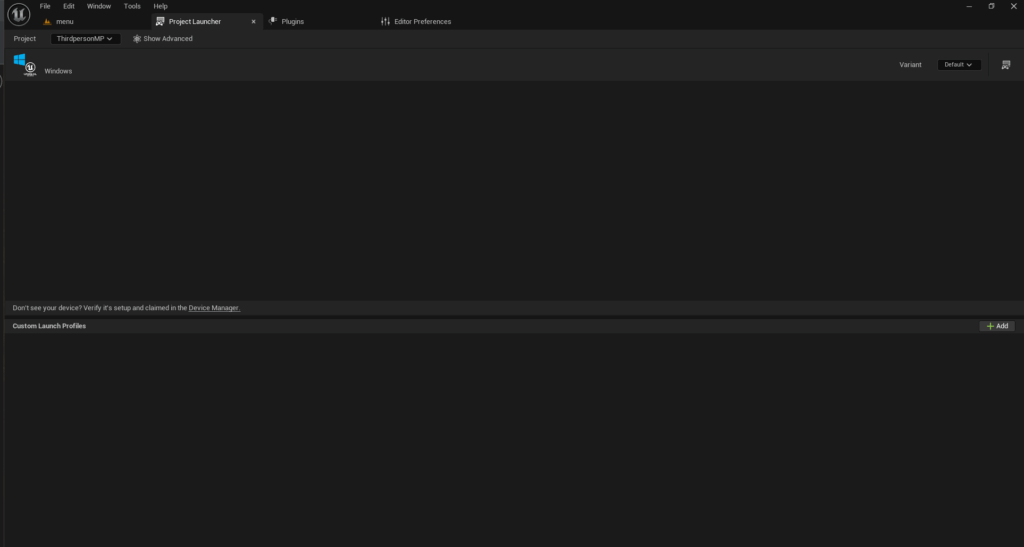
Creating a Custom Profile: The Project Launcher window will initially appear empty. Click the
Addbutton in the bottom right, then chooseCreate Custom Profile. This opens a comprehensive configuration menu.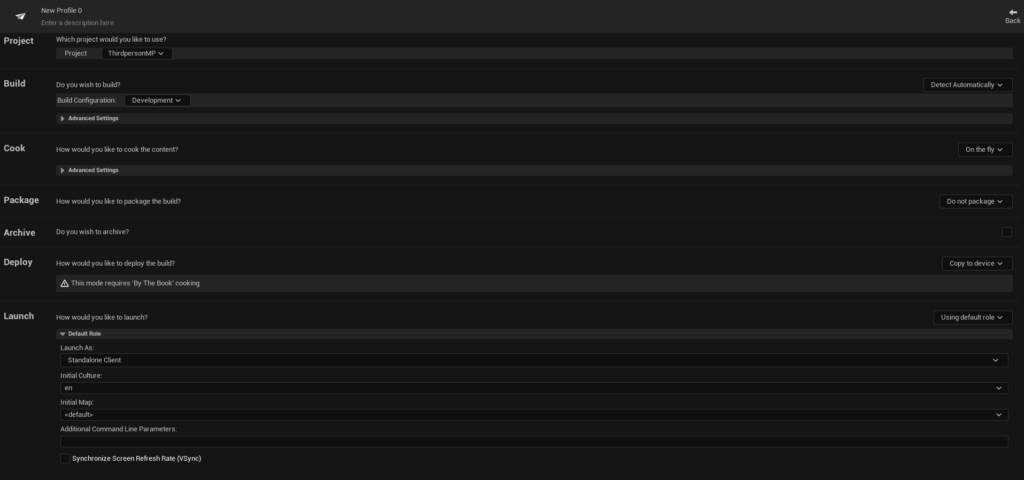
-
Cook Section Configuration:

- Cook Method: Change the
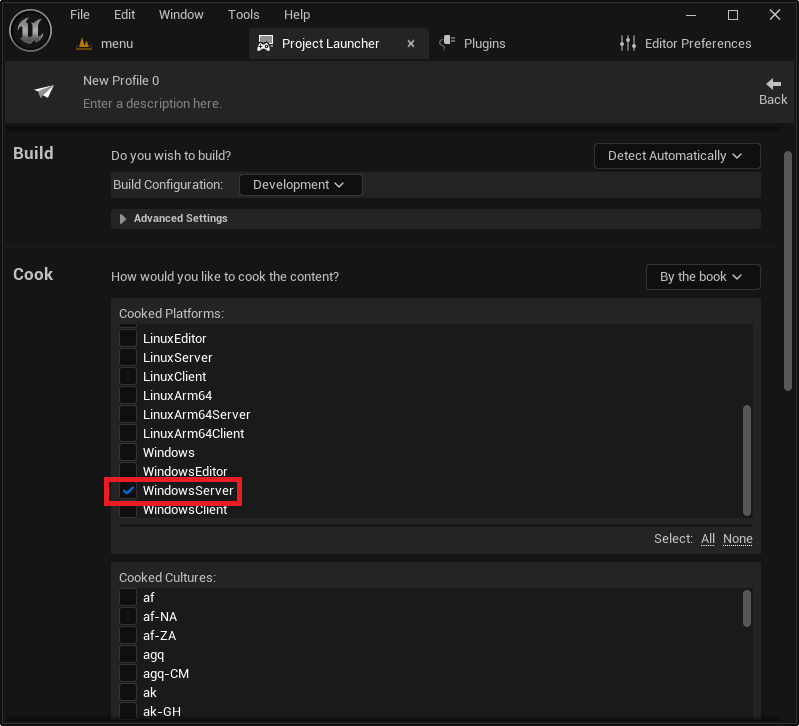
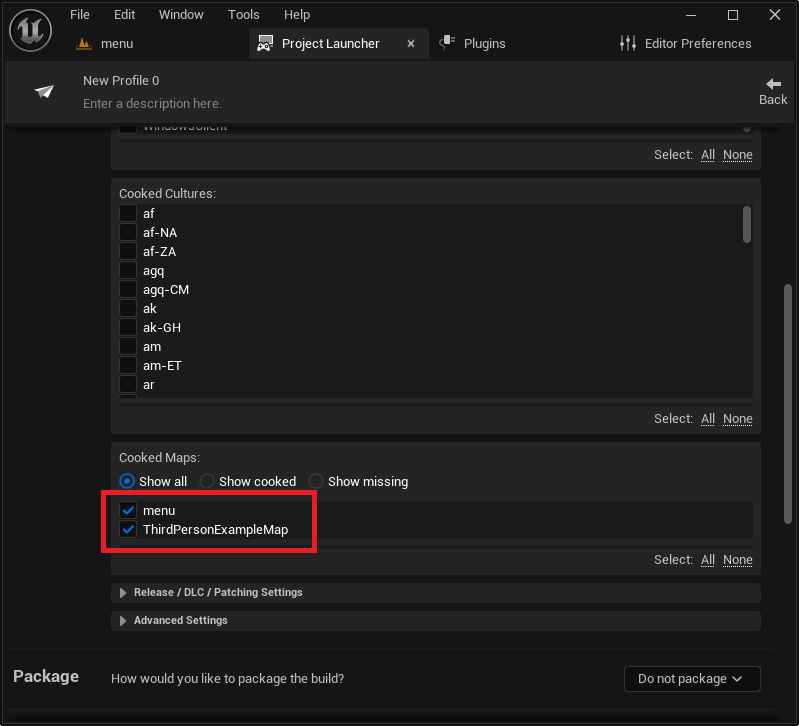
Cookoption from "On the fly" to "By the book." "On the fly" cooking processes assets as needed during development, while "By the book" pre-cooks all specified assets into a distribution-ready format, which is essential for a packaged server. - Cooked Platforms: Scroll down and enable the server platform you intend to build for. For Windows hosting, select
WindowsServer. If targeting Linux infrastructure (often more cost-effective for servers), selectLinuxServer(for x86/64 architectures) orLinuxArm64(for ARM-based servers). Most developers will opt forWindowsServerinitially for local testing and common hosting environments. - Maps to Cook: Crucially, select all the maps your server will need to load. This includes your
Server Default Mapand any other gameplay maps that clients might transition to. Failing to include a map here will result in the server being unable to load it.
- Cook Method: Change the
-
Package Section Configuration:
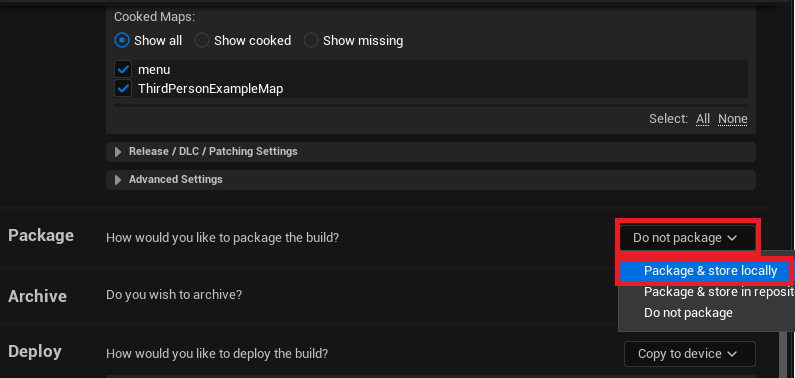
- Package Method: Change the
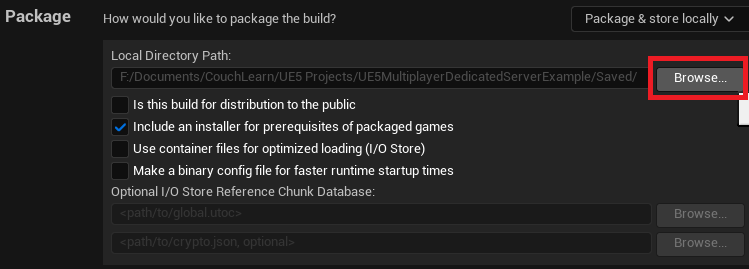
Packageoption from "Do not package" to "Package & store locally." This tells the launcher to compile and package all necessary game files into a deployable folder. - Output Directory: A default path within your project’s
Saved/StagedBuildsdirectory will be generated. You can use theBrowsebutton to specify an alternative output location if preferred. This is where your compiled server executable and associated files will reside.
- Package Method: Change the
-
Deploy Section Configuration:
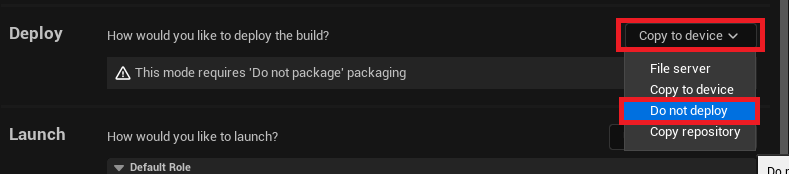
- Deployment Method: Change the
Deployoption from "Copy to device" to "Do not deploy." For dedicated servers, manual deployment to a hosting provider or a specific server machine is typically required, so automatic deployment from the launcher is usually bypassed.
- Deployment Method: Change the
-
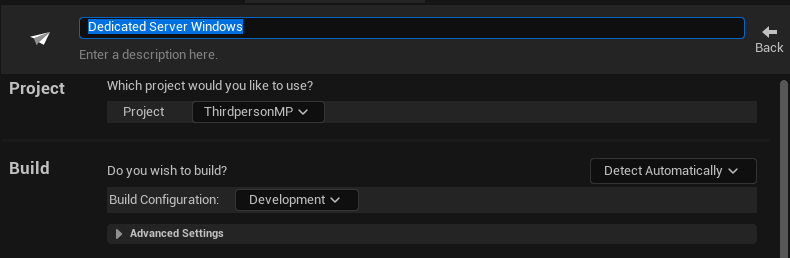
Profile Naming: Give your new profile a clear, descriptive name (e.g., "MyGameDedicatedServer") to easily identify its purpose. This helps in managing multiple build configurations.
-
5. Building the Dedicated Server Files:
With the custom profile meticulously configured, the next step is to initiate the build process.
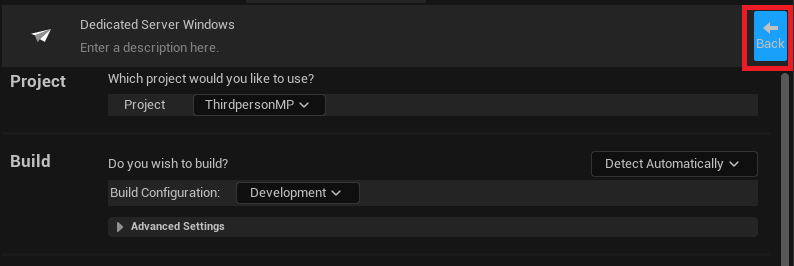
- Launch the Profile: Click the
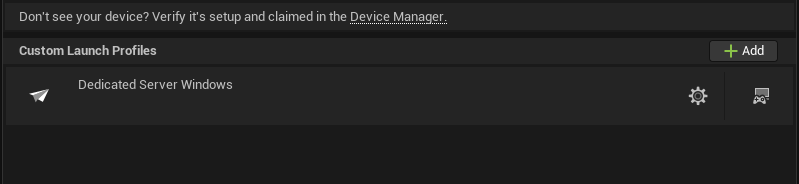
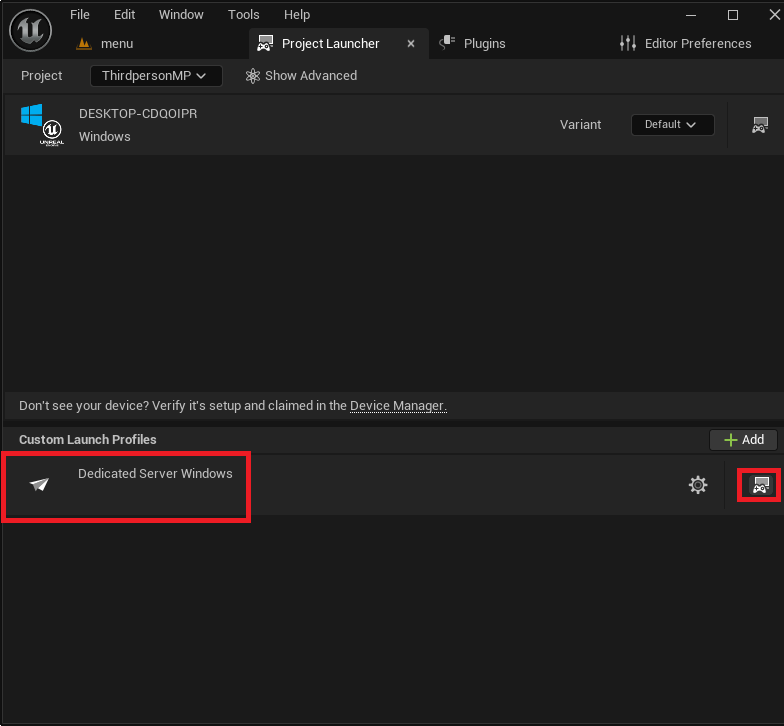
Backbutton to return to the main Project Launcher menu. Your newly created custom profile will now be listed. Press theLaunchbutton (typically represented by a controller and display icon) next to your profile. - Monitoring the Build: The Project Launcher will display a console window showing the progress and debug logs of the build process. This involves cooking assets, compiling code, and packaging the final server executable.
- Completion Time: Be aware that the first time you build your dedicated server, especially for a larger project, it can take a significant amount of time, potentially hours depending on your project size and hardware specifications. Allow the process to complete fully without interruption. A "Build Complete" message with successful task indicators signifies a successful build.
6. Testing the Dedicated Server Locally:
Once the build is complete, it’s time to verify its functionality.
- Locating the Executable: Navigate to the output folder you specified in the Project Launcher. If you used the default path, it will be located in your project folder under
Saved/StagedBuilds/[PlatformName](e.g.,MyProject/Saved/StagedBuilds/WindowsServer). Inside this directory, you’ll find a subfolder named after your project, containing the server executable (e.g.,MyProjectServer.exe). - Creating a Shortcut: To simplify launching and monitoring, create a shortcut to your
MyProjectServer.exe(right-click -> Send to -> Desktop (create shortcut)). - Adding the
-logArgument: Right-click the newly created shortcut and selectProperties. In theTargetfield, append-logto the end of the existing path, outside the quotation marks (e.g.,"C:PathToMyProjectServer.exe" -log). This command-line argument forces the server to open a console window, displaying real-time logging messages, which is invaluable for debugging and monitoring server activity. - Launching and Connecting: Double-click the modified shortcut. A console window will appear, displaying server initialization logs. Watch for messages indicating session creation and map loading. Once the server is running, launch multiple instances of your client game (either from the editor with "Play in Standalone Game" or a client build). Your clients should now be able to discover and connect to the dedicated server session, allowing players to interact within the hosted game world.
Demonstration and Broader Implications
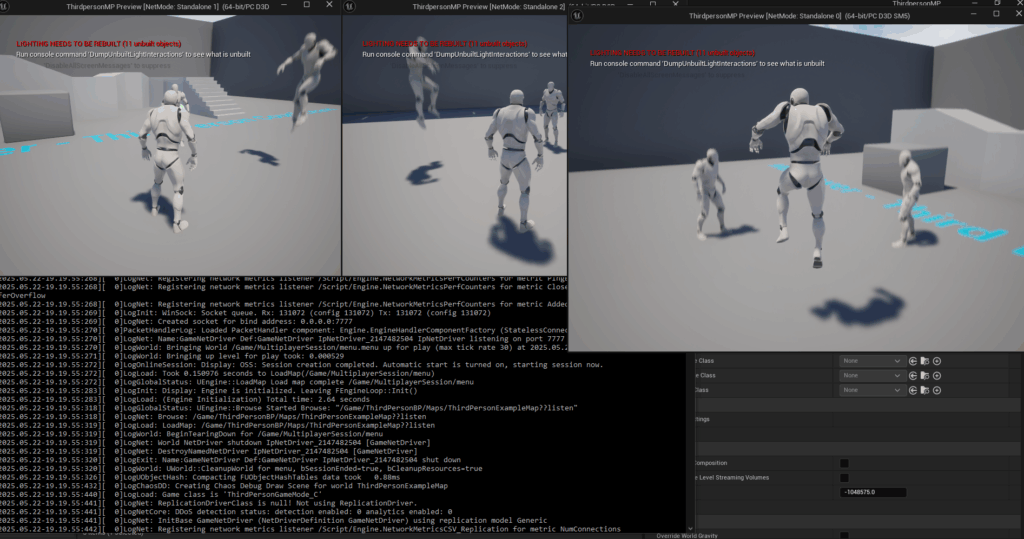
With the dedicated server running and multiple clients connected, you can observe a truly independent multiplayer experience. Players move and interact without any single client dictating the game state, providing a smooth, synchronized, and fair environment. This setup allows for rigorous testing of network replication, game logic, and server performance under various conditions.
The successful implementation of a dedicated server marks a significant milestone in professional game development. It not only elevates the technical quality of your multiplayer title but also opens doors for broader strategic implications:
- Enabling Esports and Competitive Play: The fair and secure environment provided by dedicated servers is non-negotiable for competitive gaming and esports, where integrity and consistent performance are paramount.
- Supporting Persistent Worlds and Live Services: For games designed as live services with persistent worlds, dedicated servers are fundamental to maintaining continuous operation and delivering dynamic content updates.
- Facilitating Community Growth: A stable and reliable online experience fosters a stronger community, encouraging players to invest more time and engagement in your game.
- Future-Proofing Infrastructure: This foundation allows for seamless integration with cloud hosting solutions (like AWS, Azure, Google Cloud) and advanced server orchestration tools (like Kubernetes), enabling truly global and dynamically scalable deployments.
Conclusion
You have now successfully built and configured a dedicated server for your Unreal Engine 5 game, capable of hosting multiplayer sessions that offer superior performance, security, and reliability. This knowledge is not merely a technical skill but a strategic asset, bringing your game one step closer to launching a fully featured, professional-grade multiplayer experience that meets the high expectations of today’s gaming audience. Embracing dedicated server architecture is a commitment to quality, fairness, and scalability, paving the way for a more immersive and consistent journey for every player. The robust tools provided by Unreal Engine 5, coupled with a clear understanding of the underlying principles, empower developers to build the next generation of online interactive experiences.
About the Author