The landscape of modern game development, particularly within powerful engines like Unreal Engine 5 (UE5), is increasingly defined by efficiency, scalability, and collaborative workflow. At the core of achieving these objectives lies the fundamental programming concept of functions, which in UE5 are robustly implemented through its visual scripting system as Blueprint Functions. These self-contained blocks of executable code are not merely conveniences but essential architectural components that streamline logic, enhance reusability, and significantly improve the maintainability of complex interactive systems. This article explores the intricacies of Blueprint Functions, their creation, application, and the profound impact they have on game development paradigms, from rapid prototyping to large-scale production.
Understanding the Core: What is a Blueprint Function?
In any programming environment, a function serves as a named block of code designed to perform a specific task. Blueprint Functions in Unreal Engine 5 adhere to this principle, providing developers with self-contained units of logic that can be defined once and invoked from various points within a Blueprint. Unlike traditional text-based coding, Blueprints utilize a node-based visual interface, where functions manifest as distinct nodes capable of receiving input parameters, executing a sequence of operations, and optionally returning output values. This visual representation makes complex logic more approachable and easier to debug, fostering a more inclusive development environment.
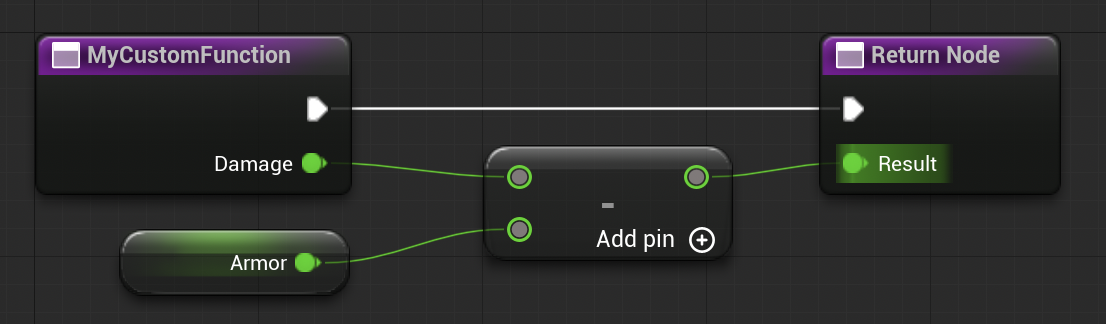
The primary advantage of Blueprint Functions lies in their capacity for modularity and reusability. Consider a common scenario in game development: calculating damage. Instead of duplicating the same damage calculation logic across multiple events or different parts of a character’s Blueprint, a developer can encapsulate this logic within a single Blueprint Function, perhaps named CalculateDamage. This function would accept parameters such as the raw damage value and the target’s armor rating, then perform the necessary calculations, and finally output the adjusted damage. Should the damage calculation formula need adjustment—for instance, to incorporate new resistances or critical hit mechanics—the change only needs to be made in one central location within the CalculateDamage function, propagating the update throughout the entire project. This adherence to the "Don’t Repeat Yourself" (DRY) principle is a cornerstone of efficient software engineering, directly facilitated by functions.
It is crucial to note that, by design, a Blueprint Function is inherently tied to the specific Blueprint Actor or Object it resides within. This means a function created in a FirstPersonCharacter Blueprint can only be directly called by that FirstPersonCharacter Blueprint or by other Blueprints that have a direct reference to it. This encapsulation helps maintain order and prevents unintended side effects, contributing to a stable and predictable development environment.
A Historical Perspective: The Evolution of Visual Scripting in Unreal Engine
The emphasis on visual scripting and functions within Unreal Engine is not new but rather the culmination of years of iterative development by Epic Games. The journey began with Kismet in Unreal Engine 3, a pioneering visual scripting tool that empowered designers to craft gameplay sequences without delving into C++ code. While Kismet proved revolutionary, it had limitations in terms of scalability and complex logic handling.
With the advent of Unreal Engine 4, Kismet evolved into Blueprints, a significantly more robust and versatile visual scripting system. Blueprints quickly became a cornerstone of UE4 development, democratizing game creation by allowing artists, designers, and even non-programmers to implement sophisticated gameplay mechanics. Epic Games’ vision was to bridge the gap between creative professionals and technical implementation, fostering a collaborative ecosystem where ideas could be rapidly prototyped and iterated upon. The introduction of features like Blueprint Interfaces and Blueprint Communication further solidified Blueprints’ role as a comprehensive scripting solution.
Unreal Engine 5 builds upon this rich legacy, refining and optimizing the Blueprint system. While the core functionality remains consistent, UE5 introduces enhancements in performance, debugging tools, and overall editor responsiveness, making Blueprint development smoother and more powerful than ever before. Epic Games has consistently stated its commitment to Blueprints, recognizing their critical role in the engine’s widespread adoption and the success of countless indie and AAA titles. Statistics from Epic Games developer surveys often highlight Blueprints as one of the most frequently used features, underscoring their importance in the daily workflow of a vast segment of the Unreal Engine community.
Implementing Blueprint Functions: A Practical Walkthrough
Getting started with Blueprint Functions in Unreal Engine 5 is a straightforward process, foundational for any developer aiming to organize their logic effectively. The following steps outline the creation and initial application of a simple function, followed by an expansion into more complex scenarios involving input and output parameters.
Creating a Basic Function
To begin, one must open the specific Blueprint Actor intended to house the new function. For illustrative purposes, the FirstPersonCharacter Blueprint from the Unreal Engine’s First Person Shooter template serves as an excellent starting point, being readily available and frequently customized.
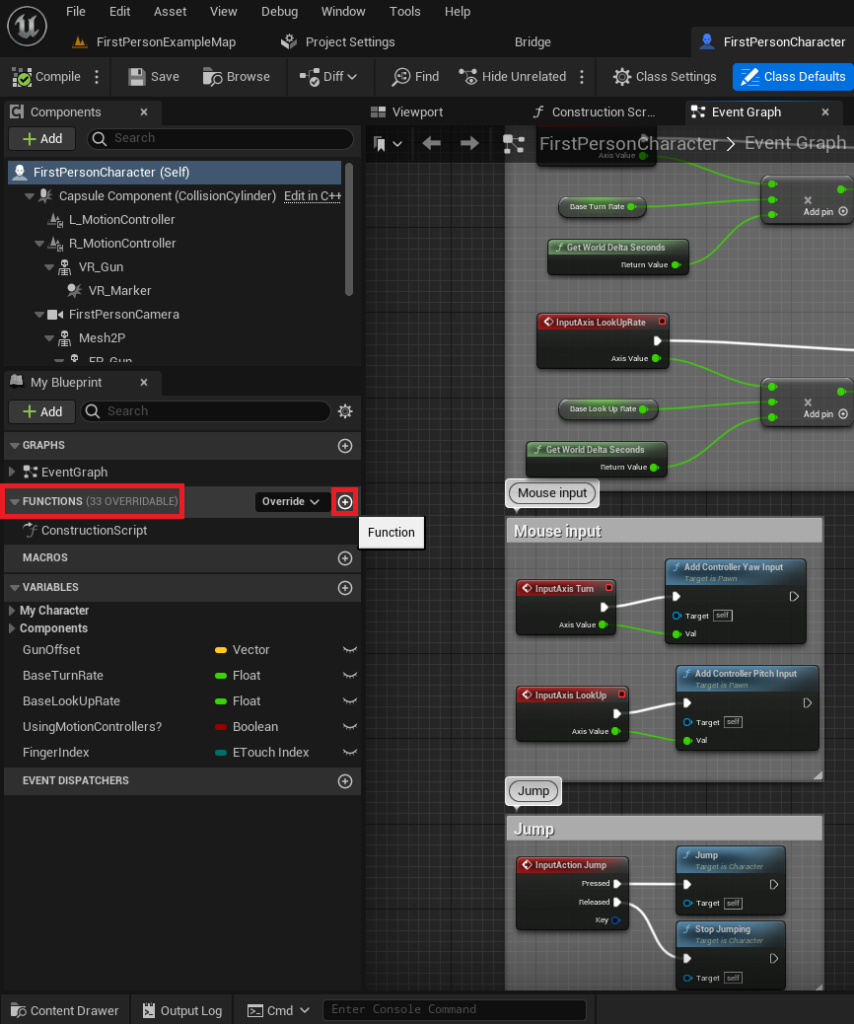
Within the Blueprint Editor, developers will observe a dedicated "Functions" section located on the left side of the editor window. This section acts as a repository for all functions pertaining to that particular Blueprint. To initiate the creation of a new function, a developer simply clicks the circular icon featuring a plus symbol situated to the right of the "Functions" dropdown.
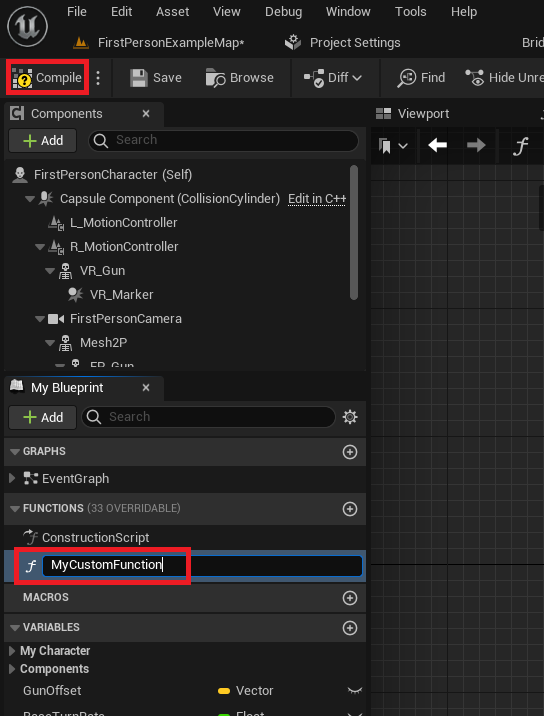
Upon clicking, a new function entry will appear, awaiting a name. Adopting clear, descriptive, and consistent naming conventions is paramount for project maintainability, especially in larger development teams. Names like CalculateDamage or PlayFootstepSound are far more beneficial than ambiguous identifiers such as Function1 or DoSomething. After assigning a name, pressing Enter or clicking elsewhere in the Blueprint window finalizes the naming. The final step in creation involves clicking the "Compile" button in the editor toolbar. This action integrates the new function into the Blueprint, making it ready for use.
Adding Basic Functionality: The "Print String" Example
Initially, a newly created function is an empty shell. To imbue it with logic, functionality must be added. As a preliminary demonstration, we can configure a function to print a string to the screen, a common debugging and testing operation.
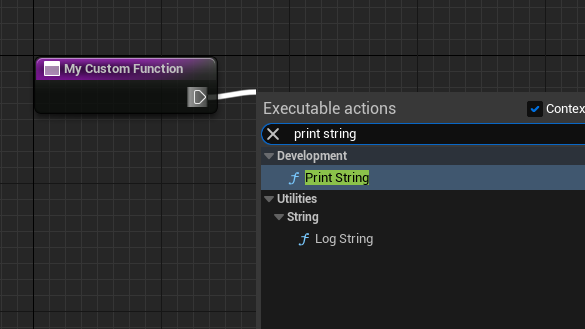
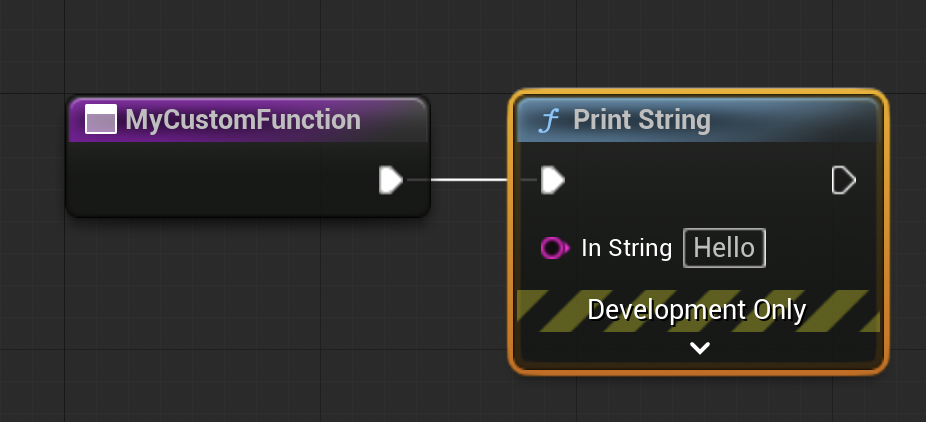
Navigating into the newly created function’s graph (by double-clicking its name in the Functions panel), the developer will see a single purple node representing the function itself. This node features a white, sideways triangle, known as an exec pin. Exec pins dictate the flow of execution, allowing nodes to be chained together sequentially. By clicking and dragging from this exec pin and releasing the mouse button anywhere on the gray background grid, a context-sensitive menu appears, listing available Blueprint nodes. Searching for and selecting "Print String" will instantiate a Print String node, automatically connecting its input exec pin to the function’s output exec pin.
With this connection established, whenever MyCustomFunction (or whatever the function has been named) is "called" or "run," it will execute the Print String node, displaying its default message "Hello" on the screen during gameplay. The terms "call," "called," and "calling" are synonymous with "running" a function and are frequently used in programming discourse.
Triggering Functions: Integration with Events
For a function to execute, it must be invoked, typically by another piece of logic within the Blueprint. A common method for testing or initiating logic is through an "Event." Events are distinct from functions in that they cannot return values and can handle certain asynchronous operations (such as delays) that functions cannot.
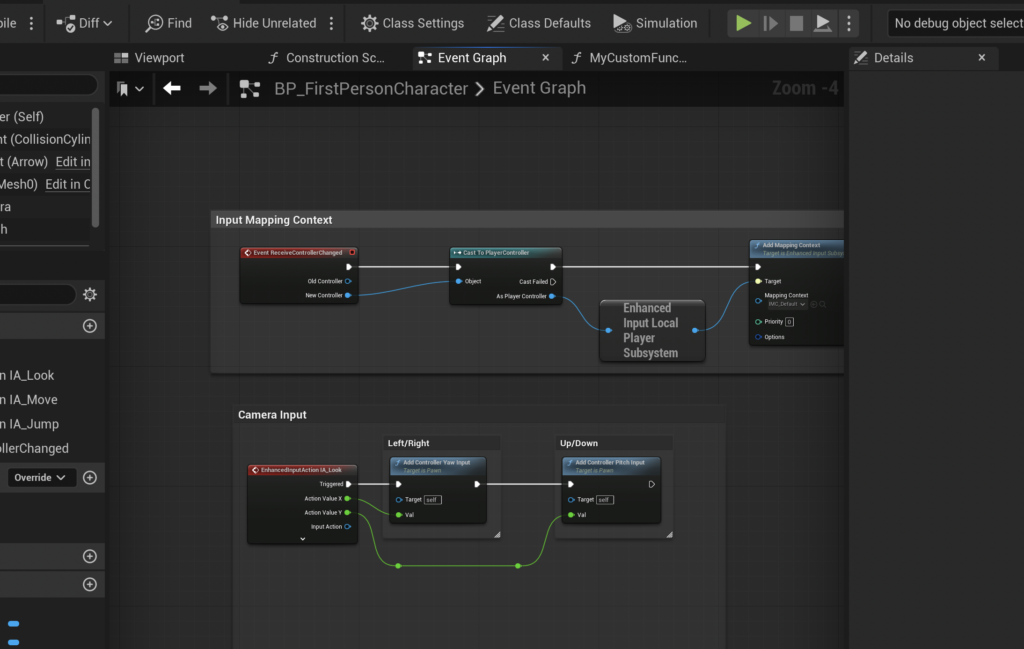
The Event BeginPlay is a particularly useful event, as it triggers automatically when the Blueprint Actor is spawned into the game world or when the game level starts if the actor is already placed in the level. To integrate our new function with Event BeginPlay:
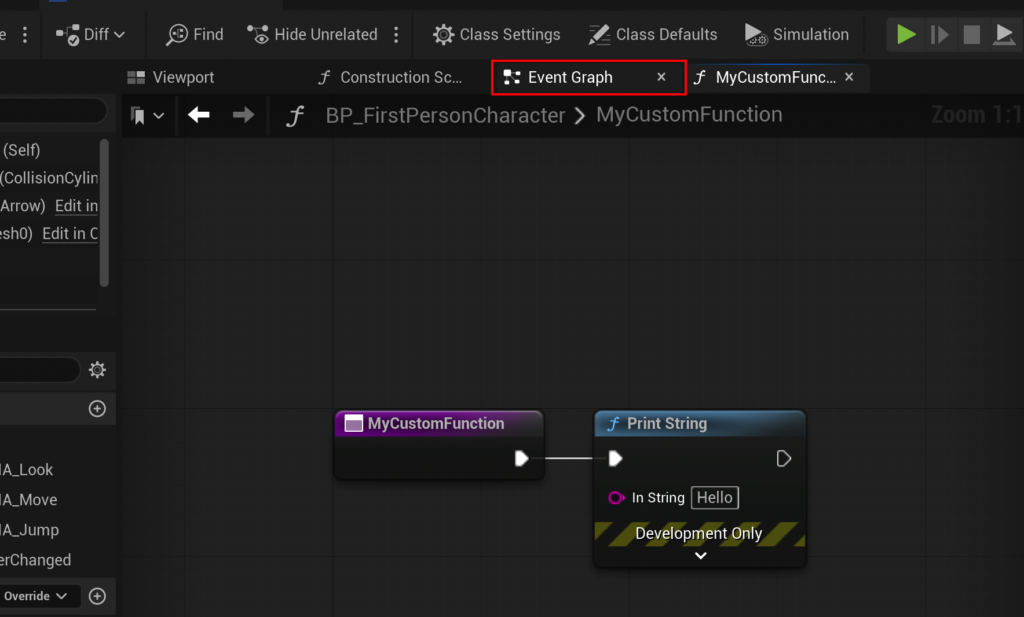
- Return to the main Event Graph of the Blueprint by clicking the "Event Graph" button at the top of the Blueprint Editor.
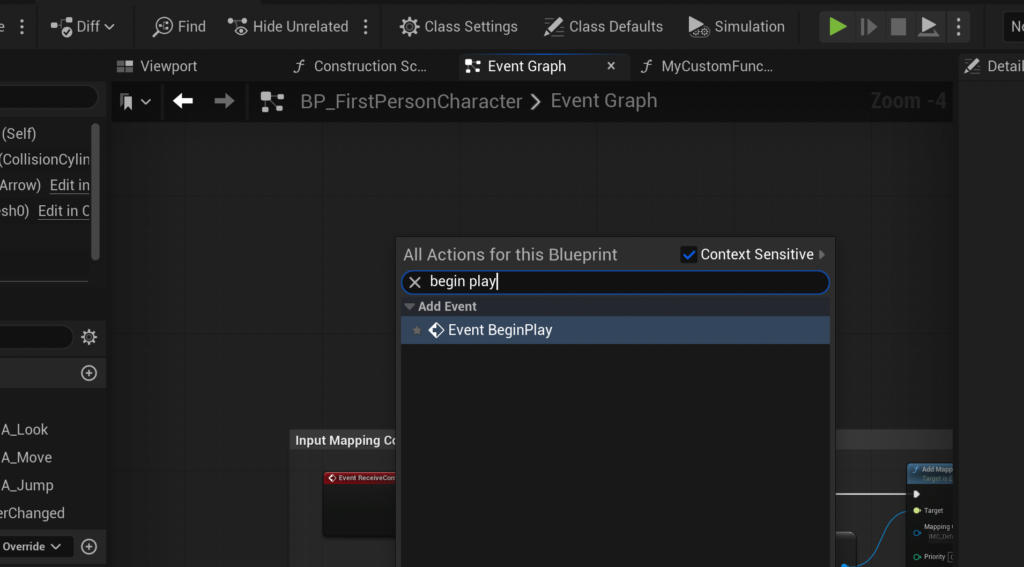
- Right-click on an empty area of the graph to bring up the context menu, then search for "Event BeginPlay" and select it to create the event node.
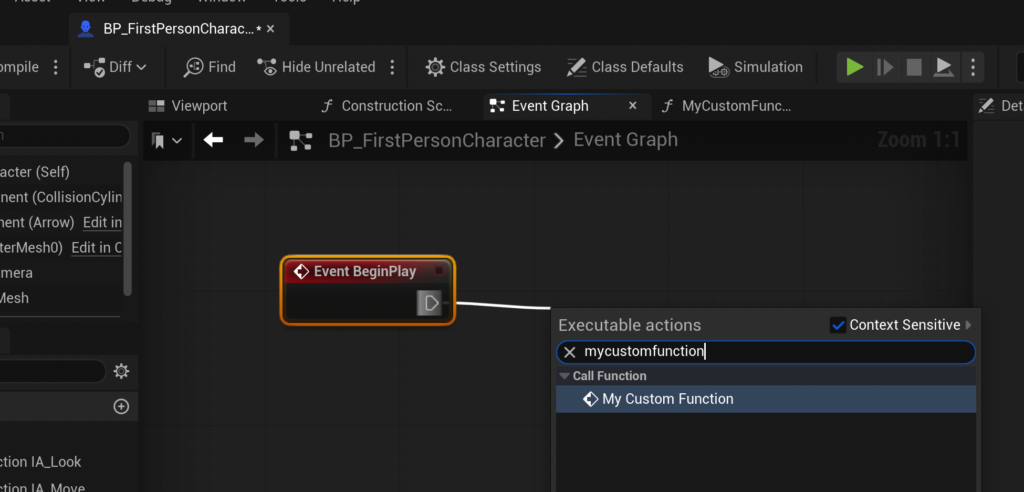
- Similar to connecting the
Print Stringnode, drag an exec pin from theEvent BeginPlaynode. - In the ensuing context menu, search for the custom function (e.g.,
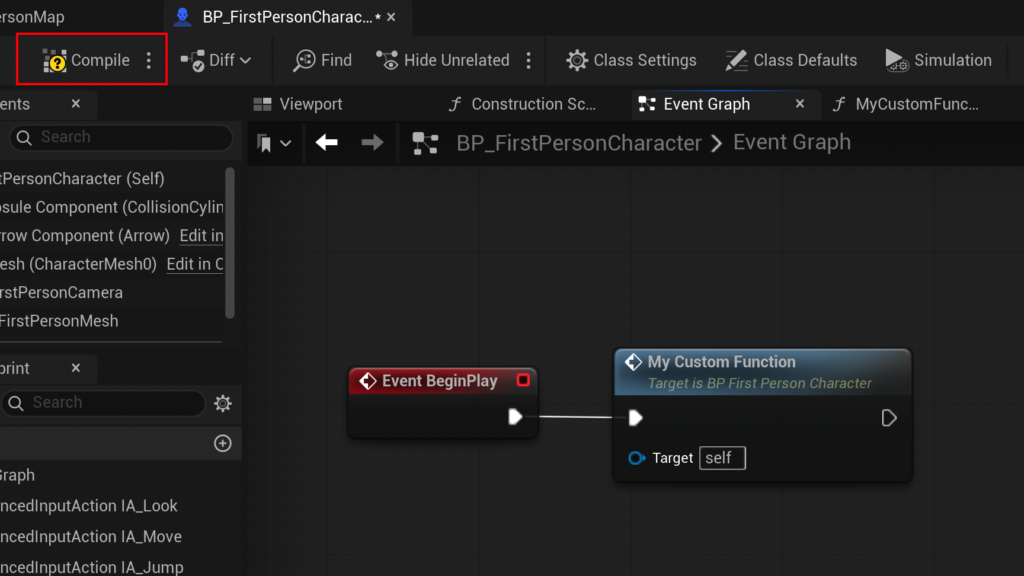
MyCustomFunction) and select it. This creates a "call" node for the function, automatically linking it toEvent BeginPlay. - Finally, click the "Compile" button and then "Save" the Blueprint.
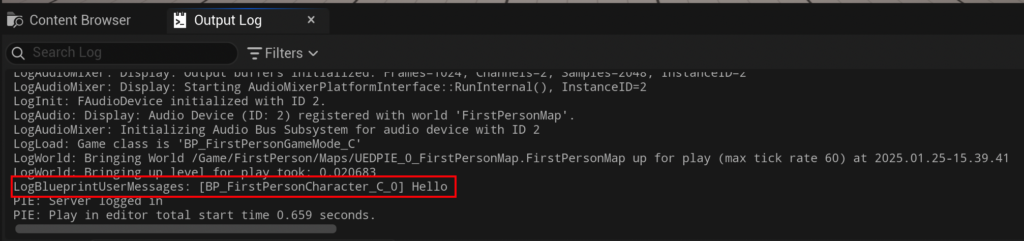
Now, upon running the game (e.g., by clicking "Play" in the editor), the Event BeginPlay will trigger, which in turn calls MyCustomFunction, resulting in "Hello" being printed to the output log, confirming the function’s successful execution.
Advanced Functionality: Inputs, Outputs, and Practical Applications
While a basic "Print String" function demonstrates the core concept, the true power of Blueprint Functions emerges when they are equipped with input and output parameters, enabling dynamic and versatile logic. Let’s revisit the CalculateDamage example, transforming our simple function into a robust damage calculation utility.
Notes on Advanced Functionality
Before proceeding, it’s important to reiterate a key technical distinction: Blueprint Functions, by design, are synchronous. This means they execute all their logic within a single frame and do not support nodes that introduce delays or other asynchronous behaviors. If a sequence of operations requires a Delay node or other time-dependent logic, developers should consider using Custom Events instead. Custom Events offer similar modularity but can incorporate asynchronous nodes, making them suitable for different types of gameplay sequences. (For more details on Custom Events, developers can refer to specialized guides on the topic.)
Making the CalculateDamage Function
To create a CalculateDamage function that computes damage after armor absorption, we need to define specific inputs and outputs.
-
Defining Input Parameters:
- First, double-click the
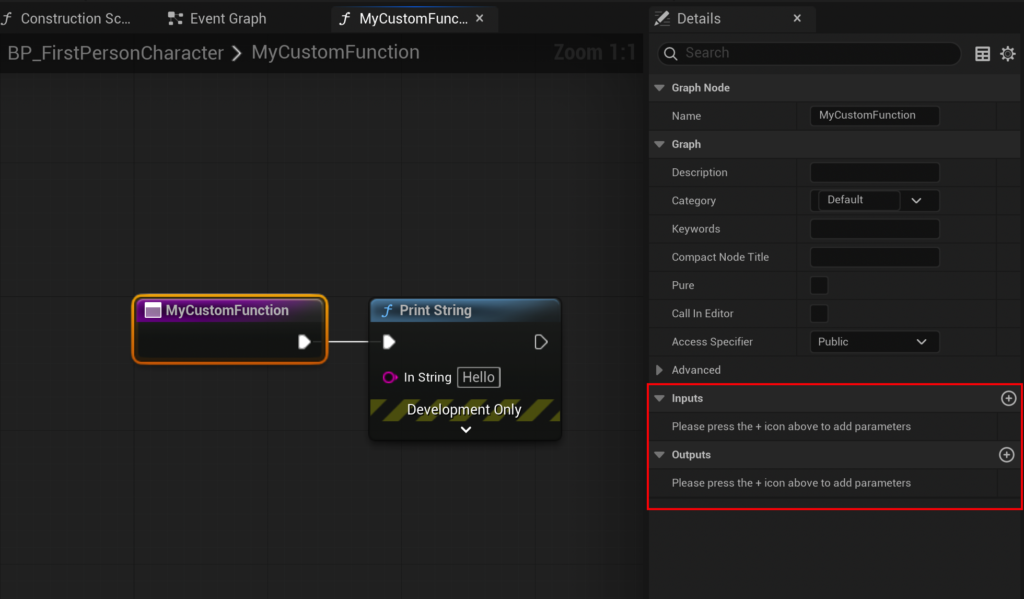
MyCustomFunction(or rename it toCalculateDamagefor clarity) in the Functions panel to open its graph. - Select the main purple function node itself. In the "Details" panel on the right side of the editor, two crucial sections, "Inputs" and "Outputs," will be visible.
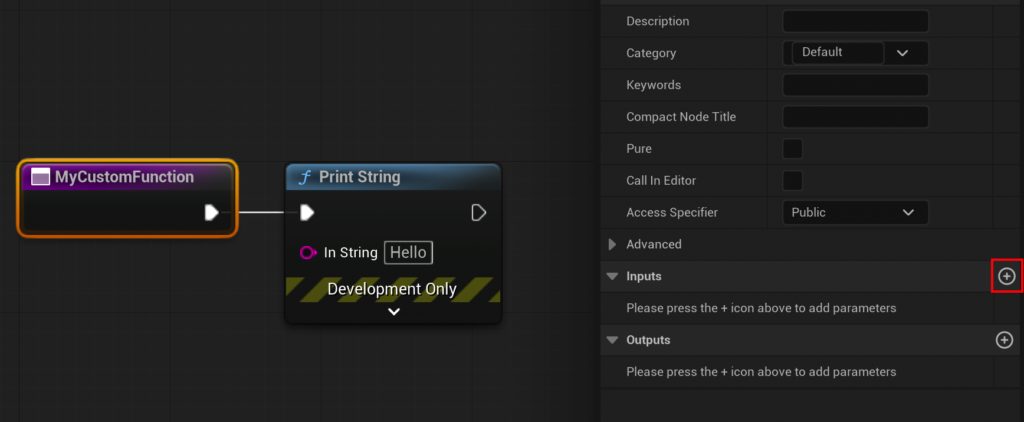
- Under the "Inputs" section, click the small "Add" button (a plus symbol). A new input parameter will appear.
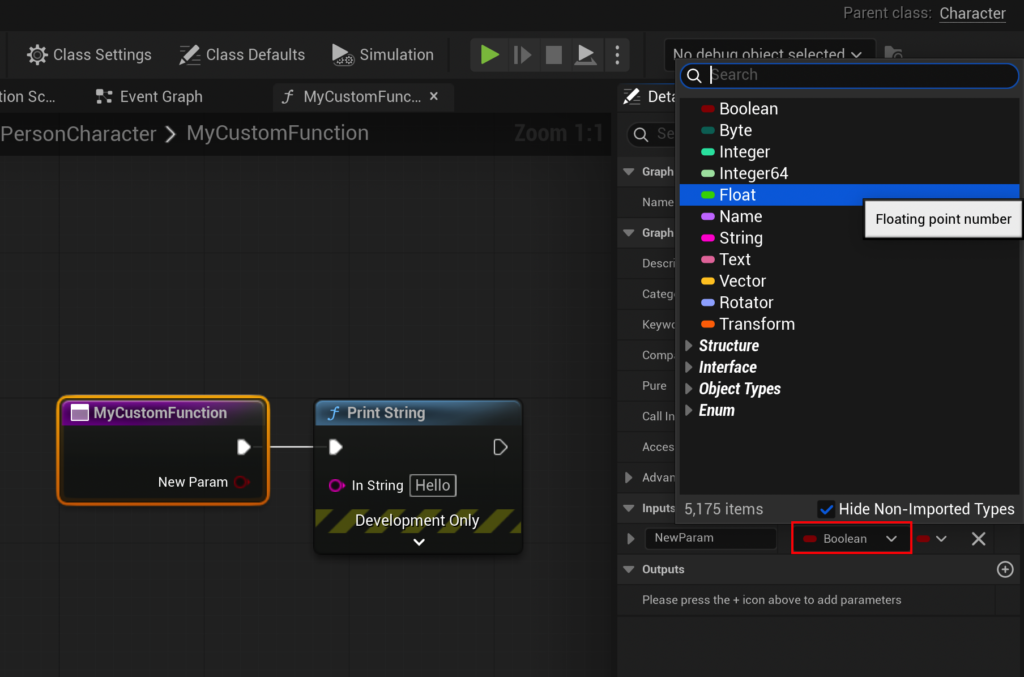
- Change the data type of this new parameter from "Boolean" (the default) to "Float" since damage values are typically numerical.
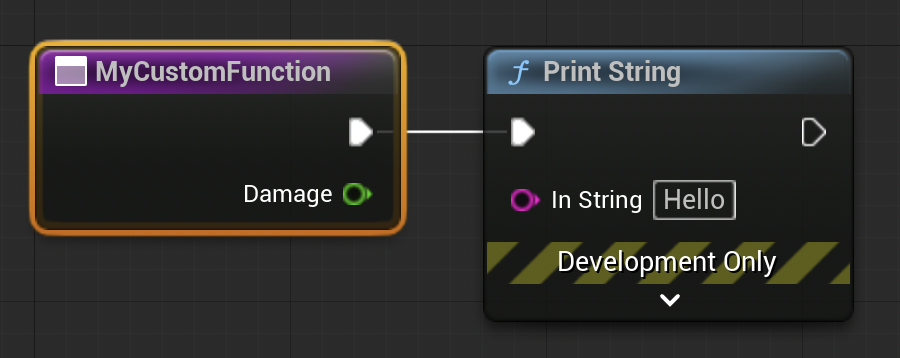
- Rename the parameter to "Damage." This parameter will represent the incoming raw damage value.
- First, double-click the
-
Integrating Internal Logic:
- From the newly created "Damage" input pin (green in color) on the function node, drag a wire into the graph and release. In the context menu, search for "-" or "Subtract" and select the "Float – Float" node. This node will subtract one float value from another.
- From the bottom input pin of the Subtract node, drag another wire. In the context menu, select "Promote to Variable." This action creates a new variable, which we will name "Armor," and automatically connects it to the Subtract node. This variable will represent the character’s armor value.
- Select the newly created "Armor" variable node in the graph. In the "Details" panel, set its default value. For instance, setting "Armor" to
15.0. - Connect the output of the "Subtract" node to the input of a "Print String" node (if still testing internally, or prepare it for output). At this stage, the function takes
Damage, subtractsArmor, and the result is available.
-
Returning Values (Outputs):
- Our function currently calculates a value but doesn’t "send" it anywhere external. To make the calculated damage available to other Blueprints, we need to "return" it as an output.
- Again, select the main function node in the graph. In the "Details" panel, navigate to the "Outputs" section.
- Click the "Add" button (plus symbol) to create a new output parameter.
- Change its data type to "Float" and rename it to "Result."
- Crucially, when an output parameter is created, Unreal Engine automatically generates a "Return Node" within the function’s graph. This
Return Nodehas an input pin corresponding to each output parameter defined. - Connect the output of our "Subtract" node to the "Result" input pin of the
Return Node. - If a
Print Stringnode was previously used within the function for testing, it can now be deleted, as the primary goal is to return the value, not just print it internally.
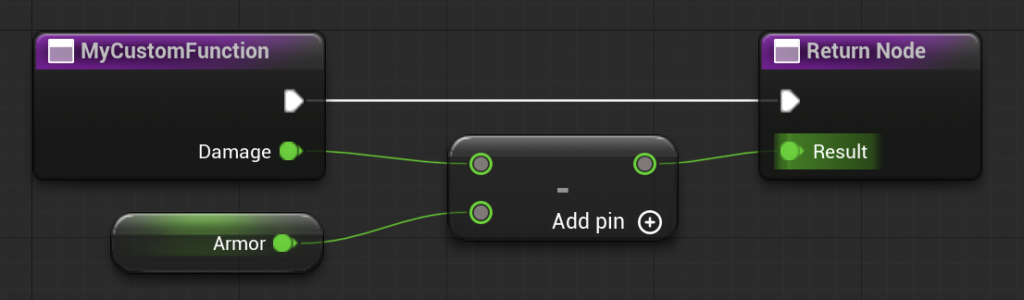
The final CalculateDamage function will now gracefully accept a Damage input, subtract the Armor value, and then output the calculated Result.
Utilizing the Advanced Function in the Event Graph
Returning to the Event Graph, the node representing our CalculateDamage function will have visually transformed. It now features an input pin for "Damage" and an output pin for "Result."
To test this enhanced function:
- Ensure the
CalculateDamagefunction call node is connected toEvent BeginPlay(or another appropriate event). - Set a test value for the
Damageinput on theCalculateDamagenode, for example,20.0. - Drag a wire from the "Result" output pin of the
CalculateDamagenode. - In the context menu, search for and add a "Print String" node. This will automatically convert the float
Resultto a string for display. - Compile and save the Blueprint.
When the game is run, Event BeginPlay will call CalculateDamage with an input of 20.0. Inside the function, 15.0 (our armor value) will be subtracted from 20.0, yielding 5.0. This 5.0 will be returned as the Result and subsequently printed to the output log by the Print String node in the Event Graph. This clear demonstration validates the successful implementation of input and output parameters, showcasing the function’s ability to process and return dynamic data.
Broader Implications for Game Development and Team Collaboration
The effective utilization of Blueprint Functions extends far beyond mere code organization; it profoundly impacts development cycles, project maintainability, and team dynamics.
Modularity and Reusability
The core benefit of functions is encapsulated in modularity. By breaking down complex systems into smaller, manageable functions, developers create reusable components. This not only reduces the amount of redundant code (adhering to the DRY principle) but also accelerates development. Once a function like CalculateDamage is perfected, it can be reused across various enemy types, player characters, or environmental hazards, saving immense time and effort. This modular approach is particularly beneficial for large-scale projects where consistency in logic is paramount.

Readability and Organization
Visual scripting can become convoluted if not properly structured. Blueprint Functions act as powerful organizational tools, allowing developers to encapsulate intricate node networks within a single, descriptive node. This dramatically improves the readability of Blueprints. When a new developer joins a project, they can quickly grasp the high-level logic by observing function calls, only diving into the function’s internal graph when detailed understanding is required. This hierarchical organization reduces cognitive load and makes debugging significantly easier.
Enhanced Debugging and Maintenance
When an issue arises in a game, pinpointing the source can be challenging. With logic contained within functions, debugging becomes localized. If the CalculateDamage function is misbehaving, developers know exactly where to look. Updates or bug fixes to a function automatically apply wherever that function is called, preventing inconsistent behavior and simplifying maintenance tasks across the entire project lifespan. This centralized control over logic is invaluable for long-term project health.
Scalability and Performance Considerations
Blueprint Functions contribute significantly to the scalability of a game project. As games grow in complexity, the ability to manage thousands of interconnected logic pieces becomes critical. Functions provide a structured way to handle this complexity, ensuring that the project remains manageable and extensible. While Blueprints are generally optimized for performance, especially in UE5, it’s worth noting that extremely performance-critical operations (e.g., highly iterative calculations or complex physics) might still be more efficiently handled in C++. However, for the vast majority of gameplay logic, Blueprint Functions offer an excellent balance of performance and development speed. Epic Games continues to invest in Blueprint runtime optimizations, narrowing the performance gap with C++ in many common scenarios.
Facilitating Team Collaboration
In a multi-disciplinary development team, Blueprint Functions serve as a common language. Programmers can expose C++ functionalities to Blueprints, and designers can then build sophisticated systems using these exposed functions without needing C++ knowledge. Within a Blueprint-centric team, different developers can be assigned specific functions or systems to develop, fostering parallel workflows and reducing merge conflicts. For instance, one designer might refine the CalculateDamage function while another implements its application to an enemy AI, leveraging the same underlying logic. This collaborative synergy is a key reason for Blueprints’ widespread adoption in studios of all sizes.
Industry Adoption and Future Outlook
Unreal Engine 5 and its robust Blueprint system, including Blueprint Functions, have seen widespread adoption across the gaming industry. From indie darlings like Stray to AAA blockbusters such as Fortnite and upcoming titles built on UE5, Blueprints are consistently used for everything from core gameplay mechanics to UI logic and complex character behaviors. Epic Games’ continued investment in the engine’s tools, coupled with a vibrant developer community, ensures that Blueprint Functions will remain an indispensable part of the Unreal Engine ecosystem. Future updates are likely to bring further refinements in performance, debugging capabilities, and integration with other engine features, solidifying their role in democratizing and streamlining game development.
Conclusion
The initial steps in mastering Blueprint Functions in Unreal Engine 5 lay the groundwork for efficient, organized, and scalable game development. These essential programming constructs enable developers to encapsulate logic into reusable, self-contained nodes, significantly cleaning up Blueprint Actors and making complex projects far easier to manage. From the foundational concept of a simple "Print String" function to the dynamic CalculateDamage example with inputs and outputs, the principles covered in this guide provide a robust foundation. Whether the objective is to construct intricate gameplay mechanics, optimize core technological systems, or simply refactor existing codebases, Blueprint Functions are an indispensable aspect of modern Unreal Engine development, empowering creators to bring their ambitious visions to life with greater ease and precision.
About the Author