The landscape of game development, particularly within powerful engines like Unreal Engine 5 (UE5), is continually shaped by the dynamic interplay between core engine capabilities and the extensive ecosystem of third-party plugins. These invaluable extensions significantly augment the engine’s inherent features, often bridging the gap between sophisticated C++ functionalities and the more accessible visual scripting environment of Blueprints. While Unreal Engine 5 boasts an impressive array of tools out of the box, certain advanced features and optimizations remain exclusive to C++ implementations. This is where the vibrant developer community, through its creation and distribution of plugins, plays a pivotal role, offering new Blueprint nodes, specialized tools, and expanded functionalities that empower developers to achieve more with greater efficiency. Understanding the proper procedures for integrating these plugins is paramount for any developer looking to maximize their productivity and creative potential within UE5. This guide delves into the two primary methods for plugin installation: leveraging the curated Unreal Marketplace and the more advanced, manual installation process for community-driven contributions.
The Indispensable Role of Plugins in Modern Game Development
Unreal Engine 5 stands as a titan in real-time 3D creation, powering everything from AAA games to architectural visualizations and cinematic productions. Its core strength lies in its modularity and extensibility. However, the sheer breadth of possibilities often necessitates specialized tools that go beyond the default feature set. Plugins serve this critical need, offering solutions for complex networking, advanced UI, custom rendering pipelines, specialized physics, or even niche integrations with external software. For many developers, particularly those who prefer the rapid prototyping and iterative design afforded by Blueprints, plugins are a game-changer. They democratize access to functionalities that might otherwise require deep C++ expertise, significantly lowering the barrier to entry for complex features and accelerating development cycles. The availability of a rich plugin ecosystem not only enhances the engine’s capabilities but also fosters innovation, allowing developers to build upon the work of others and focus their efforts on unique aspects of their projects.
Epic Games, the steward of Unreal Engine, has actively cultivated this ecosystem. The Unreal Marketplace, launched in 2014, has grown into a robust platform offering thousands of assets, including a substantial category dedicated to code plugins. This centralized hub ensures a degree of quality control and compatibility, providing developers with reliable tools vetted by Epic’s review process. Beyond the official marketplace, a thriving independent developer community contributes open-source and privately distributed plugins, often pushing the boundaries of what’s possible and responding to specific, emerging needs within the developer community. This dual approach to plugin distribution offers both convenience and flexibility, catering to a wide spectrum of development needs and risk tolerances.
Navigating the Unreal Marketplace: A Streamlined Installation Process
The Unreal Marketplace represents the most common and recommended avenue for acquiring and installing plugins, offering a secure and user-friendly experience. This method benefits from Epic Games’ direct support for compatibility and updates, providing developers with peace of mind regarding the stability and integration of their chosen tools.
Step 1: Accessing the Epic Games Launcher and Unreal Marketplace
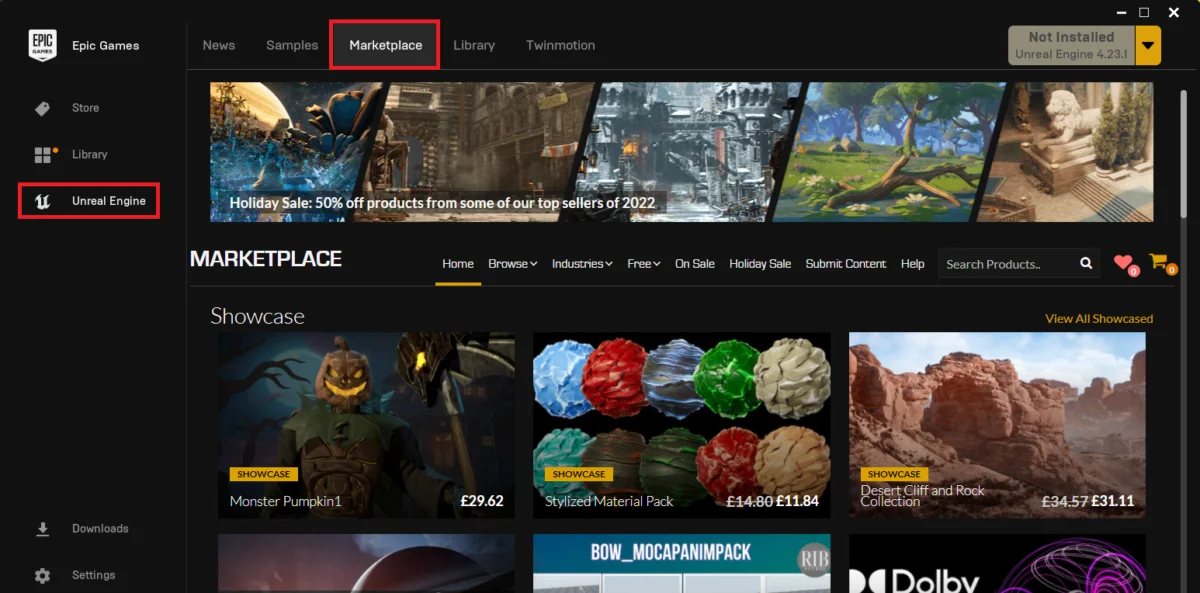
The journey begins with the Epic Games Launcher, the central application for managing all Epic Games products, including Unreal Engine installations and marketplace assets. Upon opening the launcher, developers are greeted with various tabs, one of the most prominent being the "Unreal Marketplace." This serves as the gateway to a vast library of resources, encompassing everything from 3D models and sound effects to intricate code plugins. Clicking on this tab transitions the user from engine management to asset exploration. The interface is designed for intuitive navigation, allowing users to browse, search, and filter content effectively. The Marketplace is not merely a storefront; it’s a critical component of the Unreal Engine ecosystem, fostering economic activity for content creators and providing essential resources for developers worldwide. According to Epic Games, the Marketplace facilitates millions of transactions annually, underscoring its importance to the developer community.
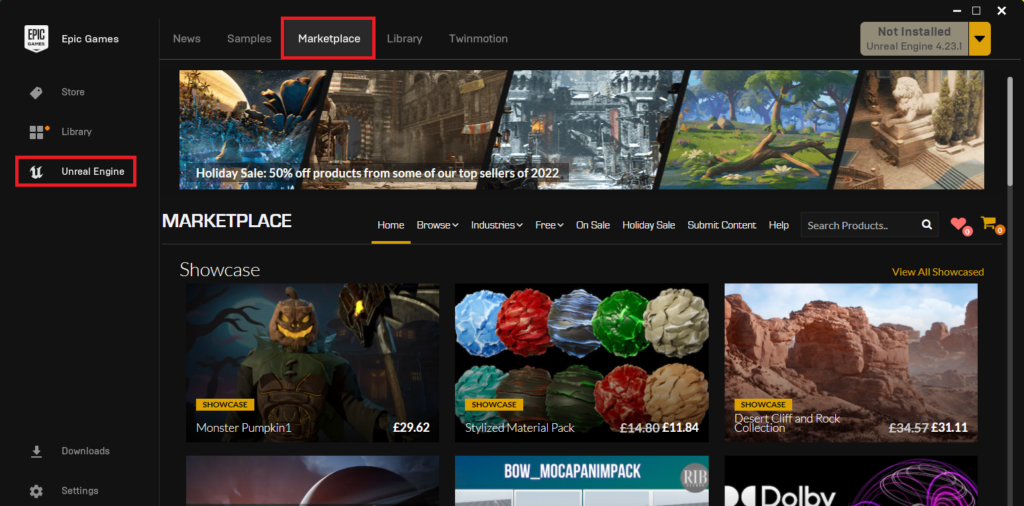
Step 2: Locating Code Plugins
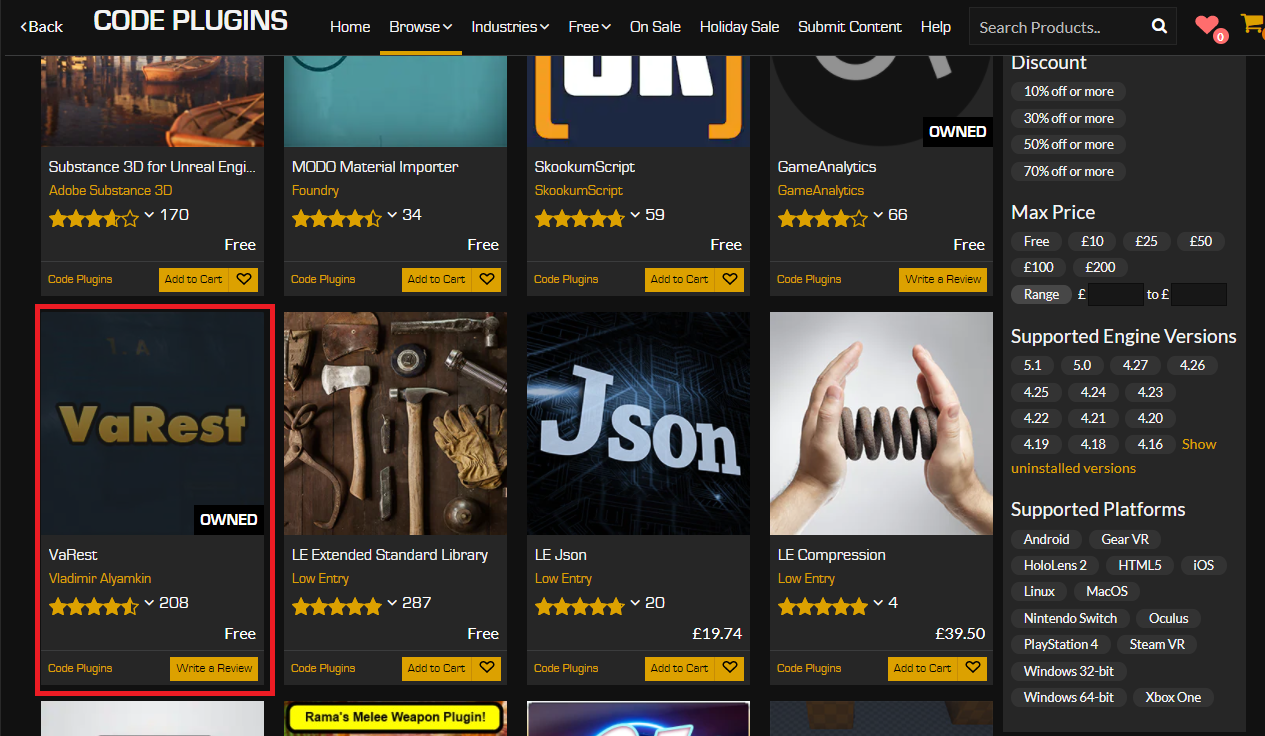
Within the "Browse" tab of the Unreal Marketplace, a variety of content categories are presented. To specifically target extensions that add programmatic functionality, developers must navigate to the "Code Plugins" option. This distinction is crucial as it separates compiled code and Blueprint logic from visual assets like environments, characters, or animations. The "Code Plugins" section typically features tools that introduce new Blueprint nodes, extend C++ classes, provide integrations with external APIs, or implement advanced engine features. Examples often include networking solutions, UI frameworks, serialization tools, and custom editor extensions. This focused category ensures that developers can efficiently find the specific type of functional enhancements they require for their projects.
Step 3: Plugin Selection and Acquisition

Once in the "Code Plugins" section, developers can browse or search for the specific plugin they wish to install. For illustrative purposes, the VaRest network plugin is frequently cited due to its popularity in enabling RESTful API communication directly within Blueprints, a feature vital for many modern applications requiring backend data interaction. Upon selecting a plugin, its dedicated page provides detailed information, including features, compatibility, documentation links, and user reviews.
The acquisition process is straightforward. If the plugin is commercial, users will click "Add to Cart" and proceed with the purchase. It’s important to note that even free plugins follow a similar "purchase" workflow, albeit with no charge incurred. This mechanism is not merely symbolic; it ensures that the plugin is officially tied to the user’s Epic Games account, granting them a perpetual license for use across their Unreal Engine projects. This licensing system also facilitates tracking of ownership, enabling automatic updates and management through the launcher. This approach maintains a consistent user experience and simplifies asset management, reflecting Epic’s commitment to a seamless developer workflow.
Step 4: Engine-Level Installation
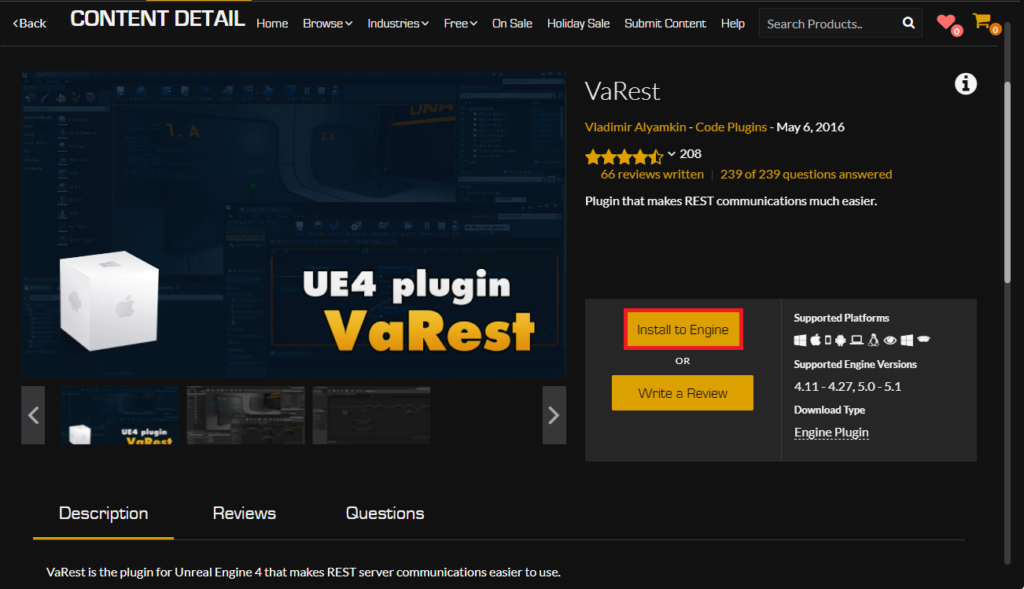
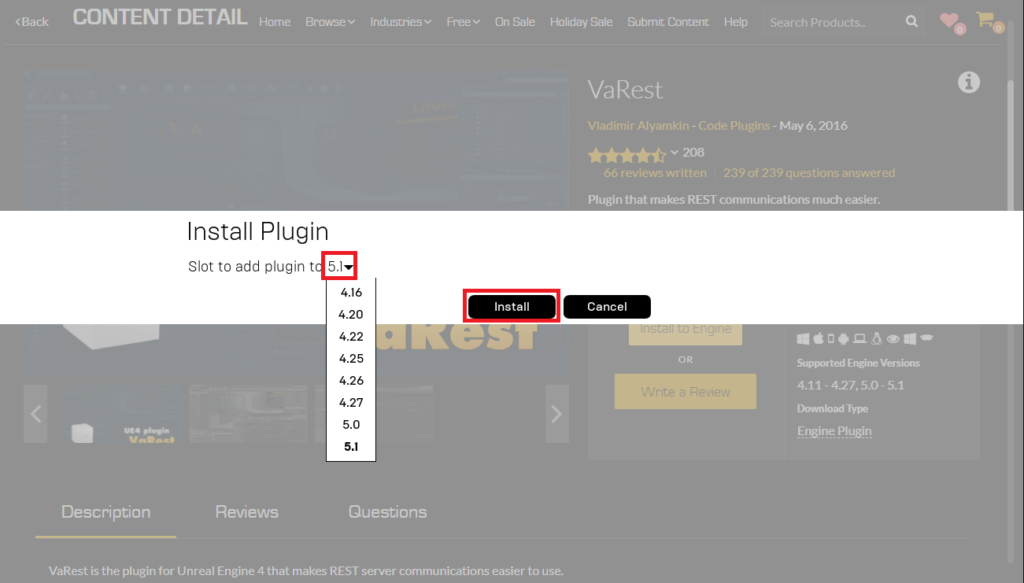
Unlike project-specific assets that are added directly to a particular project’s content folder, code plugins from the Marketplace are typically installed at the engine level. This means they become available to any project running on the specific engine version(s) they are installed to. After acquiring the plugin, an "Install to Engine" button becomes available. Clicking this prompts the user to select the target Unreal Engine version(s) from a dropdown list of their installed engines. This is a critical step, as plugin compatibility is often tied to specific engine versions. Installing a plugin developed for UE5.0 to a UE5.3 installation, for example, could lead to compilation errors or unexpected behavior. The launcher handles the complex process of copying the plugin files into the correct directory within the chosen Unreal Engine installation path, typically [EngineInstallationFolder]EnginePluginsMarketplace. This centralized installation ensures efficient resource management and simplifies updates, as a single update applies across all projects utilizing that engine version.
Step 5: Monitoring Installation Progress and Finalization
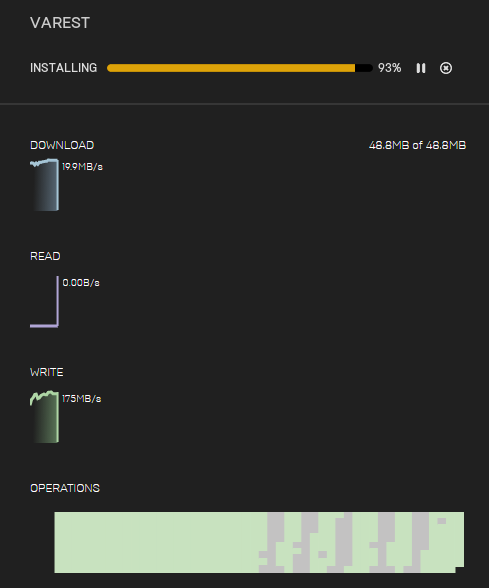
Once the installation is initiated, its progress can be monitored within the "Downloads" tab of the Epic Games Launcher. This tab provides real-time updates on download speed, remaining time, and overall completion status. Upon successful completion, the plugin files are securely placed within the Unreal Engine installation directory, ready for activation within individual projects. The launcher’s download manager is designed to handle multiple installations concurrently, providing a robust and reliable mechanism for managing a developer’s growing library of plugins and engine versions.
Enabling the Plugin within Your Unreal Engine Project
Even after a plugin has been successfully installed to the engine, it is not automatically active within every Unreal Engine project. This design choice is intentional and serves several practical purposes: it prevents unnecessary code compilation, reduces the overall executable size of projects that don’t require the plugin, and allows developers granular control over which functionalities are active in each specific project.
Step 6: Accessing the Plugin Manager
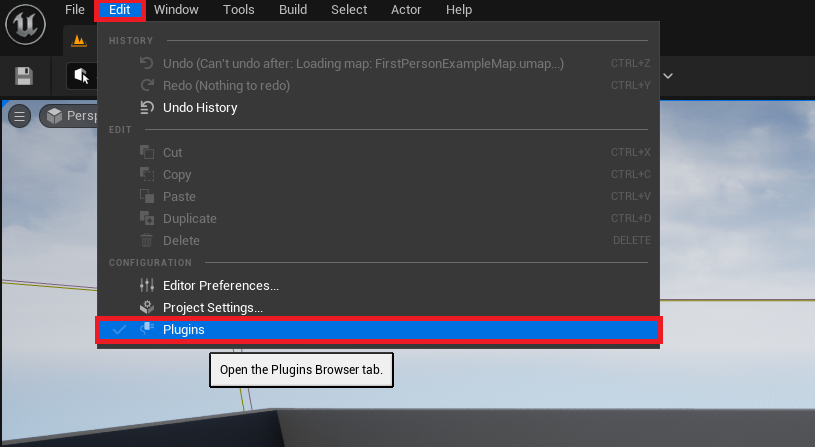
To enable a newly installed plugin, developers must open the target Unreal Engine project. Within the Unreal Editor, navigate to the main menu bar, click "Edit," and then select "Plugins." This action opens the "Plugins" window, a comprehensive interface that lists all detected plugins—both those installed globally to the engine and those installed locally within the project. The Plugin Manager is an essential tool for project configuration, providing detailed information about each plugin, including its status (enabled/disabled), version, author, and whether it’s a built-in engine feature or a third-party extension.
Step 7: Locating and Activating the Plugin
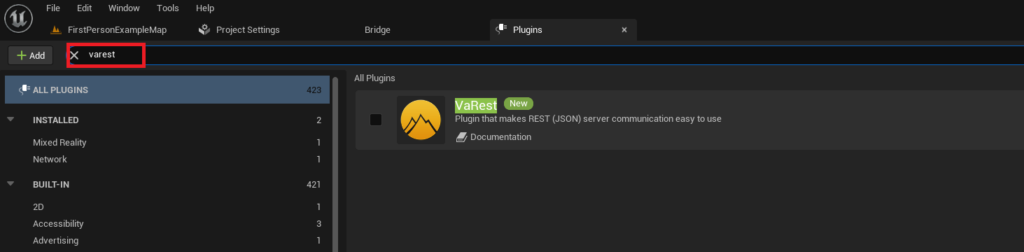
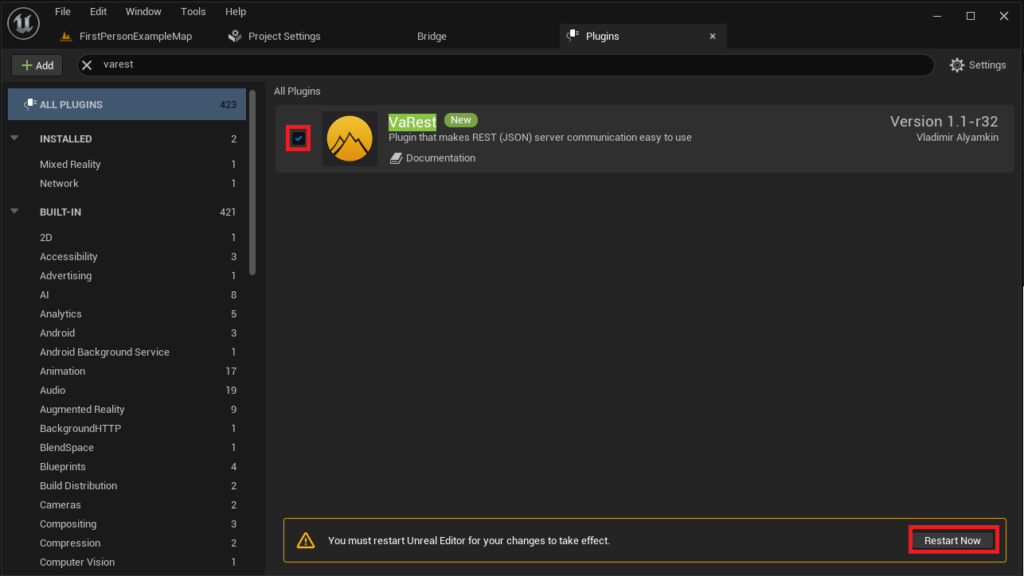
Inside the "Plugins" window, a search bar allows developers to quickly locate their desired plugin by typing its name. Once found, the plugin’s entry will display a checkbox. To activate the plugin for the current project, simply click this checkbox. Upon activation, the Unreal Editor will typically prompt the user with a "Restart Now" button. This restart is crucial as it allows the engine to recompile necessary modules, integrate the plugin’s code, and make its functionalities (such as new Blueprint nodes or C++ classes) available within the editor and for compilation. Ignoring this restart would mean the plugin’s features are not yet fully integrated and usable within the project. This final step completes the integration process, empowering developers to immediately leverage the new capabilities provided by the plugin in both C++ and Blueprint environments.
Manually Installed Plugins: Advanced Integration for Community Contributions
While the Unreal Marketplace offers convenience and curation, the broader Unreal Engine community often shares plugins through independent channels, such as GitHub repositories, personal websites, or forum posts. This method, while offering greater flexibility and access to niche or experimental tools, requires a more hands-on approach and a heightened awareness of potential risks.
Disclaimer: Exercising Due Diligence
The primary caveat with manually installed plugins is the absence of Epic Games’ official vetting process. Developers must exercise extreme caution when downloading and integrating untrusted files and code from the internet. The risks are significant and include, but are not limited to, malware infection, project instability, incompatibility issues leading to crashes, and potential security vulnerabilities. CouchLearn, like any responsible platform, strongly advises developers to only download Unreal Engine plugins from trusted sources. Verify the developer’s reputation, scrutinize the source code if possible, and ensure the plugin is compatible with your specific Unreal Engine 5 version. Misaligned versions can lead to immediate compilation failures or subtle, hard-to-diagnose runtime errors. It is also prudent to back up your project before attempting any manual plugin installation.
Installing the Plugin Files Manually
The core principle of manual installation involves placing the plugin’s files directly into a designated "Plugins" folder within your Unreal Engine project directory.
Step 1: Preparing Your Project Directory
First, navigate to your Unreal Engine project’s root directory. This is the folder that contains your .uproject file, along with folders like Content, Config, and Source (if it’s a C++ project). Within this root directory, you need to ensure a folder named "Plugins" exists. If it does not, simply create a new folder and name it "Plugins." This folder serves as the local repository for project-specific plugins, distinct from the engine-level installations from the Marketplace. This structure allows for greater control over individual project dependencies and facilitates easier sharing of projects with unique plugin requirements.
Step 2: Copying the Plugin Folder
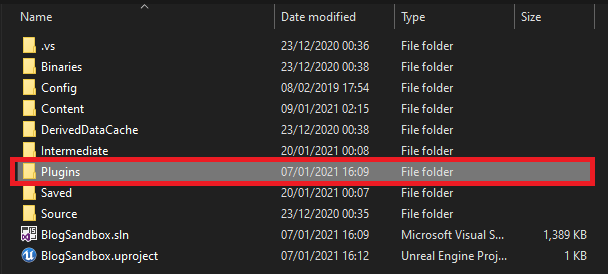
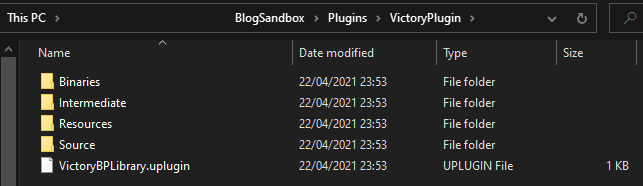
Once the "Plugins" folder is established, copy the entire downloaded plugin folder into it. For instance, if using a plugin like "Victory BP Library" by Rama (a well-known community contributor for extensive Blueprint utilities), you would typically download a compressed archive (e.g., a .zip file) containing the "VictoryPlugin" folder. After extracting, this entire "VictoryPlugin" folder—containing all the plugin’s .uplugin file, source code, binaries, and other assets—is then placed directly into your project’s "Plugins" folder. It is crucial to ensure that the internal structure of the downloaded plugin is preserved during this copy operation. The plugin’s root folder (e.g., "VictoryPlugin") must contain its .uplugin descriptor file directly. Incorrect placement or alteration of the folder structure will prevent the engine from recognizing the plugin. Compatibility is key here; ensure the downloaded plugin explicitly states support for your Unreal Engine 5 version (e.g., UE5.0, UE5.1, UE5.2, etc.).
Step 3: Verification of Plugin Files
Inside the newly copied plugin folder, you should find a collection of files essential for the plugin’s functionality. This typically includes:
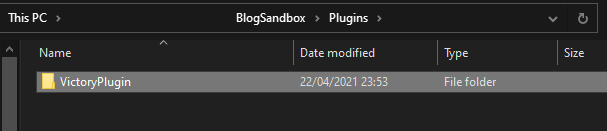
.upluginfile: The descriptor file that tells Unreal Engine about the plugin.Sourcefolder: Contains the C++ source code if it’s a code plugin.Binariesfolder: Holds compiled.dllor.sofiles for specific platforms and engine versions.Contentfolder: May contain assets used by the plugin (e.g., Blueprint assets, textures, materials).Resourcesfolder: For icons or other supplementary files.
Verifying the presence of these core components, especially the .uplugin file, confirms that the plugin structure is correct and that the engine will likely detect it.
Enabling the Manually Installed Plugin
The process for enabling a manually installed plugin within your Unreal Engine project is identical to that of a Marketplace-installed plugin. The Unreal Editor’s plugin manager serves as the central hub for activation, regardless of the installation origin.
Step 4: Accessing the Plugin Manager (Revisited)
As before, open your Unreal Engine project. From the editor’s main menu, navigate to "Edit" and then select "Plugins." This will open the Plugin Manager window, which scans both engine-level and project-level "Plugins" folders for available extensions.
Step 5: Locating and Activating the Manually Installed Plugin
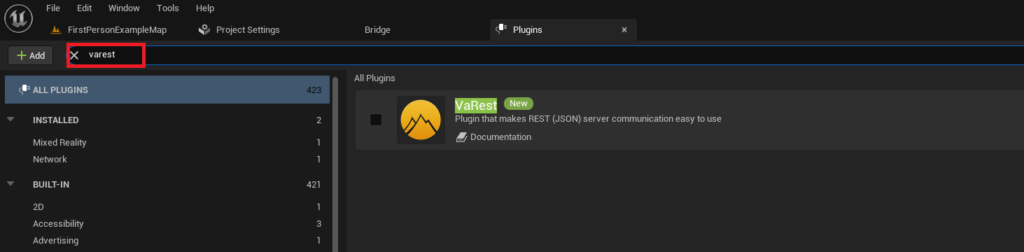
Use the search bar within the "Plugins" window to find the name of
About the Author