The concept of functions stands as a cornerstone in modern programming, fundamentally enabling developers to encapsulate discrete blocks of code for reusability and improved project organization. Within the expansive ecosystem of Unreal Engine 5 (UE5), this principle is powerfully embodied through Blueprint Functions, a visual scripting paradigm that allows creators to build complex logic with unparalleled clarity and efficiency. This guide delves into the essence of Blueprint Functions, demonstrating their creation, application, and the profound impact they have on streamlining game development workflows.
Understanding the Core of Functions in Game Development
At its heart, a function is a self-contained unit of code designed to perform a specific task. This modular approach is central to the "Don’t Repeat Yourself" (DRY) principle, a fundamental tenet of software engineering that advocates for minimizing redundant code. In the context of game development, where projects often involve intricate systems and vast amounts of interconnected logic, functions become indispensable tools for maintaining a manageable and scalable codebase.
Blueprint Functions in Unreal Engine 5 extend this powerful concept into a visual medium, allowing designers and programmers alike to define and execute reusable sequences of nodes within the Blueprint editor. These functions are highly versatile, capable of accepting input parameters to influence their behavior and returning output parameters to convey their results, thereby offering a flexible mechanism for encapsulating complex operations. For instance, instead of duplicating the intricate logic for calculating damage across various enemy types or player abilities, a developer can construct a single CalculateDamage Blueprint Function. This function can then be called from anywhere within the relevant Blueprint actor, ensuring consistency and simplifying future modifications. Should the damage calculation formula require an update, only this single function needs to be altered, automatically propagating the change throughout the entire project. This dramatically reduces the potential for errors and significantly accelerates the iteration process. It is important to note that, by design, a Blueprint Function is created for a specific Blueprint actor and operates exclusively within that actor’s scope, ensuring localized and contained logic.
The increasing complexity of modern game titles, often featuring dynamic environments, sophisticated AI, and highly detailed physics simulations, underscores the critical need for robust modular programming solutions. According to a 2023 industry report by the Game Developers Conference (GDC), efficiency and maintainability were cited by over 60% of surveyed developers as top concerns in projects utilizing visual scripting tools like Blueprints. This data highlights the direct correlation between adopting structured programming practices, such as leveraging functions, and achieving successful project outcomes.
The Evolution of Visual Scripting and Unreal Engine 5
Unreal Engine’s Blueprint system itself represents a significant evolution in game development accessibility. Introduced as a successor to Unreal Kismet, Blueprints matured into a fully-fledged visual scripting language, empowering artists and designers who may not have traditional coding backgrounds to contribute directly to gameplay logic. Unreal Engine 5, released in April 2022, further refined this system, enhancing performance, debugging capabilities, and the overall user experience, making functions even more intuitive to implement. This democratisation of game development, allowing non-programmers to define game logic, has profoundly impacted team structures and development pipelines. Epic Games, the developer of Unreal Engine, consistently emphasizes the importance of tools that foster collaboration and rapid prototyping, with Blueprint Functions serving as a prime example of this philosophy in action. The ability to abstract complex operations into visually digestible nodes facilitates cross-disciplinary understanding and reduces communication overhead.
Initiating Function Creation in Unreal Engine 5
The process of creating a Blueprint Function in Unreal Engine 5 is designed to be straightforward, guiding developers from foundational steps to more advanced implementations. To begin, one must access the Blueprint actor intended to host the new function. A common starting point, as often recommended for learning, is the FirstPersonCharacter Blueprint found within Unreal Engine’s standard First Person Shooter template.
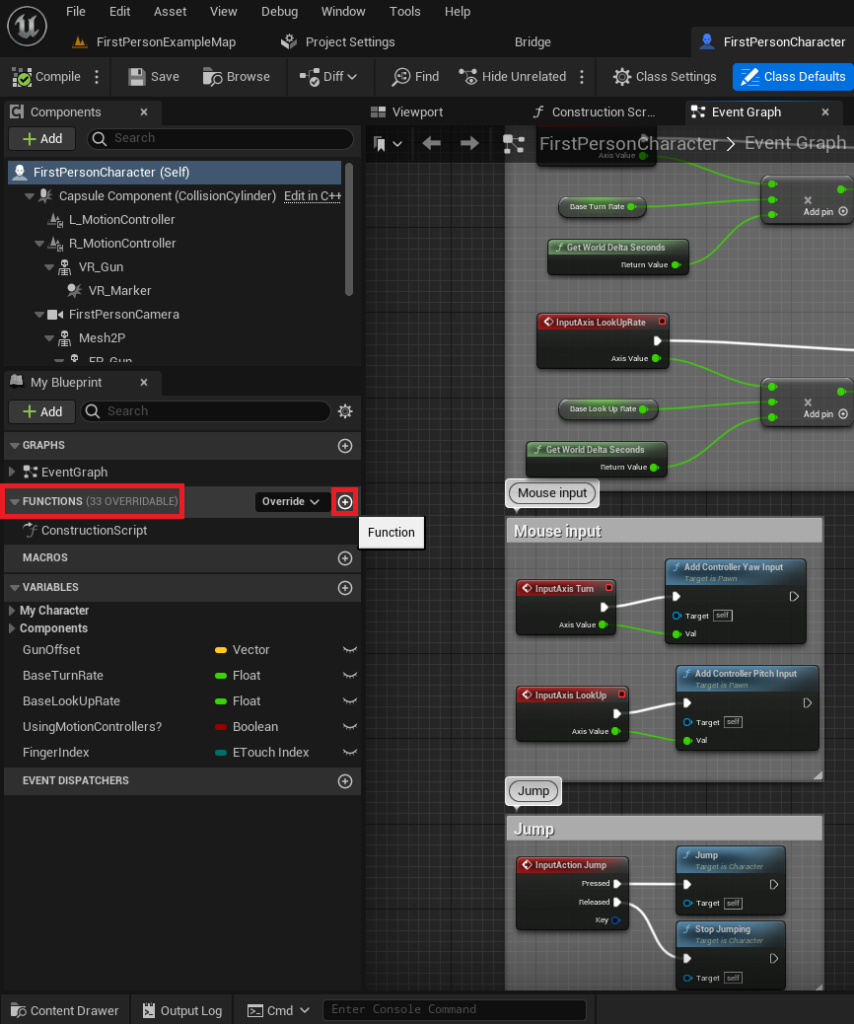
Upon opening the Blueprint editor, attention is drawn to the "Functions" dropdown section located on the left-hand side of the editor window. This dedicated area serves as the repository for all functions pertinent to the specific Blueprint actor. To instantiate a new function, a developer simply clicks the circular icon adorned with a plus symbol, positioned conveniently to the right of the "Functions" section. This action immediately prompts the system to create a new function entry.
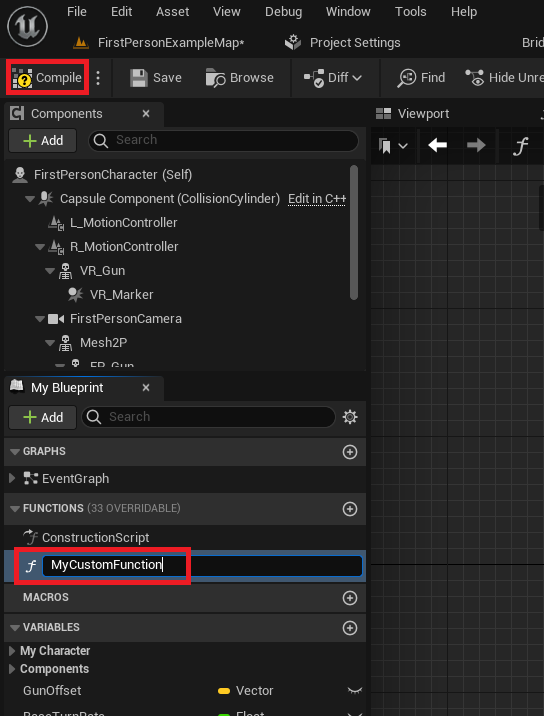
Naming conventions are paramount for maintaining clarity and navigability within large-scale projects. Developers are strongly advised to assign clear, descriptive names to their functions. Ambiguous or inconsistent naming can quickly lead to confusion, hinder debugging efforts, and impede collaborative development, particularly as projects grow in complexity and team size. Once a suitable name has been entered, confirming it by pressing Enter or clicking elsewhere in the Blueprint window is followed by a crucial step: clicking the "Compile" button. This compilation process integrates the newly defined function into the Blueprint, making it available for immediate use within the project. This rapid compilation cycle, a hallmark of Blueprint development, provides instantaneous feedback, allowing developers to test and refine their logic without the lengthy build times often associated with traditional code compilation.
Implementing Basic Functionality: A "Print String" Example
With a function successfully created and compiled, the next logical step involves imbuing it with practical functionality. For introductory purposes, a "Print String" operation serves as an excellent starting point, demonstrating how a function can execute a simple task and provide immediate feedback.
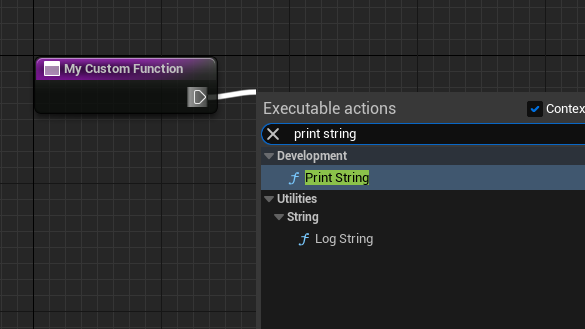
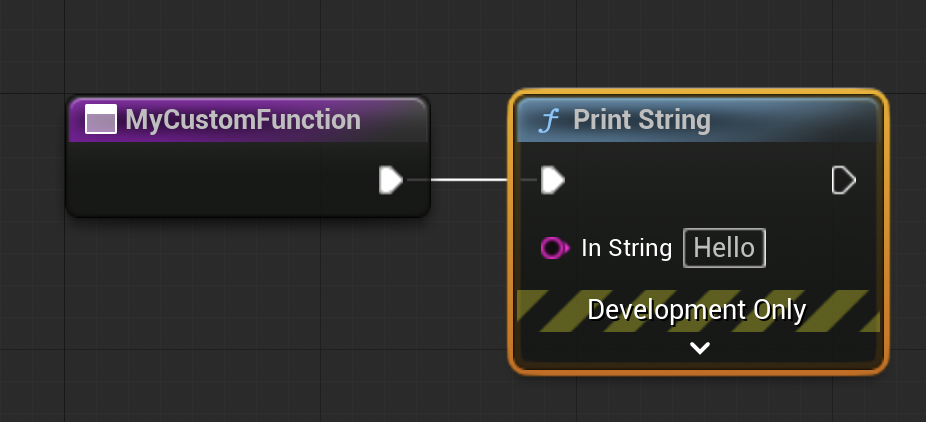
Within the newly created function graph, the initial node, often bearing the function’s name (e.g., "My Custom Function"), features a white, sideways-pointing triangle. This is known as an exec pin, a critical element in Blueprint logic flow. Exec pins dictate the sequence of operations, ensuring that nodes connected via these pins execute one after another in a controlled, sequential manner. By clicking and dragging from this exec pin and releasing the mouse button anywhere on the gray background grid, a context-sensitive menu appears, presenting a comprehensive list of available Blueprint nodes. Selecting "Print String" from this menu automatically generates and connects a "Print String" node to the function’s entry point.
This immediate connection means that whenever "My Custom Function" is invoked or "called," the "Print String" node will execute as part of its internal logic. The terminology of "calling" a function is interchangeable with "running" or "executing" it and is universally understood across programming disciplines. This simple setup illustrates the fundamental principle: functions encapsulate actions, and these actions are triggered upon the function’s invocation.
Integrating Functions into the Event Graph for Execution
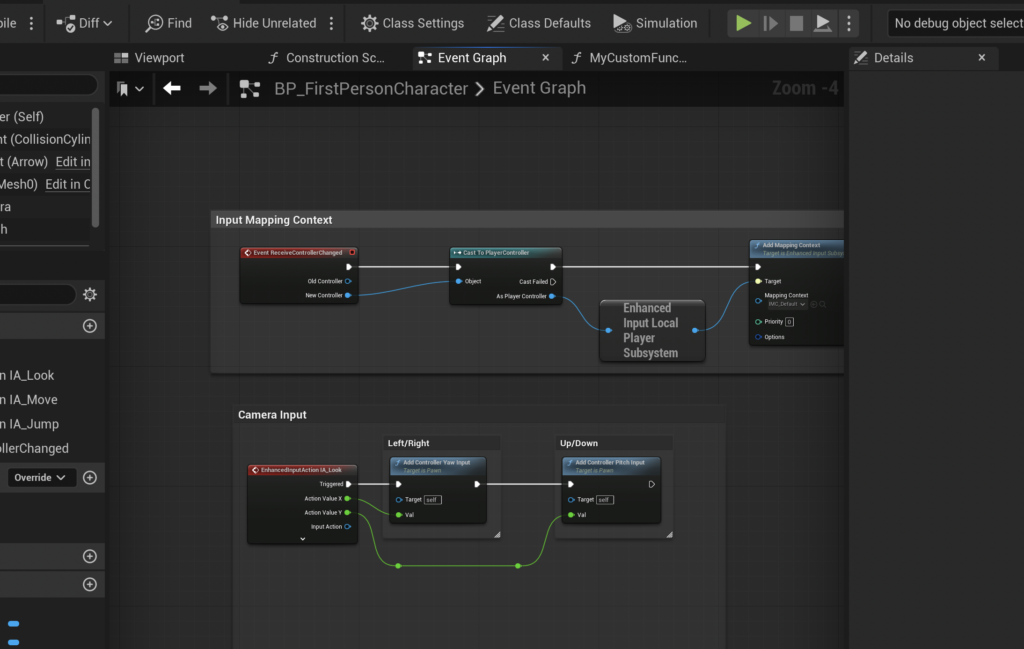
For a newly created function to actively contribute to the game’s logic, it must be explicitly called from an appropriate point within the Blueprint’s execution flow. The most common orchestrator for such logic in a Blueprint is the Event Graph. The Event Graph serves as the primary hub for handling events, which are triggers that initiate a sequence of actions, such as player input, collision detection, or the start of the game.
Crucially, it is important to distinguish between Events and Functions within Blueprints. While both represent blocks of logic, Events, such as Event BeginPlay or Event Tick, are typically asynchronous, can initiate processes that involve delays, and generally do not return explicit values to their callers. Functions, conversely, are synchronous, execute immediately, cannot contain delay nodes, and are designed to return one or more values. This distinction is vital for architectural decisions in complex Blueprints; for operations requiring time-based sequencing or asynchronous calls, Custom Events are the preferred choice, as detailed in specialized guides on Unreal Engine event handling.
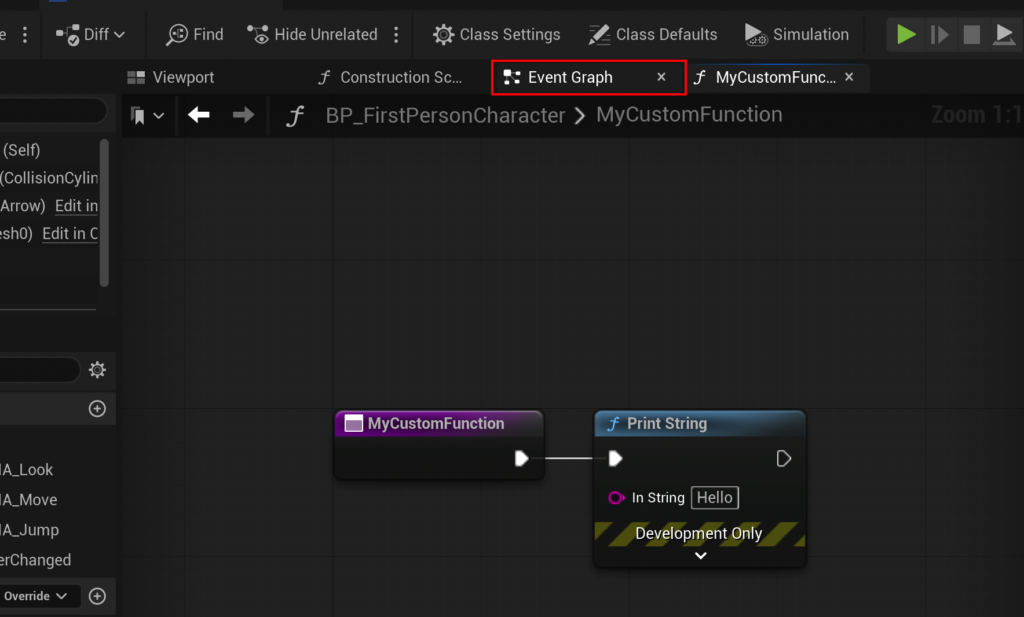
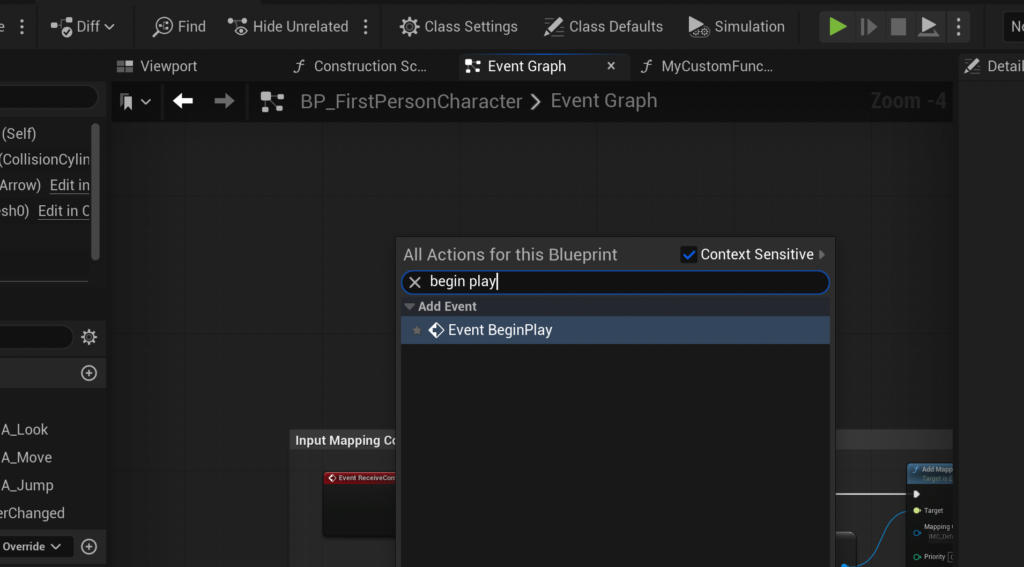
To test the "Print String" functionality, the Event BeginPlay node is an ideal candidate. Event BeginPlay is automatically triggered when the actor (in this case, the FirstPersonCharacter) is spawned into the game world or when the game level begins. To access the Event Graph, developers click the dedicated "Event Graph" button located at the top of the Blueprint editor.
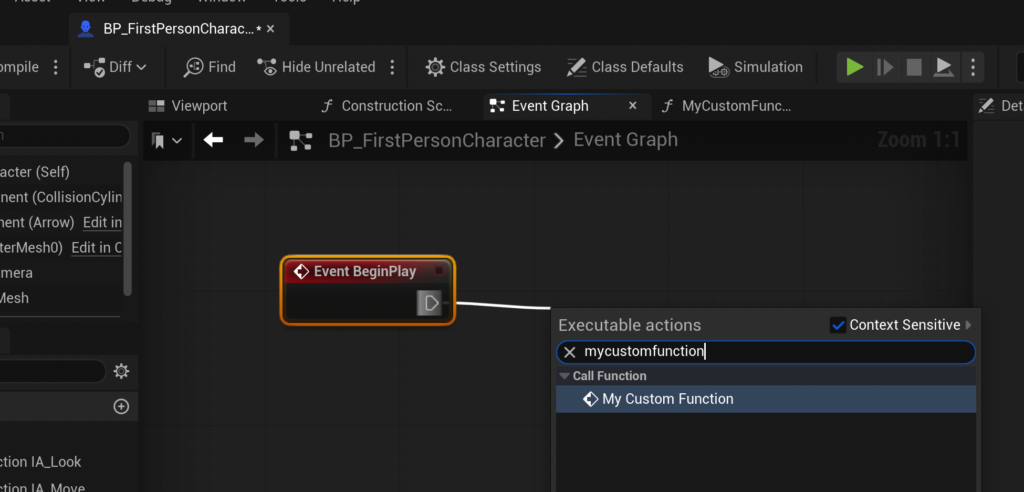
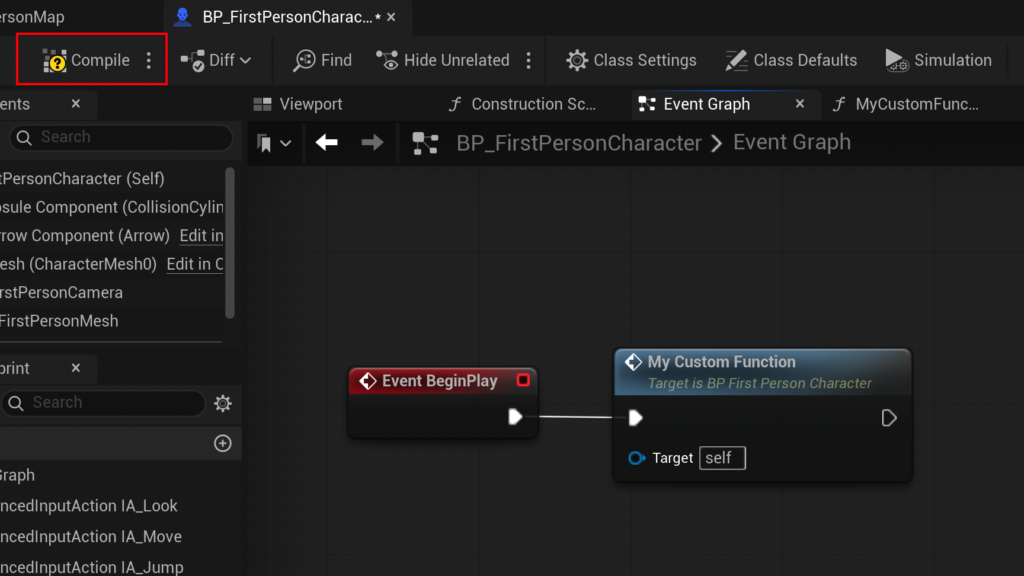
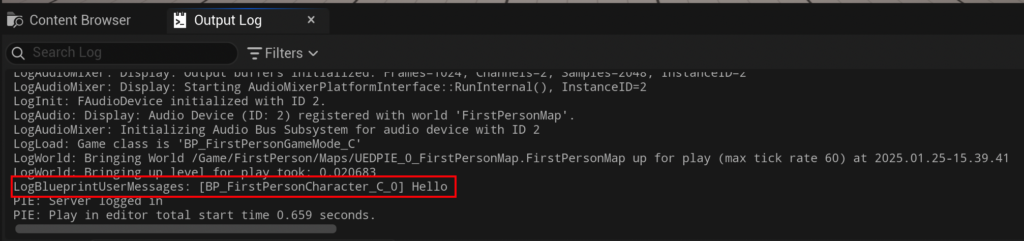
Within the Event Graph, right-clicking on an empty space brings up the context menu. Searching for "Event Begin Play" and selecting it creates the event node. From the exec pin of the Event BeginPlay node, a developer can drag and release the mouse to bring up the context menu again. This time, searching for and selecting "MyCustomFunction" will create a call node for the function, automatically connecting its execution flow to Event BeginPlay. The final step involves clicking the "Compile" button and then saving the Blueprint. Upon launching the game in the editor’s play mode, the "hello" string, by default set in the Print String node, will appear in the output log, confirming the successful execution of the custom function. This simple test pipeline underscores the iterative nature of Blueprint development, where changes can be rapidly implemented, compiled, and verified.
Enhancing Functionality: Introducing Input and Output Parameters for Damage Calculation
While a simple "Print String" demonstrates the basic concept, the true power of Blueprint Functions emerges when they are equipped with input and output parameters, enabling them to process data and return results. To illustrate this, let’s evolve "My Custom Function" into a practical CalculateDamage function, designed to compute damage after factoring in a character’s armor. This example directly addresses the DRY principle by centralizing a common game mechanic.
The CalculateDamage function will perform the following operations:
- Receive an initial
Damagevalue as an input. - Reference a character’s
Armorvalue (potentially stored as a variable within the Blueprint). - Subtract the
Armorvalue from theDamage. - Return the resulting "actual damage" value as an output.
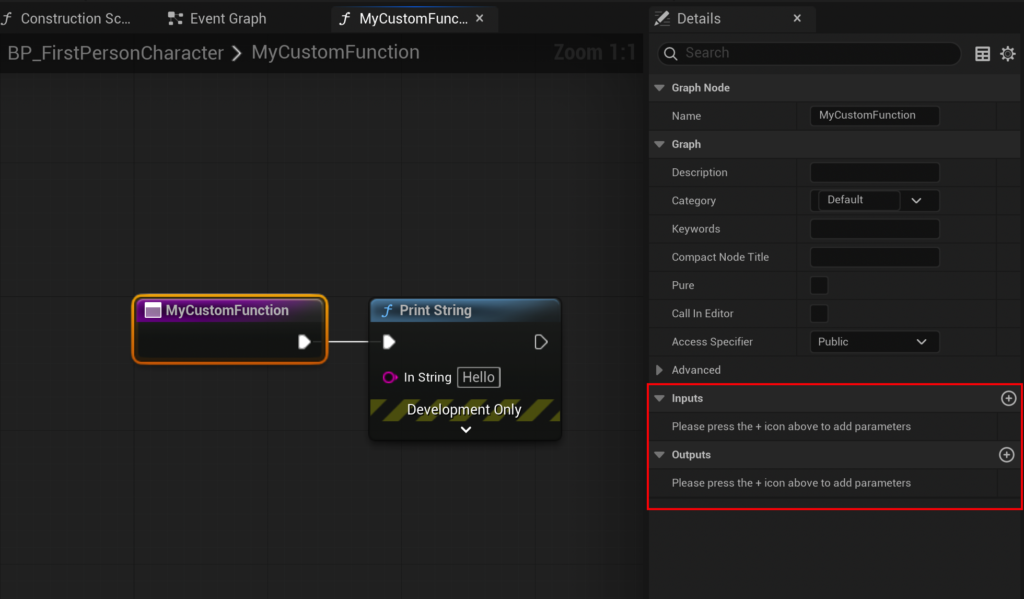
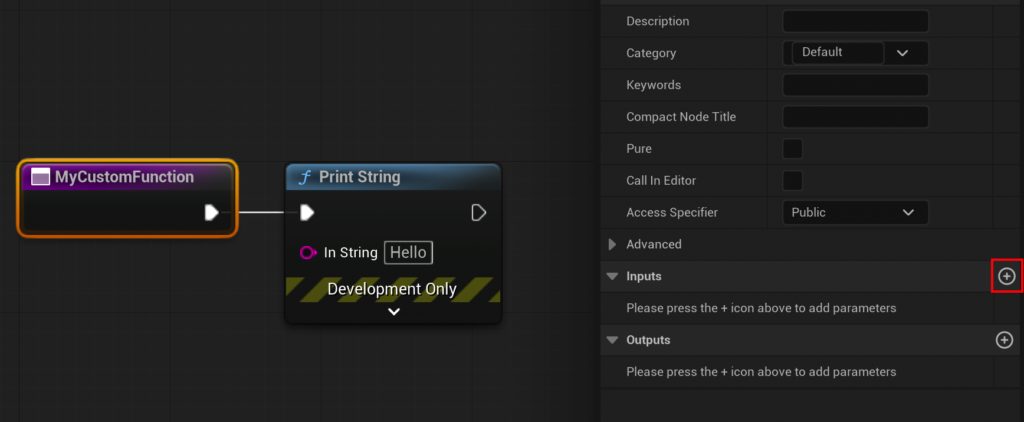
To achieve this, the first step is to modify the function’s signature to accept input data. By clicking on the function’s entry node (e.g., "My Custom Function," which should be renamed to CalculateDamage for clarity) within its own graph, the "Details" panel on the right side of the editor becomes active, revealing sections for "Inputs" and "Outputs." Clicking the small "Add" button within the "Inputs" section creates a new input parameter.
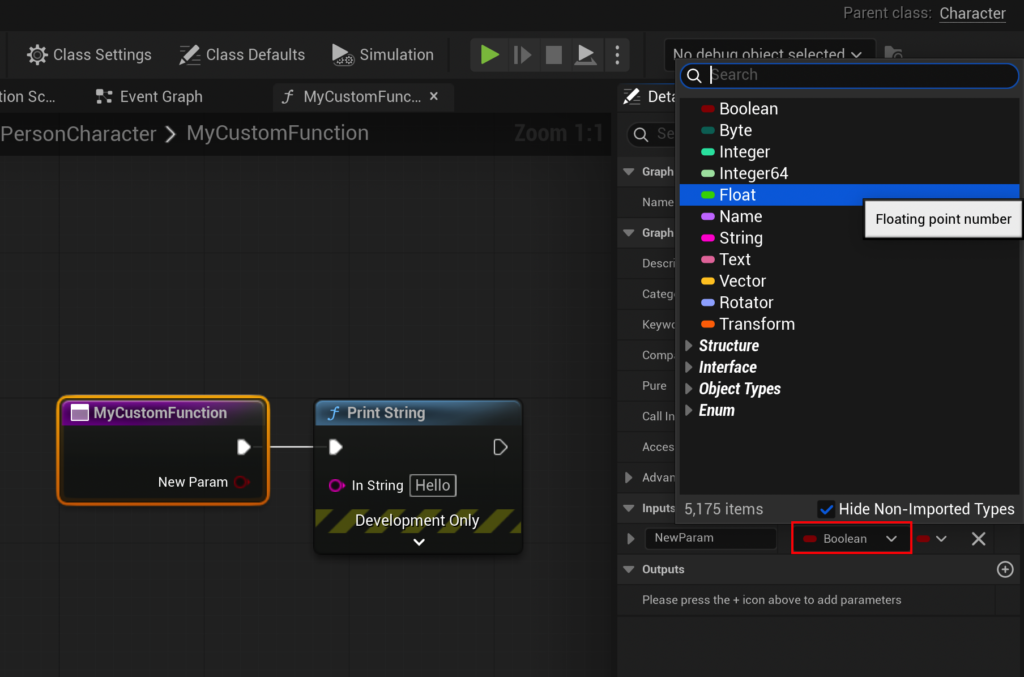
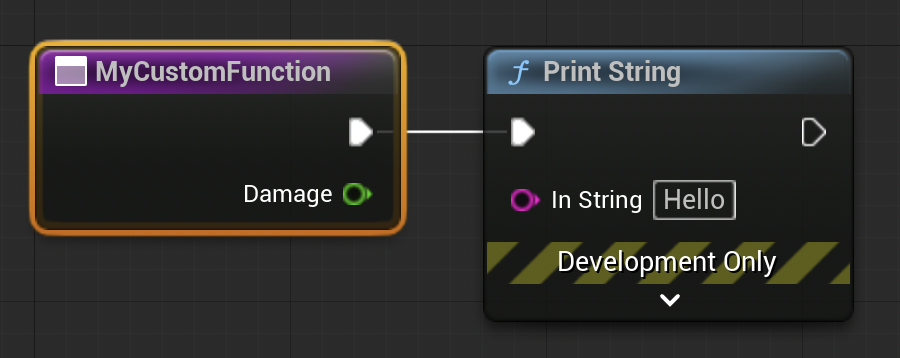
By default, this parameter might be a "Boolean" type. For damage calculation, a numerical type is required, so the type is changed to "Float" (for floating-point numbers) using the dropdown menu. The new parameter is then named "Damage" in the corresponding text box. This action immediately updates the function entry node, showing a new green "Damage" pin, indicating a Float input.
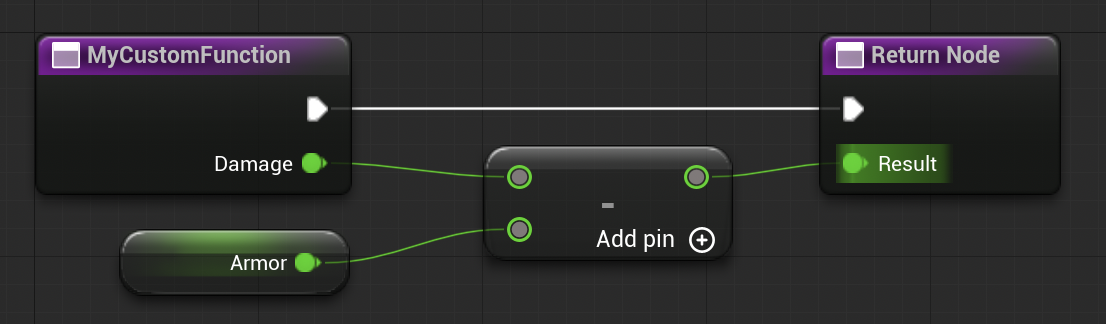
Next, the calculation logic is constructed. From the green "Damage" input pin, a developer drags into the grid and searches for a "Subtract" node (or simply "-"). This node is connected, with the "Damage" input feeding into its upper pin. The lower pin of the "Subtract" node represents the value to be subtracted (our armor). To make this dynamic, a developer can drag from this lower pin and select "Promote to Variable" from the context menu. This creates a new variable, which is then named "Armor." This "Armor" variable, by default, will be a Float. In the "Details" panel for the newly created "Armor" variable, a default value, such as 15.0, can be set. This entire sequence builds the core calculation: Damage - Armor.
Returning Values: The Output of a Function
A function’s utility is often defined by its ability to provide a result. This is achieved through return values, which represent the data a function outputs back to the part of the Blueprint that called it. Unreal Engine Blueprints allow for multiple input and output values, offering significant flexibility in function design.
To define an output, the CalculateDamage function’s entry node is selected again, and in the "Details" panel, the "Add" button within the "Outputs" section is clicked. Similar to inputs, the type of the new output parameter is set to "Float," and it is named "Result." The creation of an output parameter automatically generates a Return Node within the function graph. This Return Node features a "Result" pin, which serves as the conduit for the function’s calculated output.

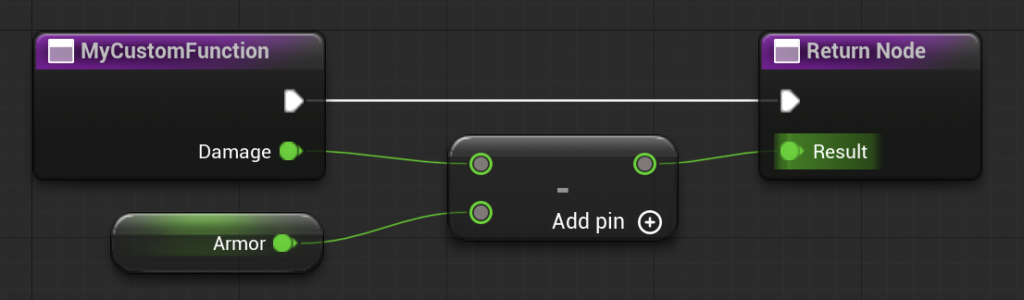
The final step in constructing the CalculateDamage function is to connect the output of the "Subtract" node (the calculated damage) to the "Result" pin of the Return Node. Any previous "Print String" nodes used for initial testing within the function should be removed, as the function’s primary role is now to calculate and return a value, not necessarily to print it directly. The completed function now visually represents Damage - Armor = Result.
Back in the Event Graph, the call to MyCustomFunction (which should now be renamed CalculateDamage) will have evolved. It now displays an input pin for "Damage" and an output pin for "Result." To test this, the "Damage" input pin can be directly set to a value, for example, 20.0. The "Result" output pin can then be connected to a "Print String" node to visualize the outcome. After compiling and saving the Blueprint, running the game will now demonstrate the damage calculation in action.
Demonstration and Implications
With an initial Damage input of 20.0 and the Armor variable set to 15.0, the CalculateDamage function performs the calculation: 20.0 - 15.0 = 5.0. This final value of 5.0 is then returned by the function and subsequently printed to the output log by the connected "Print String" node in the Event Graph. This clear, verifiable output confirms the function’s correct operation.
The implications of mastering Blueprint Functions extend far beyond simple arithmetic. By embracing this modular approach, developers unlock several critical advantages:
- Enhanced Maintainability: Centralizing logic means that updates or bug fixes only need to be applied in one place, reducing the risk of introducing new errors and accelerating the maintenance cycle.
- Improved Readability and Collaboration: Complex logic is broken down into smaller, self-contained units, making the Blueprint graphs easier to understand and debug. This clarity is invaluable for team environments, allowing multiple developers to understand and work on different parts of the game logic concurrently without stepping on each other’s toes.
- Increased Reusability: Functions can be called repeatedly throughout a Blueprint, avoiding redundant node networks and significantly reducing the overall size and complexity of the graphs.
- Optimized Performance (Indirectly): While Blueprints are interpreted, well-structured Blueprints with efficient function calls can lead to cleaner, more optimized logic flows, which indirectly contributes to better game performance.
- Scalability: As game projects grow, the ability to organize logic into functions ensures that the Blueprint system remains manageable and scalable, preventing the dreaded "spaghetti Blueprint" scenario.
In conclusion, Blueprint Functions are an indispensable tool for any developer working with Unreal Engine 5. They embody the fundamental programming principle of modularity, translating it into a highly accessible visual format. From encapsulating basic operations like printing debug messages to implementing complex gameplay mechanics such as damage calculation, functions provide a robust framework for building clean, efficient, and scalable game logic. As the demands on game development continue to grow, the strategic use of Blueprint Functions will remain a cornerstone for creating high-quality, maintainable, and immersive interactive experiences, enabling creators to transform their ambitious visions into reality with greater ease and precision.
About the Author