The fundamental concept of functions, a cornerstone of programming, finds powerful expression within Unreal Engine 5’s Blueprint visual scripting system, offering developers a robust mechanism for creating modular, reusable, and maintainable game logic. This comprehensive guide delves into the essence of Blueprint Functions, providing a structured approach to their creation, implementation, and advanced application, thereby empowering game creators to streamline development workflows and enhance project scalability.
Understanding the Fundamentals: The Role of Functions in Game Development
At its core, a function is a self-contained block of code designed to perform a specific task. In traditional text-based programming languages, functions encapsulate operations, taking inputs (parameters) and often producing outputs (return values). This principle of encapsulation is vital for managing complexity in any software project, particularly in game development where intricate systems and interactions are commonplace. By breaking down large problems into smaller, manageable functions, developers can improve code readability, reduce redundancy, and facilitate easier debugging. Industry statistics consistently show that projects employing modular programming practices, heavily reliant on functions, tend to have fewer bugs and shorter development cycles. For instance, a common task like calculating damage, which might involve several steps such as applying armor reduction, critical hit multipliers, and elemental resistances, can be condensed into a single CalculateDamage function. This function can then be "called" or "run" from any part of the game logic requiring damage calculation, ensuring consistency and centralizing updates.
Unreal Engine 5 Blueprints: A Visual Approach to Functional Programming
Unreal Engine 5’s Blueprint system extends the paradigm of functional programming into a highly intuitive visual scripting environment. Introduced as a successor to Kismet in earlier Unreal Engine iterations, Blueprints have evolved to become a powerful tool, allowing designers and programmers alike to create complex gameplay mechanics without writing a single line of C++ code. Blueprint Functions, in particular, serve as the visual equivalent of traditional programming functions, enabling developers to organize nodes within the Blueprint editor into logical, reusable units. This visual representation not only lowers the barrier to entry for new developers but also enhances collaboration among diverse team members, as the flow of logic becomes immediately apparent. While C++ remains the backbone for performance-critical systems, Blueprints excel in rapid prototyping, iterative design, and implementing gameplay-specific logic, with Blueprint Functions being indispensable for maintaining order within these visual scripts. A key advantage of Blueprint Functions is their adherence to the "Don’t Repeat Yourself" (DRY) principle, which dictates that every piece of knowledge must have a single, unambiguous, authoritative representation within a system. This significantly reduces the potential for errors that can arise from duplicating code logic across multiple locations.
Step-by-Step Implementation: Crafting Your First Blueprint Function
To fully grasp the utility of Blueprint Functions, a hands-on approach is most effective. We will begin by creating a simple function to illustrate the core process, using the widely accessible FirstPersonCharacter blueprint from Unreal Engine’s First Person Shooter template.
Initiating a New Function:
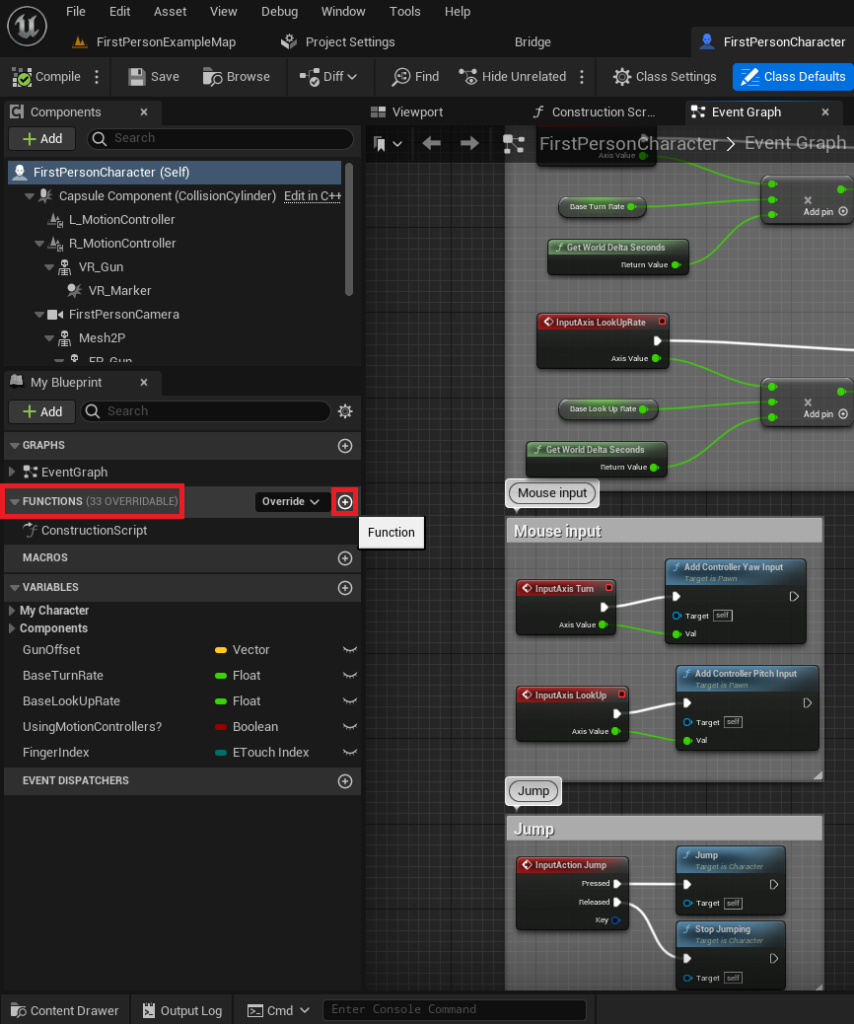
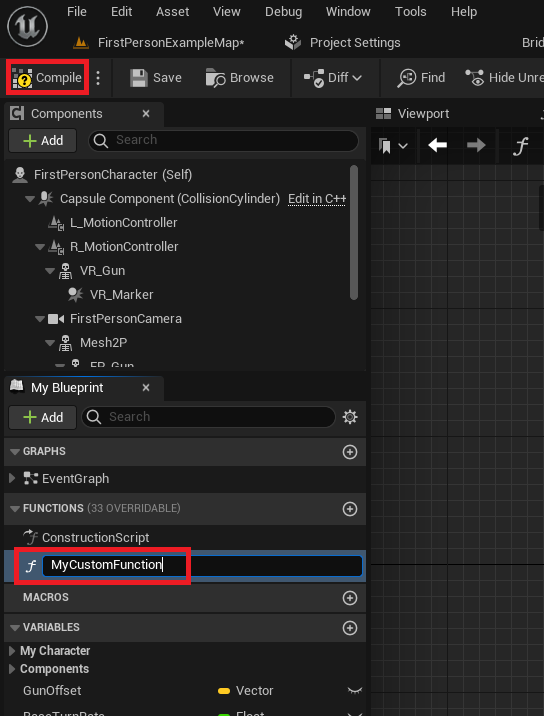
The journey begins by opening the desired Blueprint Actor. For our example, we select the FirstPersonCharacter Blueprint. Within the Blueprint editor window, on the left-hand side, developers will locate the "Functions" dropdown section. This area serves as the repository for all functions specific to that particular Blueprint. To create a new function, the user clicks the circular button adorned with a plus symbol, situated to the right of the "Functions" dropdown. Upon creation, it is paramount to assign a clear, descriptive name to the function. Adhering to consistent naming conventions (e.g., CalculateDamage, ApplyStatusEffect, PlayFootstepSound) is a critical best practice that significantly improves project readability and maintainability, especially as projects grow in size and complexity. Once named, either pressing Enter or clicking elsewhere in the Blueprint window finalizes the name. The crucial next step is to click the "Compile" button in the editor toolbar. This action integrates the newly defined function into the Blueprint, making it ready for use.
Adding Core Logic: The "Print String" Example:
Initially, a newly created function is an empty shell. To imbue it with functionality, we must add nodes. For our foundational example, we will implement a "Print String" node, which, as its name suggests, outputs a specified string of text to the debug log (and optionally, the screen) during runtime.
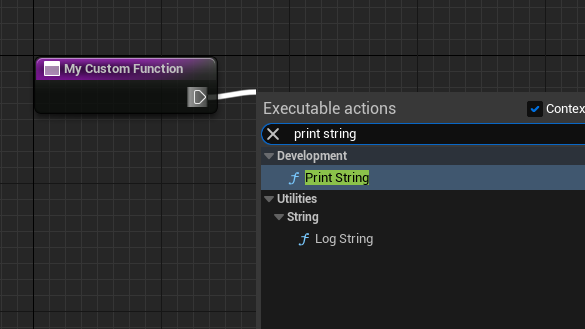
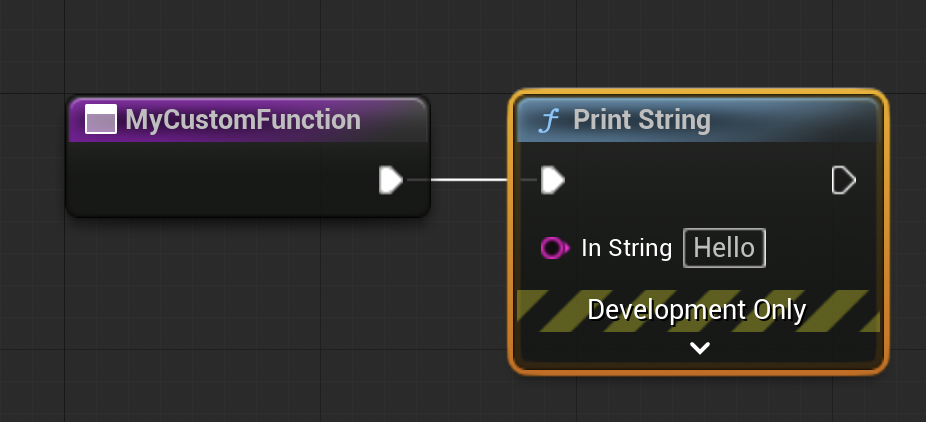
The process involves navigating into the newly created function’s graph. From the white, sideways triangle (known as an "exec pin") on the "My Custom Function" node, the developer clicks and drags. Releasing the mouse button anywhere on the gray background grid will summon a context-sensitive menu. This menu displays a comprehensive list of Blueprint nodes that can be added. Searching for and selecting "Print String" from this menu will instantiate the "Print String" node within the function graph, automatically connecting it to the function’s exec pin. This connection signifies that when "My Custom Function" is executed, the "Print String" node will be activated sequentially. The terms "call," "called," or "calling" a function are interchangeable with "running" or "executing" a function and are frequently used in programming discourse.
Integration and Testing: Triggering Functions via Events:
Having defined the logic within our function, the next logical step is to trigger its execution. The simplest method for initial testing is to invoke the function via the "Event Begin Play."
It is important to differentiate between functions and events in Unreal Engine. Events, such as "Event Begin Play," are specific points in time or responses to actions (e.g., a key press, a collision). Unlike functions, events typically do not return values and can accommodate certain asynchronous nodes (like "Delay" nodes) that functions generally cannot. "Event Begin Play" is automatically triggered when an actor (like our FirstPersonCharacter) is spawned into the game world or when the game starts.
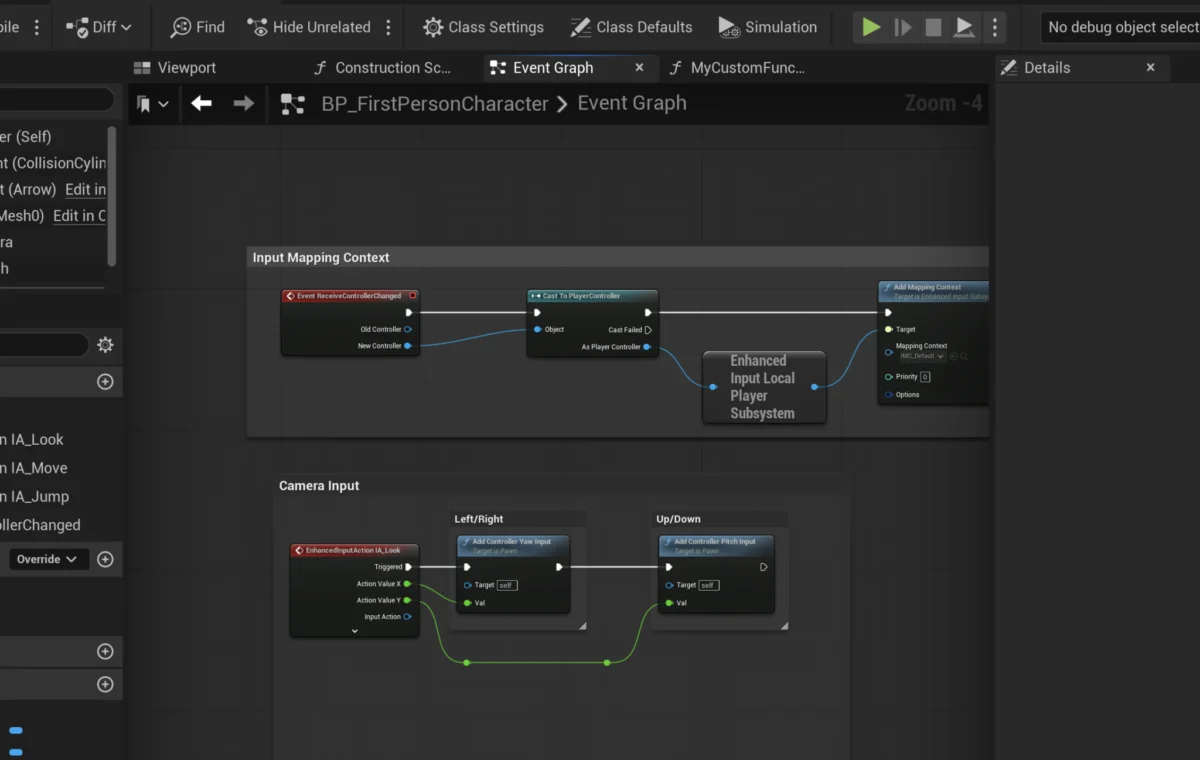
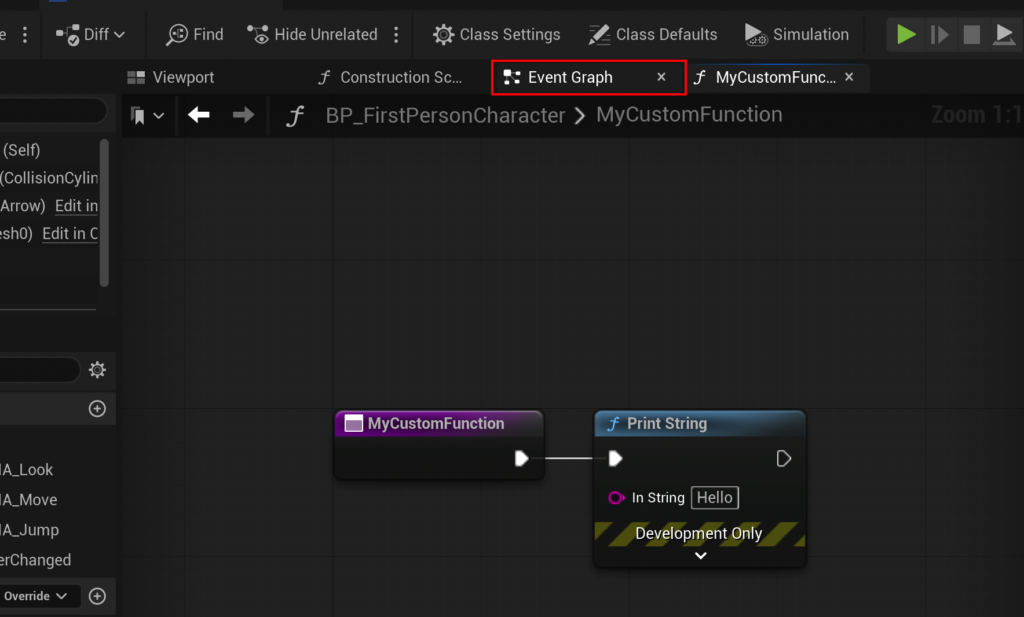
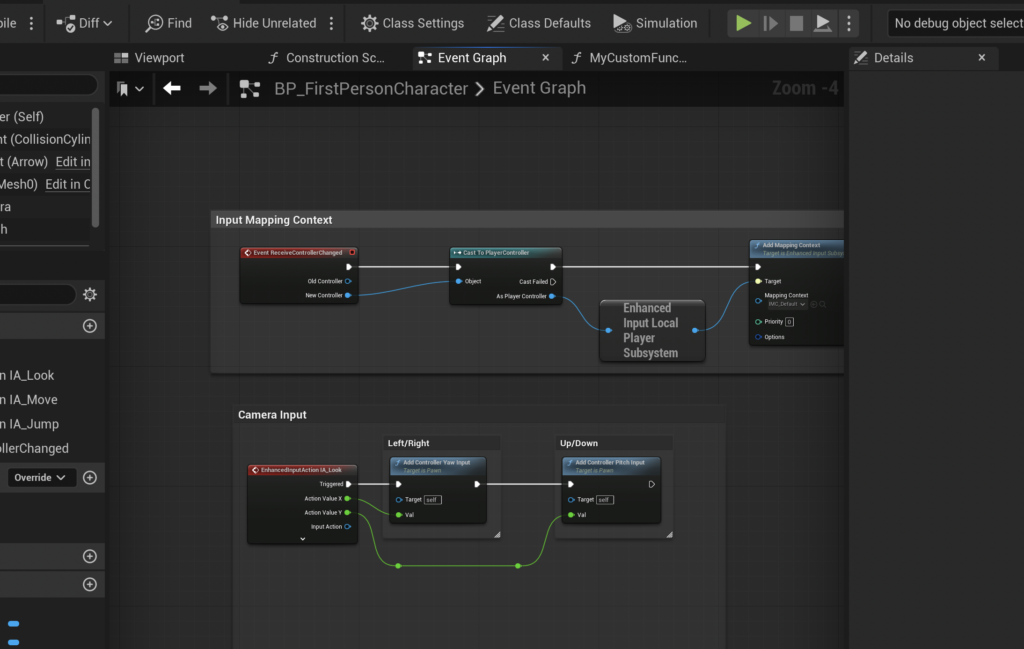
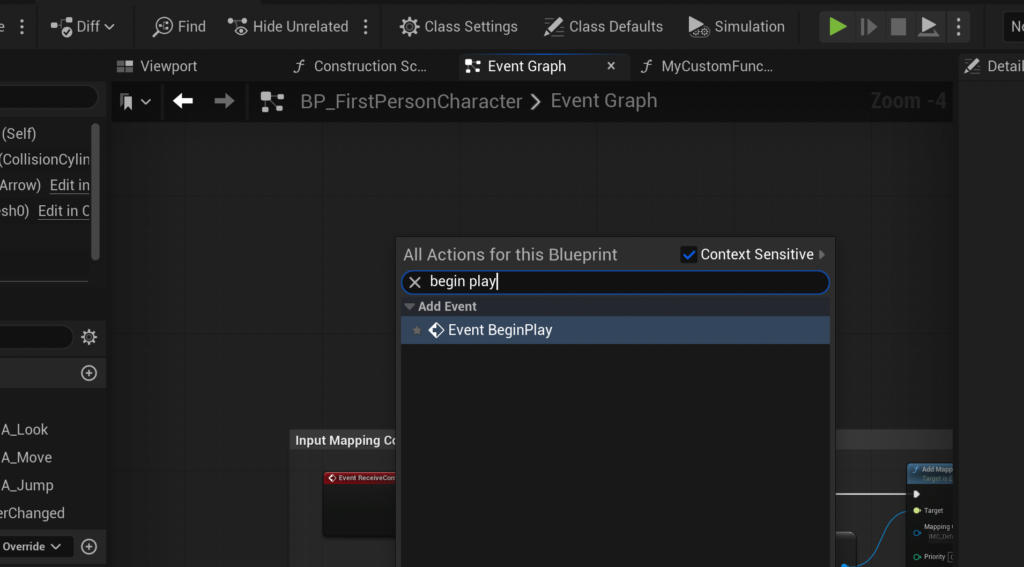
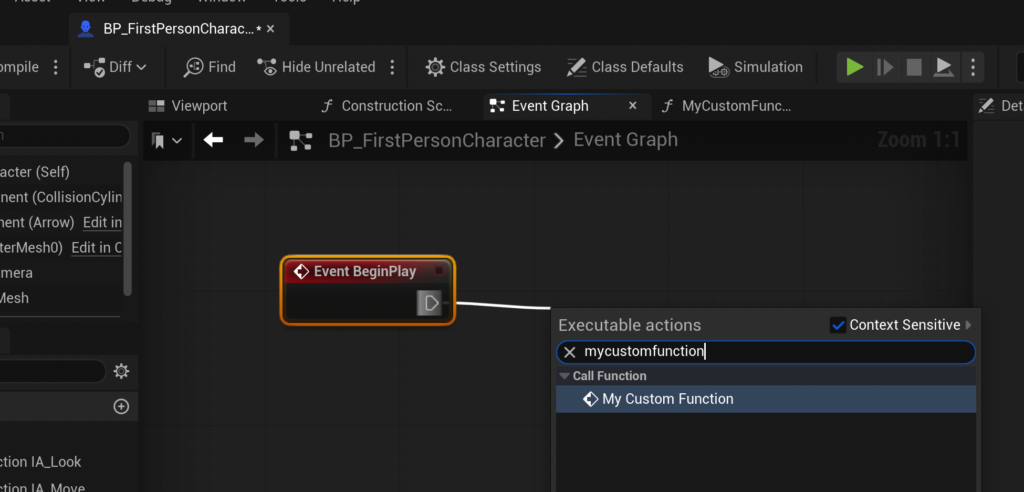
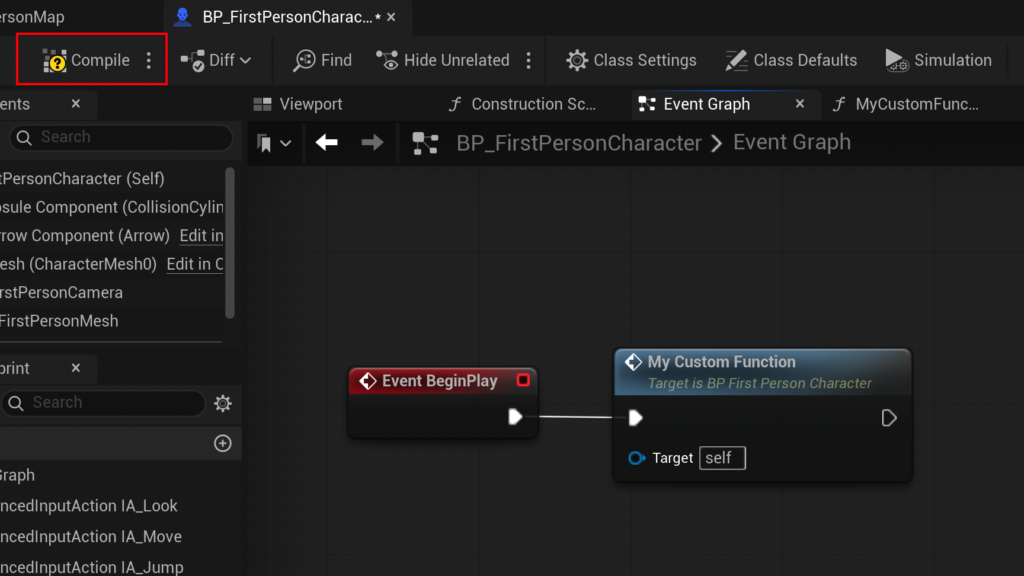
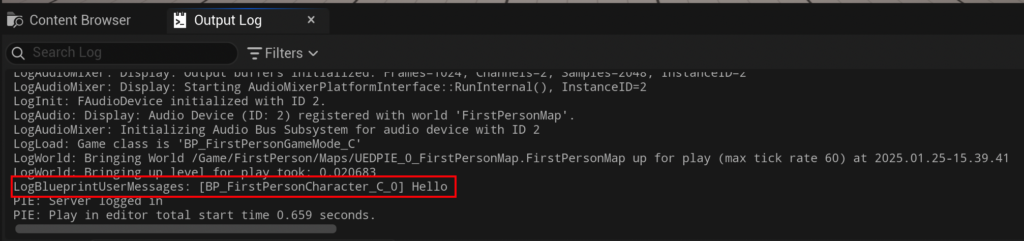
To connect our custom function to this event, the developer first clicks the "Event Graph" button located at the top of the Blueprint editor. This action returns them to the main event graph of the Blueprint. In an empty space within the event graph, a right-click will bring up the context menu. Searching for "Event Begin Play" and selecting it will create the event node. Similar to adding the "Print String" node, the developer drags from the white exec pin of the "Event Begin Play" node and releases the mouse. In the subsequent menu, searching for and selecting "MyCustomFunction" will create a call node for our function, automatically connecting it to the "Event Begin Play" sequence. The final and critical step is to click the "Compile" button and then "Save" the Blueprint. Upon initiating gameplay in the FirstPersonMap, the phrase "hello" (the default string of the Print String node) will appear in the Unreal Engine’s output log, confirming the successful execution of our custom function.
Advanced Functionality: Input, Output, and Practical Applications
While a simple "Print String" demonstrates the basic mechanism, the true power of functions lies in their ability to process dynamic data through input and output parameters. This allows functions to be highly flexible and adaptable to various scenarios.
Beyond Simple Execution: Parameterized Functions:
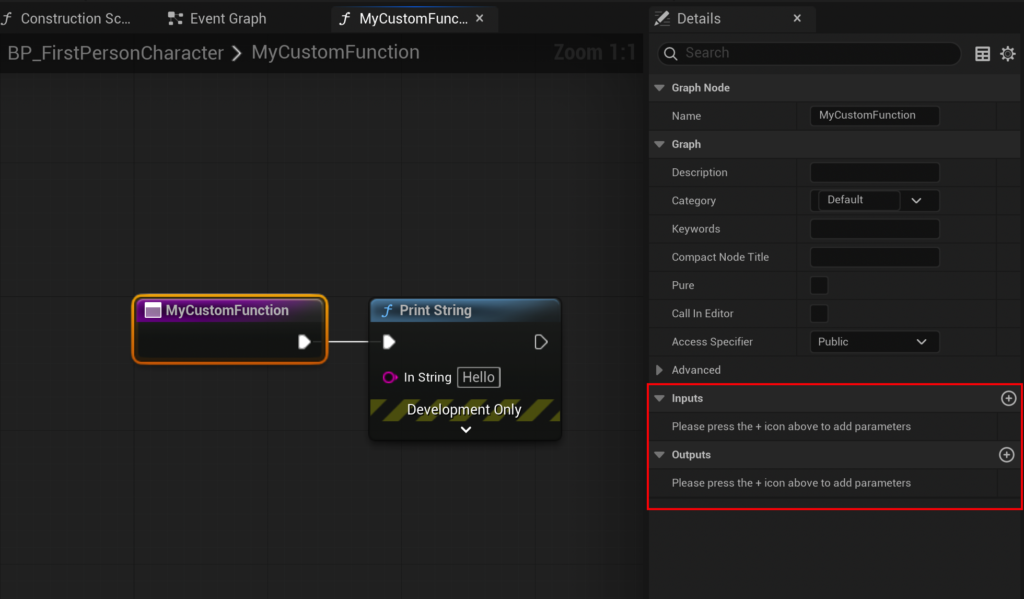
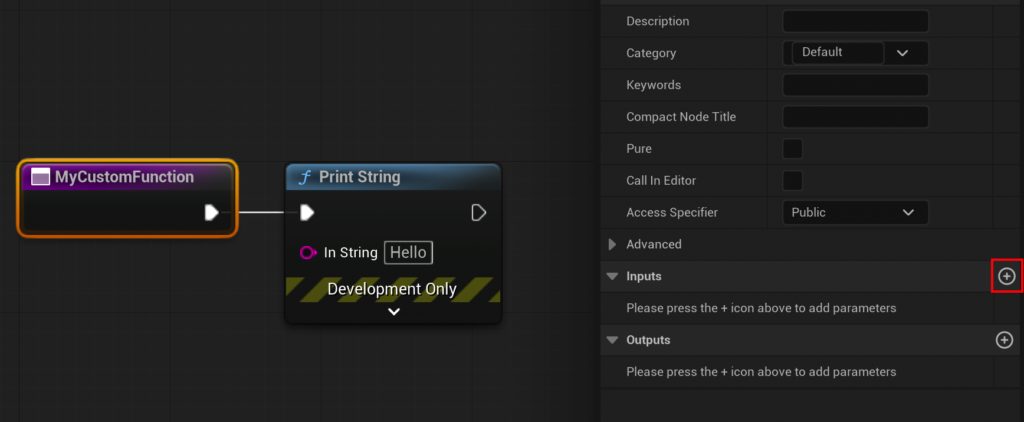
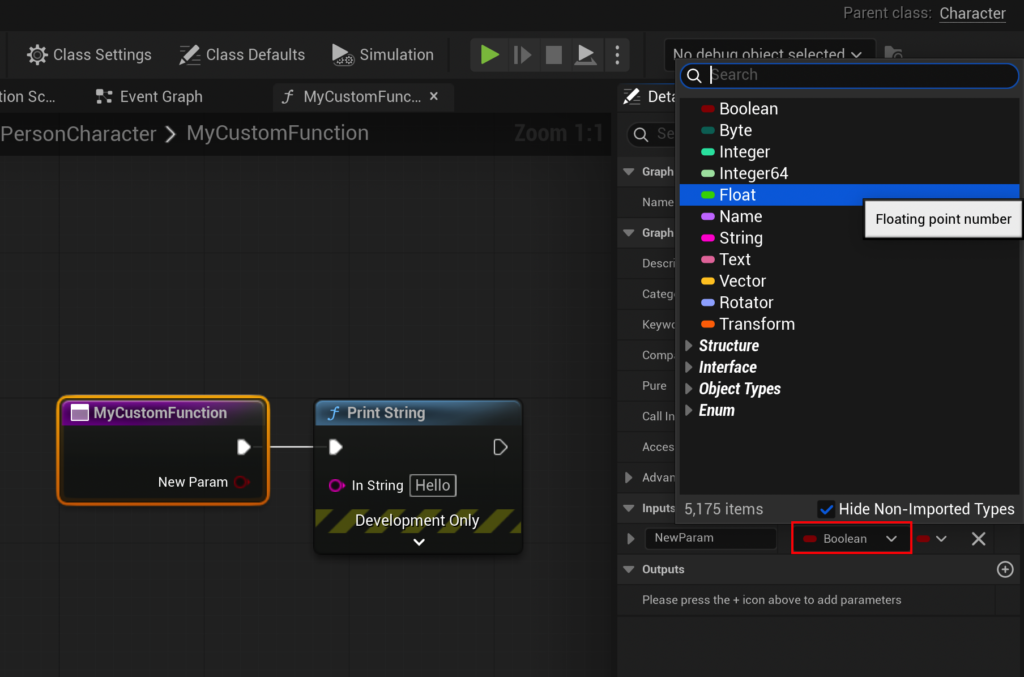
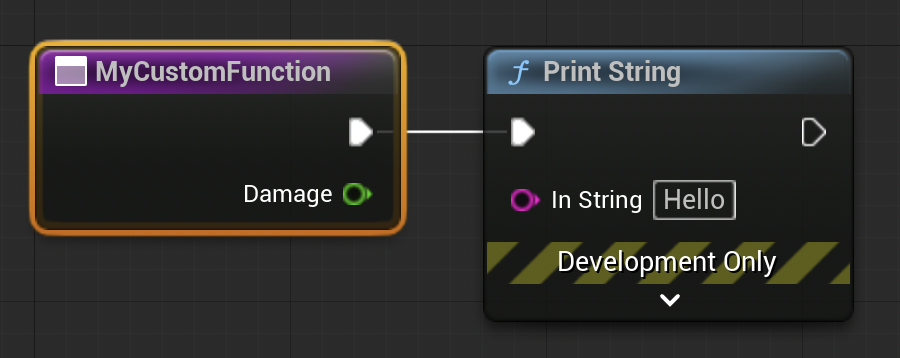
Consider the CalculateDamage example mentioned earlier. To make this function versatile, it needs to accept the initial damage value as an input. To achieve this, the developer must first select the function’s main entry node (the purple "My Custom Function" node) within its graph. In the "Details" panel on the right side of the editor, sections for "Input" and "Output" parameters will become visible. Clicking the small "Add" button within the "Input" section creates a new input parameter. By default, this parameter might be a "Boolean" type. For numerical calculations like damage, this needs to be changed to a "Float" (a floating-point number, suitable for decimals). The parameter is then given a meaningful name, such as "Damage." This input pin will now appear on the function’s main node, ready to receive a value when the function is called.
Implementing Complex Logic: The CalculateDamage Scenario:
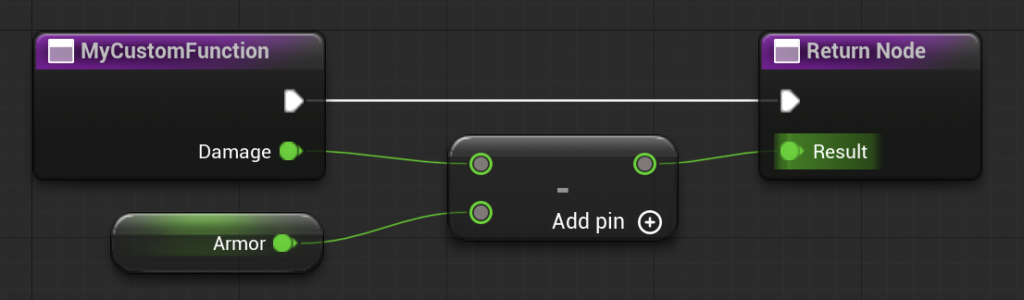
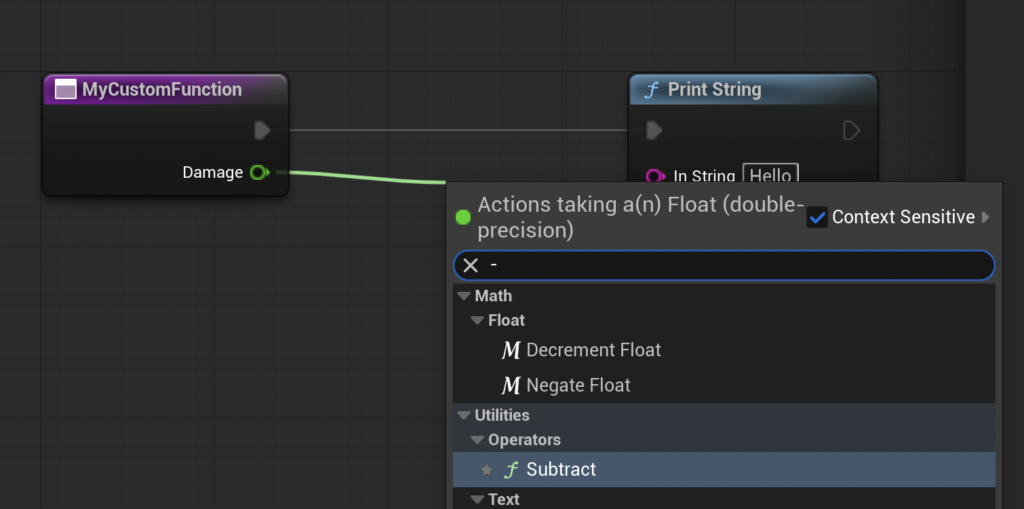
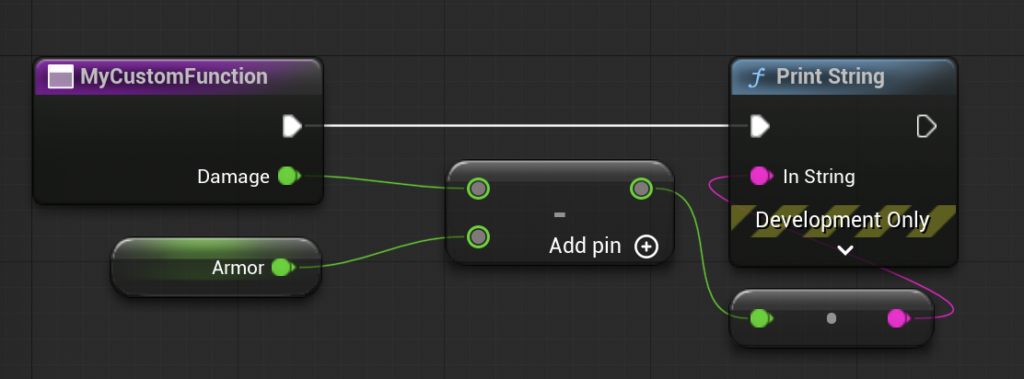
With the "Damage" input parameter established, we can build the damage calculation logic. The goal is to subtract an "Armor" value from the incoming "Damage." From the green "Damage" pin on our function’s entry node, the developer drags into the graph and releases the mouse. In the context menu, searching for "-" or "subtract" and selecting the "Float – Float" node will add a subtraction operation. The "Damage" input is automatically connected to the top pin of the subtract node.
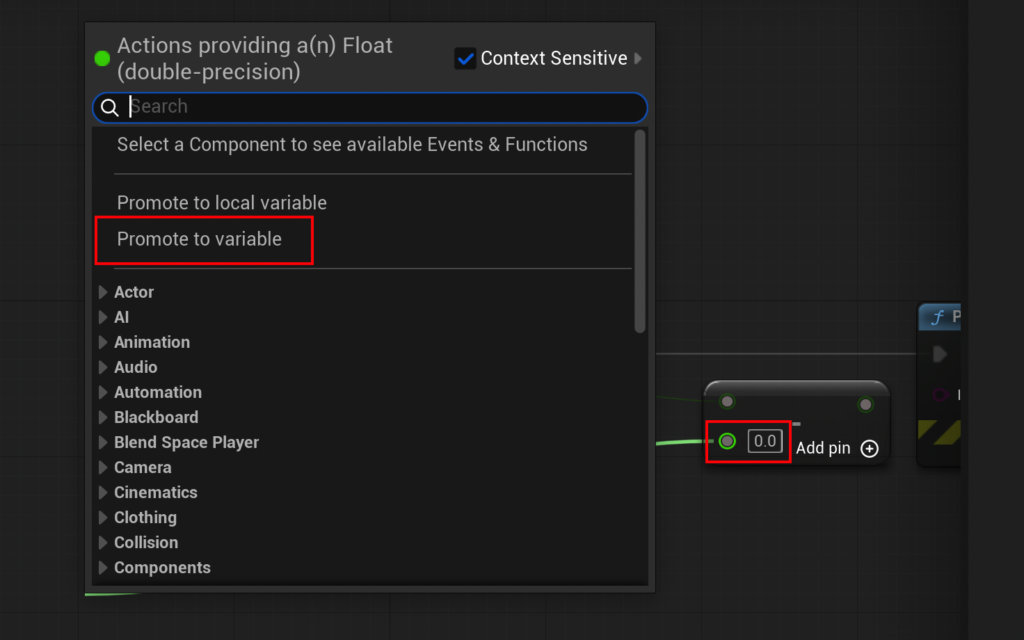
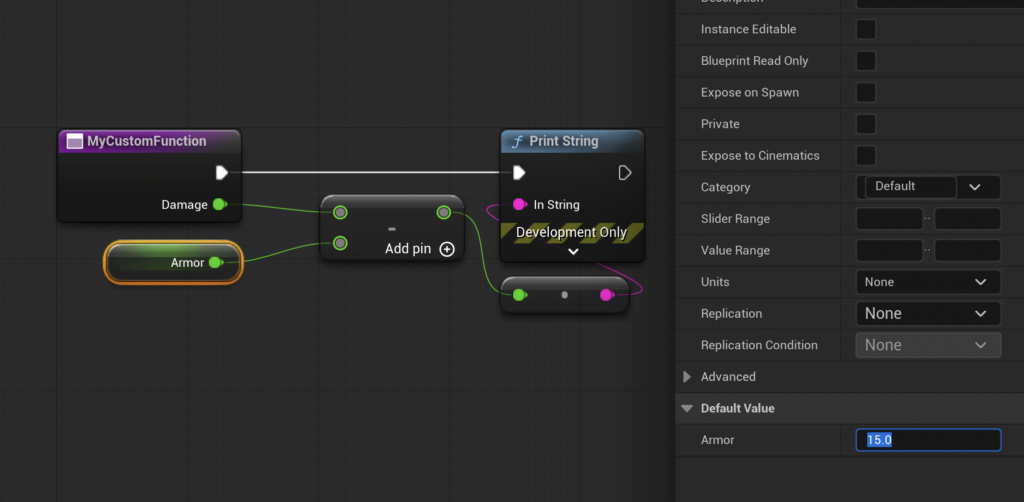
For the "Armor" value, we want it to be a configurable property within our Blueprint. From the bottom pin of the subtract node, drag and release the mouse. This time, select "Promote to variable." This action creates a new variable, which we can name "Armor," and automatically connects it to the subtract node. By selecting the new "Armor" variable in the graph, its default value can be set in the "Details" panel. For our example, we might set "Armor" to 15.0. The Print String node from our previous example can be reconnected to the output of the subtract node for immediate visual verification during development, showing the result of Damage - Armor.

Returning Values for Interoperability:
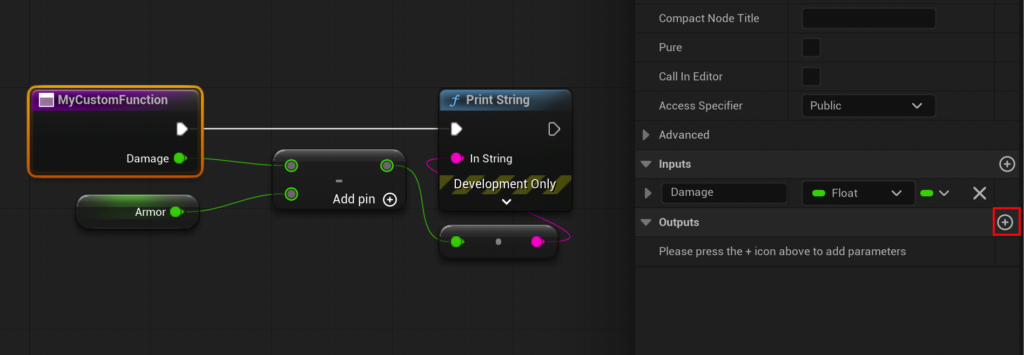
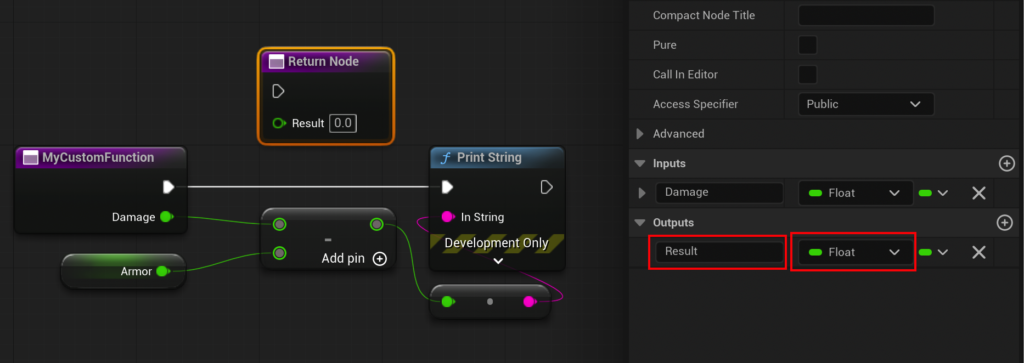
A function is often expected to produce a result that can be used elsewhere in the Blueprint. This is where "returning" a value comes into play. To enable our CalculateDamage function to output its calculated value, we need to add an output parameter.
Again, select the function’s main entry node. In the "Details" panel, click the "Add" button within the "Output" section. Similar to input parameters, this new output parameter’s type should be set to "Float," and it should be named "Result." Crucially, upon creating an output parameter, Unreal Engine automatically generates a "Return Node" within the function’s graph. This "Return Node" has pins corresponding to all defined output parameters. To return our calculated damage, we connect the output of the subtract node (which represents Damage - Armor) to the "Result" pin of the "Return Node." The Print String node that was previously used for debugging inside the function can now be deleted, as the function’s responsibility is solely to calculate and return the value, not to display it. Displaying the value becomes the responsibility of the code that calls the function.
Real-World Application and Testing
With our CalculateDamage function fully equipped with input and output parameters, we can now test its effectiveness in the Event Graph. Returning to the Event Graph, our "MyCustomFunction" call node will now display the "Damage" input pin and the "Result" output pin.
To test, we can connect the "Event Begin Play" to our function call. For the "Damage" input, we can directly type a value, for instance, 20.0. From the "Result" output pin of our function call node, we drag and connect it to a new "Print String" node. This setup ensures that when the game begins, our function is called with 20.0 damage, the internal armor of 15.0 is subtracted, and the resulting value is then passed to the "Print String" node for display.
After compiling and saving the Blueprint, launching the game will yield the numerical output "5" in the log, demonstrating the successful calculation (20 - 15 = 5). This clear demonstration highlights how Blueprint Functions encapsulate complex logic, making it easy to reuse and test specific functionalities in isolation.
Strategic Considerations: Optimizing with Blueprint Functions
The effective utilization of Blueprint Functions extends beyond mere structural organization; it encompasses strategic considerations for performance, maintainability, and team collaboration.
Performance and Best Practices:
While Blueprints offer immense flexibility and rapid iteration, it’s a generally accepted principle that C++ provides superior performance for computationally intensive tasks. However, well-structured Blueprints with judicious use of functions can still deliver excellent performance for most gameplay logic. Key best practices include:
- Modularity: Keep functions focused on a single responsibility. A function that calculates damage should not also manage UI updates or sound effects.
- Readability: Use clear, concise names for functions and their parameters. Add comments to explain complex logic.
- Avoid Excessive Nesting: While functions reduce node clutter, excessively deep chains of function calls can sometimes impact debugging clarity.
- The "Delay Node" Caveat: A crucial technical detail is that Blueprint Functions cannot contain "Delay" nodes or other latent actions (actions that take time to complete). This is because functions are designed to execute synchronously and immediately return a value. For logic requiring delays or asynchronous operations, developers should instead utilize "Custom Events," which offer similar modularity but support latent nodes. Unreal Engine’s documentation explicitly guides developers on this distinction.
- When to use Functions vs. Macros: Functions allow for input and output exec pins and can be called from other Blueprints (if exposed). Macros are more like copy-pasted code blocks, expanding at compile time, and are useful for common sequences without input/output exec pins, but they do not reduce compilation time or memory footprint in the same way functions do.
Impact on Development Workflow:
The implications of embracing Blueprint Functions are far-reaching across the entire game development lifecycle:
- Faster Iteration: Developers can quickly modify a function’s internal logic, knowing that all instances where it is called will instantly reflect the changes. This accelerates the iterative design process.
- Easier Debugging: When a bug is identified, pinpointing the source becomes significantly easier if logic is compartmentalized into functions. Debugging a small, focused function is less daunting than sifting through a monolithic graph.
- Improved Project Scaling: As projects grow, the number of Blueprints and nodes can become overwhelming. Functions provide a hierarchical structure that keeps the visual scripting manageable, allowing large teams to work on different parts of the game concurrently without constantly stepping on each other’s toes.
- Empowering Designers: By encapsulating complex logic within functions, programmers can expose easily consumable function calls to game designers. This allows designers to implement sophisticated gameplay behaviors without needing deep programming knowledge, fostering greater creative freedom and efficiency.
Conclusion: The Indispensable Role of Functions in Modern Game Development

The journey from understanding the abstract concept of a function to practically implementing it within Unreal Engine 5’s Blueprint system underscores its indispensable role in modern game development. Blueprint Functions are not merely a feature; they are a foundational aspect of creating robust, scalable, and maintainable interactive experiences. By enabling the separation of logic into reusable nodes, they significantly clean up Blueprint Actors, making complex game projects easier to manage, debug, and expand.
The basic concepts and examples covered in this guide — from creating a simple "Print String" function to developing a parameterized CalculateDamage utility — provide a solid foundation for aspiring and experienced developers alike. Whether the goal is to construct intricate gameplay mechanics, optimize core technological systems, or simply refactor existing code for clarity, mastering Blueprint Functions is a critical step towards professional Unreal Engine development. The emphasis on modularity, reusability, and clear organization that functions promote directly translates into more efficient workflows, higher quality games, and a more enjoyable development experience for all involved. As the complexity of game development continues to escalate, the strategic use of Blueprint Functions will remain a cornerstone for achieving ambitious creative visions within the Unreal Engine ecosystem.
About the Author